Cooking Tips · Ingredients

Summer equals Salads!

Warmer weather is often an incentive to eat more salads. The word “salad” can mean a lot of things but it usually includes some sort of greens. Americans tend to equate lettuce with iceberg lettuce but, there are so many more varieties of lettuce and greens to liven up your salads. In this Cooking Tip, I would like to open your eyes to all there is out there. The following list is not all-encompassing as the Yuma, Arizona, County Cooperative Extension office claims there are more than 100 varieties of lettuce and salad greens. I will only discuss some of the most common greens.

Leaf lettuce – This type of lettuce comes in red & green. Rather than coming as a “head” of lettuce, the leaves all branch off of a single stalk. Both red and green leaf are mild in flavor and have tender leaves. It is often found in varieties termed spring lettuce, mesclun, etc. It is great for the base of many salads.

Romaine lettuce – This lettuce has elongated leaves with a thick white rib. Its leaves are sturdy but a bit more bitter. It provides more texture to your salads.

Iceberg lettuce – Although iceberg is looked down upon because it does not have as many nutrients as other types, it does provide a nice crunch. It also is less perishable and will last longer in your refrigerator than other lettuce.

Butterhead lettuce – Two types are Boston and Bibb. Boston is an extremely tender and soft lettuce and due to it flexible leaves that can be separated from the head, it is great for making lettuce cups. Bibb comes in smaller heads and has a sweeter taste.

Kale – Although not a “lettuce”, it is thought of as a nutrient-dense green. It does have a bitterness that is not to everyone’s taste.

Arugula – Known as “rocket” in Europe, it has dark green leaves usually with a long, spiky shape. It has a peppery bite to it. It can be used on its own but is often a great addition to other lettuce mixes. It is also used in sandwiches and as a pizza topping. Because of its peppery flavor, it goes well with tangy dressings.

Spinach – Another green that is full of nutrients that can be the sole green in a salad or mixed with other varieties.

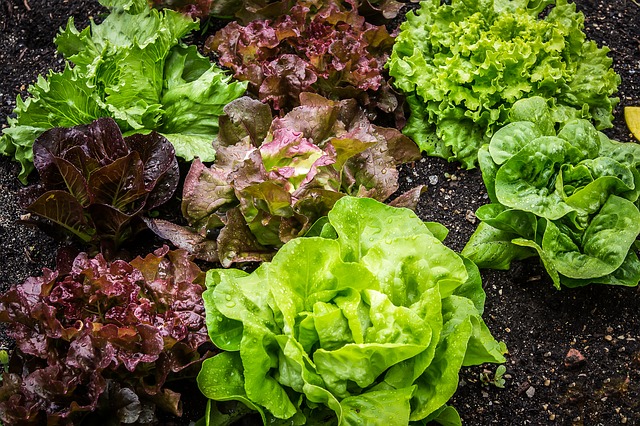
Radicchio – Easily recognized by its reddish-purple color, it also goes by the name of “chicory”. It also tends towards bitterness but that can be tempered by grilling or roasting.

Endive – Also known as Belgian endive, these small leaves are a relative of radicchio and are crisp and slightly bitter. Due to their spoon-like shape, they are great for acting as a vessel for dips or fillings. Another popular preparation is to braise them.

Frisée – Other names include curly endive & curly chicory. These are also in the same family as radicchio and endive and are known by the very curly leaves that are tinged with yellow and green. It has a fairly potent flavor and so, often just a small amount will be added to lettuce blends.

Escarole – This is a type of endive that is mildly bitter. It holds up well to cooking, making it a great addition to soups and pastas.

Mâche – Also known as lamb’s lettuce or corn salad, it is a delicious and sweet green with soft green leaves. Its dark green leaves grow in a rosette pattern. This is one of my favorite greens to add to a salad.

Watercress – The name derives from its semi-aquatic growing nature and is classified as both a green and an herb. It is another green with a peppery flavor.

Mizuna – Also known as Japanese mustard greens, it has a mild, peppery taste. Some say it is like a less intense version of arugula.

For the best salad, try to buy whole heads of lettuce when you can. (Even better, grow your own.) The texture and flavor will be much better than pre-bagged items. They do need to be thoroughly washed before consuming. If you do buy bags of pre-washed greens, the question that always arises is if you need to wash them once you get them home. According to the FDA, prewashed greens can be consumed directly from the bag. They say that prewashed items probably have less bacteria (if any) than what is found on your kitchen counter or sink. Therefore, washing the prewashed greens is more likely to introduce bacteria into an already clean product. Another point made by a microbiologist is that any pathogens remaining on prewashed greens is not likely to be removed by your own washing of them. Here is a link to the FDA Guidelines. If you choose to wash the prewashed greens, make sure your counters/sinks are very clean and store the washed greens in the refrigerator.

For proper storage of crisp heads of lettuce such as iceberg and romaine, core the heads, wrap it in moist paper towels and refrigerate in a plastic bag that has been left slightly open. For leafy greens, including arugula & spinach, either store them in the original container or, if you have room, leave them in the salad spinner after washing and drying them & put the spinner in the refrigerator. More tender heads such as Boston lettuce with the root attached can be stored in the original plastic container or in a plastic bag left slightly open. If there is no root, wrap in moist paper towels and place in a plastic bag left slightly open.

TheKitchn.com tested three different methods of storing greens. The favorite in this test was to line a plastic storage container with paper towels, put the greens on top and cover with more paper towels followed by the lid before placing in the refrigerator.

If your lettuce has wilted, it means it has lost water. To refresh it, just soak it in plain ice water for about 30 minutes.

According to WebMD, eating a salad almost every day may be one of the healthiest eating habits we can adopt. It is also one of the simplest and, if you branch out with some of these less-frequently used greens, it can also be a very tasty one!

Cooking Tips · Ingredients

Cinnamon — Sweet or Spicy?

Cinnamon is one of those wonderful, warm spices that makes us think of fall. It is a spice, though, that I daresay most of us use year-round. In this Cooking Tip, I want to talk about the different types of cinnamon so you can choose what works best for you.

There are two main types of cinnamon – Cassia cinnamon and Ceylon cinnamon. They are from the bark of different trees (although the trees are related scientifically) and are very different products. The different trees result in different levels of the volatile oils, which is what impart the flavor. The amount of these oils can also vary with the age of the bark at the time of harvesting. Older trees contain more oils.

Cassia cinnamon is what most of us probably have in our pantries and see on most supermarket shelves. In the bark-form, it has a rougher texture, a darker color and is rolled into thicker sheets. It also has a more intense flavor, which is what makes it a favorite in the culinary world.

Cassia cinnamon can be further broken down into Indonesian, Chinese and Vietnamese/Saigon.

  • Indonesian – this is the sweetest and most mild among the three. This is also the most common in the US. It usually comes from the bark of trees that are under 10 years old. Another name is Korintje cinnamon.

  • Saigon – this is very fragrant and flavorful, more spicy than sweet. The trees from which it is harvested are often 20-25 years old.

  • Chinese – this has a strong, bitter flavor and is mainly used medicinally in China. In the US, it is mainly found in the form of oils used to flavor food in the manufacturing industry.

Ceylon cinnamon is often referred to as “True” cinnamon and is native to Ceylon/Sri Lanka. As compared to cassia, the bark sheets are thinner and finer in texture. Its flavor and aroma are very mild and delicate although proponents say its floral and citrus notes add more complexity to the flavor. It is more expensive and harder to find than cassia cinnamon. The trees are usually only 3-4 years old. Another interesting fact is that this is the type of cinnamon that is most used in Mexico where it is known as canela. (Asian dishes are more likely to use cassia cinnamon.)

So, there are definite differences but do they make a significant difference in what comes out of your kitchen? Cooks Illustrated did a taste test of eight cinnamons. Half of them were from Vietnam and the other half were Indonesian. While definite differences could be detected when the cinnamon was simply sprinkled on rice pudding, those differences went away when baked into cinnamon rolls or on pita chips.

Cooks Illustrated also did a different taste test comparing three Ceylon cinnamons with their favorite Indonesian product. Once again, they added them to rice pudding as well as baking them into cinnamon rolls. In this test, tasters could easily identify the Ceylon products as they were milder although they preferred the spicier Indonesian cinnamon.

Serious Eats also did tastings and produced the following recommendations.

  • Saigon cinnamon is best for most traditional Western dishes – cookies, cakes, pies, breads, etc. They found that the bolder flavor held its own against the fat/flour of these items. They also found that it paired well with other spices that are typically found in these recipes such as allspice, clove and nutmeg.

  • Ceylon cinnamon was best when there were not as many competing flavors. Their favorite uses were when used with chocolate, vanilla, dark liquors and citrus as well as in savory dishes.

One aspect with which you may or may not be concerned is the presence of a compound known as Coumarin. It is found in much higher levels in the cassia cinnamon as opposed to Ceylon cinnamon. Some feel it may have deleterious effects on your liver. Whereas this is probably more of a problem if you are taking cinnamon supplements, if you are concerned, consult your physician. Here is a link to a discussion of cinnamon and coumarin by the National Institutes of Health.

Just like any other spice, store your cinnamon in a cool, dark and dry place. It should last at least a year. If you take a sniff and don’t smell much, it is time for a new bottle. Some recommend grinding it fresh from cinnamon sticks. Of course, how fresh it will be depends on how fresh your sticks are. You may have no idea of this when buying in a supermarket. It is unusual but not impossible to find harvest dates on your cinnamon sticks. Cinnamon Hill was one such place. However, as of April 2022, they have closed their website. If you know of others, let me know. If you have read many of my Cooking Tips or attended my classes, you will know that I am a fan of Savory Spice Shop. (This is an affiliate link and I may earn a commission if you decide to purchase.) Next time I am in their shop, I will ask if they know the harvest dates of their cinnamon sticks. If you want to know their answer, just email me.

I encourage you to pick up some of these cinnamon varieties and do your own taste test. You may not find just one favorite and that is fine. Different cinnamons lend themselves to different preparations. Enjoy and have fun with cinnamon!

Cooking Tips · Ingredients

The Spicy Flavor of Pepper!

Apart from salt, pepper is probably one of the most commonly used spices in your kitchen. Today, there are multiple types available in the spice aisle. Do you just grab what is cheapest? Have you ever thought if there are differences between types and brands? In this Cooking Tip, I will try to give you some food for thought concerning pepper.

Peppercorns come from the Piper nigrum plant, a climbing vine that is native to India and Indonesia although grown in other tropical countries. Vietnam is one of the largest producers. If destined to become Black Pepper, the berries are picked when they are slightly under-ripe and allowed to dry until they are dark brown or black and shriveled. This type of pepper has the strongest flavor.

White Peppercorns have been allowed to fully ripen, the skin is removed and the berry is dried. White peppercorns have smoother skins, are light tan in color and milder in flavor. They are often used in sauces or foods where you do not want the dark specks or the bold spiciness of black pepper. Its flavor is a bit more earthy than black pepper.

Green Peppercorns are the soft, under-ripe berry and are often preserved in brine although you can find them in dried form. They have a fresher and less pungent flavor.

Pink Peppercorns are misnamed as they are not truly peppercorns. They are the dried fruit from the Brazilian pepper tree. They have a rosy color and, although still spicy, they also have flavor notes of herbs and citrus. Besides flavor, they add an element of color to the dish. Because this tree is a relative of the cashew tree, people with nut allergies should be cautious before consuming. The berries are too fragile to be put through a peppermill and, so should be crushed by hand.

Apart from the type of peppercorn, there are also differences depending on the origin of the plant. Just as with wine or tea, the variations in terroir and climate can make the flavor profile distinct despite being the same plant.

Among black peppercorns, one of the most sought-after is the Tellicherry peppercorn. They are grown in India, are larger in size and some feel they are superior in flavor. Recently, Cooks Illustrated did a taste test among black peppercorns – both Tellicherry and regular. They tested them by mixing with rice as well as using them in dishes such as steak au poivre, pepper-crusted beef tenderloin and ricotta/pepper crostini. In these dishes, it was hard to detect any flavor differences. It was a bit more evident in a simple egg salad although it was still subtle. Their conclusion – there was no clear preference among their tasters for the Tellicherry. Rather, they did find more differences among brands. Their three favorites among major brands of whole black peppercorns were Tone’s, Penzeys and McCormick.

Serious Eats also did a taste testing and rated their favorites in terms of type rather than brand. Their tastes preferred the following peppercorns: Lampong (Indonesia), Tellicherry, Brazilian and Vietnamese. They do stress, though, that taste preferences are very subjective. On a more objective level is the flavor profile, aromas and textures of these different peppercorns. Some may lend themselves to particular uses better than others. The main takeaway is that pepper is not pepper. There is a wide variety among flavor that you will only come to know by trying different kinds.

There is one piece of advice that most experts agree upon. No matter what type of pepper you buy, get whole peppercorns and grind them yourselves. Pre-ground pepper can be gritty and tough as well as significantly lacking in peppery flavor. The oils that are responsible for pepper’s heat and aroma start to dissipate shortly after cracking the peppercorn. Another consideration is that whole peppercorns, when stored correctly, will keep their flavor for a little over a year. As mentioned, ground pepper’s flavor starts to degrade shortly after grinding. Who knows how long that pepper in the shaker has been ground and sitting there?

This simple step of purchase a peppercorn grinder and whole peppercorns can make a world of difference in your dish’s flavor. Experiment with the different kinds and brands of pepper and have fun!

Cooking Tips · Ingredients

Mirepoix, Sofrito & What?

Good cooking techniques transcend the type of cooking you want to do. However, when you get to ingredients, they vary between types of cuisines. Mirepoix, Sofrito and Cajun Trinity are examples of similar items that differ from cuisine to cuisine. In this Cooking Tip, I would like to explain these mixtures, their similarities and differences.

All three of these terms refer to the basis of so many savory dishes. The ingredients are mixtures of aromatic vegetables. These vegetables are diced and sautéed in some type of oil. This base is used in the completion of whatever dish you are cooking. They are meant to provide a subtle but pleasant background flavor as well as supporting and improving the flavor of the finished dish. In French cooking, it is called Mirepoix. Sofrito refers to a similar mixture in Italian, Spanish & Latin American cuisine. For Cajun cooking, it is called the Cajun Trinity, also known as the Holy Trinity.

France is the home of classical cooking techniques. Their classic Mirepoix is a mixture of onions, carrots & celery. The ratio is typically 2 parts onion, 1 part carrot and 1 part celery – by weight. A common variation is White Mirepoix where leeks and parsnips replace some of the onions and carrots. It is used to flavor dishes when you want a white color in the final dish. Other ingredients that are sometimes used are shallots, garlic, diced ham, tomatoes, mushrooms, peppers and ginger.

The classic Italian Sofrito actually starts as something called a Battuto and, once cooked, it is termed a Sofrito. Usually it is a combination of onions, celery, carrots, garlic and parsley although there are quite a few variations on this mixture. It also can include bell peppers or fennel as well as finely diced cured meats such as pancetta or prosciutto. There is no set ratio for the ingredients.

There are many regional variations on the Italian Sofrito including Puerto Rican, Cuban and Dominican. These variations often include ingredients that are specific to those areas.

The Cajun Trinity requires bell pepper, onion and celery. Although there is a difference of opinion on this, a good starting ratio is 2 parts onion, 1 part celery and 1 part green bell pepper. This particular mixture does not usually have as many variations as the other mixtures. Along with a dark roux, it becomes the base for Cajun and Creole dishes such as gumbo, jambalaya and étouffée.

Suppengrün is of German origin and is made of carrots, celery root and leeks. Variations include onions, parsnips and potatoes. There is no set ratio.

From Poland we get Włoszczyzna, similar to its German counterpart but often with cabbage as the primary ingredient.

No matter which version of this base you are using, be sure to cut the vegetables relatively uniform in size. The shorter the cooking time of the ultimate dish, the smaller size the pieces should be. For longer times, they can be cut into larger pieces.

To turn these vegetables into the respective base, heat the cooking fat (typically oil or butter) in a sturdy pan. Generally, the onions (or leeks) will be cooked in the fat first. What comes next depends on the particular mixture. If garlic is called for, add it next but cook carefully so it doesn’t brown or burn. Follow by adding the rest of the vegetables. Lastly, add the herbs.

Usually, only “sweating” the mixture is what you want. This would be done on a lower heat just until the vegetables are giving off some of their juices, softening in texture but not browning. If you are using this base in a dish such as a soup, stew or pasta sauce, feel free to slowly cook the vegetables until they are almost melted. If you wish to add them to something like a frittata or omelet, you may want to stop cooking before they lose all their texture. There are times when the mixture is cooked until it browns but I will leave that for another discussion.

The main take-away from this discussion is that slowly cooking these aromatic vegetables even if you do not follow the listed combinations can add a tremendous amount of flavor. This simple step can take your dish from good to great!


Cooking Tips · Ingredients

Garlic — How to tame it

If you cook from scratch much, I suspect you have used garlic in something within the last week or so. It is just one of those ingredients that is a “must have” for your pantry and is used in many different savory applications. In this Cooking Tip, I would like to discuss garlic, what it is and how to use it.

Garlic is a member of the lily family and is a cousin to onions, leeks, shallots & chives. The part we eat is actually the bulb (termed a head) made up of multiple cloves. What we do with those cloves can greatly affect the resulting flavor of the garlic.

First, let’s start with the germ of the clove, that small inner part of the clove. Should you remove it? The answer is “perhaps”. If your garlic is young, there is probably no need to remove the germ. If the garlic head is older, then the germ may give your dish an unpleasant and pungent flavor. In that case, it is best to remove. The problem comes in knowing whether your garlic is old or not. Even though you can buy garlic year-round, it is seasonal with harvests occurring from late summer to late fall. If you grow your own garlic or if you buy from a farmer’s market where you can ask the grower, it is simple to tell how old the garlic is. If you get your garlic from the supermarket, you do not know but you can be pretty assured that it is old if you are buying it in the winter or spring. You can also do a visual inspection but you have to open a clove. If the germ is barely visible, it is on the younger side. As the garlic matures, that germ also grows and becomes very visible. If in doubt and you are concerned about an overpowering and harsh garlic flavor, remove the germ.

Something else that affects garlic’s flavor is how you cut it. As you cut a garlic clove, cells are damaged causing a chemical reaction that produces compounds that we associate with the odor & taste of garlic. The more cell damage that occurs, the more intense the odor and flavor. Therefore, the smaller you cut up garlic, the more intense it will be. Grating it produces the most intense product. As one culinary expert puts it, “a single whole clove will deliver less intensity than a crushed one, a crushed clove will be milder than a sliced clove, and a sliced one isn’t as pungent as a chopped or pureed one—the more cells we rupture when cutting garlic, the more potent it is.”

Cooking the garlic will help tame its pungency. However, this does depend on how long it is cooked. If you cook it briefly, you will probably still notice the flavor differences that result from your cutting method. The longer the dish is cooked, the less noticeable the differences in cutting techniques will be. Roasting whole heads in the oven produce a tender and even sweet product. Experts also say that cooking the garlic in butter will lead to a milder flavor than cooking it in vegetable oil.

Using acid will also produce milder garlic flavors. For example, pureeing the garlic with lemon juice produces garlic with good flavor but it will be fairly mellow. Or, allowing the garlic to soak in vinegar for a minute and then proceeding to add it to your vinaigrette will result in a milder garlic flavor than just throwing the garlic in without this step.

Another chef recommends just washing your garlic in a bowl of lukewarm water after slicing or chopping it. After removing it from the water, dry it and then continue with your recipe. A further step is blanching it in boiling water or milk before shocking it in ice water before using it. Cooks Illustrated says that just microwaving for 2-3 minutes or until warm to the touch is another effective method. For these methods to work, the garlic’s temperature must rise to or above 140°F.

What about those bottles of garlic? Sure, they are convenient but are they worth it? Health experts say that any supposed health benefits are greatly reduced in the bottled versions. As far as flavor, fresh will taste – well, fresher. How you are using the garlic may help you decide whether to use fresh or bottled. If it is in an uncooked or lightly cooked dish, opt for raw. If you are making something that is going to cook or simmer for a while, the bottled will probably suffice.

Not everyone likes the taste of garlic. It is an essential ingredient, though, for many dishes. I trust that the above information will help you adjust the intensity of the aroma and flavor to your liking.

Cooking Tips · Ingredients

Salmon — wild or farmed

I was making salmon for dinner and started thinking that I could hardly wait for the time that fresh, wild Pacific salmon is in the stores again. Why is that? Because, in my opinion, it is the best tasting salmon ever. I thought some of you might enjoy a Cooking Tip about this very subject. Now, I am not going to address environmental concerns over farmed versus wild or similar topics. Nor am I going to focus on the health benefits/concerns although wild-caught salmon is felt to be an extremely healthy and nutritious food. I am approaching this Tip purely from a culinary perspective.

Salmon are fish that live naturally in the northern Atlantic & Pacific oceans. The two main groups of salmon around North America are Atlantic and Pacific salmon. There is only one type of Atlantic salmon but there are quite a few from the Pacific ocean.

Chinook salmon (aka King) is the largest and found mainly in Alaska but also down the west coast. It is known for its smooth, melting texture and a rich, buttery flavor.

Chum salmon (aka dog or silverbrite salmon) is found in Alaska down to the northwest tip of the US. As you can assume from the name, this is not a highly desired salmon. There are those, though, that say as long as it is handled properly, it is a perfectly acceptable salmon with a lighter flavor. It is often used for grilling and smoking.

Coho salmon (aka silver salmon) is greatly prized and is found in Alaska and down the west coast.

Pink salmon is the most abundant but also the smallest. It is the type used for canned salmon.

Sockeye salmon (aka red salmon) is named for its colorful red flesh.

All Atlantic salmon is farm-raised, mostly from the states of Washington and Maine. There are also international farms in Canada, Norway and Chili. It is harvested year-round. At times, you will see terms other than Atlantic vs Pacific. For instance, it might say Chilean, Norwegian, Scottish, etc. These salmon are undoubtably Atlantic, and therefore farmed. If in doubt, ask the fishmonger.

If you want wild salmon, you must buy Pacific. The harvest season is from May through September.

Why do I eagerly await the fresh, wild salmon season? The succinct answer is TASTE. In my opinion, the taste of wild salmon is far superior to that of farmed salmon. You will have those that disagree, though, as they prefer the milder flavor of the Atlantic. Another item to consider is that if you look at the signs advertising the Atlantic salmon, you will usually see “color added”. Because of its diet, wild Pacific salmon is naturally orange, pink or reddish. On the other hand, Atlantic salmon is very pale and unappetizing looking. To counter this, the fish are fed an ingredient called “astaxanthin”. Although this ingredient can be produced naturally thorough algae or pulverized crustaceans, it is often synthesized in a lab from petroleum products. Its purpose is to add color to the flesh.

Another term you will notice that I have used is “fresh”. That term distinguishes it from frozen salmon. Pacific (preferably Alaskan) salmon that has never been frozen and has been wild-caught is my preference any day of the week – not only for the superior flavor but also because I like the texture better. Many fishmongers will tell you if the fish has been handled properly after catching and then flash frozen, it is just as good, if not better, than fish that has been transported in a fresh state to the store. One researcher postulated that this may be true for more fatty salmon – either King salmon or Atlantic salmon. Other Pacific salmon is leaner and may not stand up as well to freezing.

Wild, fresh, Pacific salmon will be more expensive. I think it is totally worth it. If you are going to spend the money for this great fish, you want to make sure to cook it properly. There are many different ways to cook salmon – pan-frying, grilling, baking, broiling or poaching. They will all give you different results. The most important thing is to not overcook it. I still remember when we lived in Guam and we went to a very nice restaurant. I ordered salmon and when the server asked me how I wanted it cooked, I said well-done. He looked at me and asked me to try it medium as the Chef recommended. If I didn’t like it, he would ask the chef to cook it more. I agreed. When it came out, I was so surprised at how tasty, moist and succulent it was. It was cooked all the way through but it was not overcooked. I never returned to the land of “well-cooked salmon”!

The best way to ensure you do not overcook your salmon is to use an instant read thermometer. Salmon is a very quick cooking fish. The actual cooking time will vary depending on the thickness of the fish portion and the cooking technique. It can be as little as 6 or 7 minutes or up to 15 minutes. Some experts recommend four to six minutes per half-inch of thickness.

There are some visual signs of doneness. The flesh will turn lighter and more opaque. The middle of the salmon, though, should still be slightly translucent. If it is opaque all the way through, it is over-cooked. The salmon should give way a bit but not necessarily flake. If it flakes, once again it is probably over-cooked. Since these visual cues can be somewhat subjective, taking the internal temperature is the best way to gauge doneness. Many sources will tell you to cook your salmon to 145°. I find that much too high. Cooks Illustrated agrees. They recommend cooking farmed salmon to 125° and wild salmon to 120°. The difference is due to the lower fat content in most wild salmon.

You may balk at those temperature recommendations. However, if you give it a try, I suspect that just as I was in that restaurant in Guam, you will be amazed at the results. Let me know!

Cooking Tips · Ingredients

Egg Tidbits Part 2

I would like to continue our discussion of Eggs in this Cooking Tip with a few more helpful tidbits. In last week’s Tip, I told you how to interpret the dates on the carton to determine how old your eggs are when you buy them. What if you have had them in the refrigerator for a while, how do you know if they are still fresh? Here is an easy test.

Freshness of eggs – Place the egg in a bowl of water. If it lays on its side at the bottom, it is still fresh. If it stands upright on the bottom, it should be eaten fairly soon. If it floats, it may be time to throw it away. According to the USDA, “an egg can float in water when its air cell has enlarged sufficiently to keep it buoyant. This means the egg is old, but it may be perfectly safe to use. Crack the egg into a bowl and examine it for an off-odor or unusual appearance before deciding to use or discard it. A spoiled egg will have an unpleasant odor when you break open the shell, either when raw or cooked.”

Egg Storage – When properly handled and stored, eggs rarely spoil. However, if you keep them too long, they are likely to dry up. Refrigerate eggs at 40°F or less. Store them in their original carton on an inside shelf and away from pungent foods. The temperature on an inside shelf remains more constant than one on the door, which is opened and closed frequently. The carton keeps the eggs from picking up odors or flavors from other foods and helps prevent moisture loss.

Raw eggs that have been removed from their shells should be refrigerated in a tightly covered container. Refrigerated whole egg yolks should be covered with water to prevent them from drying out; drain before using. The following chart shows how long hard-boiled eggs and raw eggs last when stored in the refrigerator.

EGG STORAGE CHART

PRODUCT REFRIGERATOR FREEZER

Raw eggs in shell 3-5 weeks Do not freeze

Raw egg whites 2-4 days 12 months

Raw egg yolks 2-4 days Yolks do not freeze well

Hard cooked eggs, in shell 1 week Do not freeze

Casseroles made with eggs 3-4 days After baking, 2-3 months

Quiche with any kind of filling 3-4 days After baking, 1-2 months

Egg sizes — Size tells you the minimum required net weight per dozen eggs. It does not refer to the dimensions of an egg or how big it looks. It is not the size of each individual egg but it is the total weight of the dozen eggs that determines the size noted on the carton.

Size of Egg Minimum net weight per dozen Weight per egg

Peewee 15 ozs 1¼ ozs
Small 18 ozs 1½ ozs
Medium 21 ozs 1¾ ozs
Large 24 ozs 2 ozs
Extra Large 27 ozs 2¼ ozs
Jumbo 30 ozs 2½ ozs

If you are wondering if you can substitute one egg size for another, the American Egg Board recommends the following.

Large Jumbo X-Large Medium Small

1 1 1 1 1
2 2 2 2 3
3 2 3 3 4
4 3 4 5 5
5 4 4 6 7
6 5 5 7 8

Peeling eggs – I’m sure you all have had the problem of peeling a hard-boiled egg and taking off a large part of the egg with the shell. Is there a solution to this? Yes, but it involves using a technique that is very different than what you have heard before or what I was taught in culinary school. This topic arose in a class I just taught about hosting an Afternoon Tea party. I do not have an Instapot but many in the class did and raved about how easy it was to peel eggs cooked in this device. I believe this as it works similarly to the following method, which is what I use.

Serious Eats did a number of tests to determine the best way to cook eggs and be able to easily peel them without creating craters in your egg. The way most of us were taught is to put the eggs in cold water and then bring that water to a boil. What this does, in reality, is to cause the egg proteins to fuse to the inside of the shell, making it very difficult to peel. To prevent this, they suggest a different method.

They found carefully dropping the eggs into boiling water (or steam), lowering the water temperature then continuing to cook in barely simmering water is the best way. After removing, peel them under running cool water. While the eggs are still hot, the membrane and egg white are more easily separated. Here is a link to the actual recipe.

In this chef’s book, The Food Lab, he recommends adding some ice to help the water cool more quickly. If you have an Instapot, let me know if you agree if it is a wonder for boiled eggs. If not, give this technique a try and I think you will be pleased.

There is much more to this wonderful foodstuff we call Eggs. However, I suspect that you have had enough. So, I will finish this second Cooking Tip on Eggs. If there are other egg-related topics that you would like for me to discuss, just let me know!

Cooking Tips · Ingredients

Eggs — so much to learn

Eggs – these are a foodstuff that goes in and out of favor depending on the current state of nutritional research. Eggs are also a very natural and simple food. However, there is quite a bit to learn about eggs. In this Cooking Tip, I want to start to tackle this topic and increase your Egg IQ. Because there is so much to learn about eggs, I will start in this Tip and finish in a subsequent one or two tips. You will recall I already wrote a Tip about Egg White Foams. If you did not get this one and wish to, just email me.

I want to start with egg terminology. Do you buy whatever eggs are the cheapest or do you spend a bit more for cage free? As you are deciding how much you want to spend, be aware that some of the egg terms can be a bit misleading. Here are just a few of the main terms.

  • Cage Free – To be considered cage free, the hens are allowed to roost and socialize freely in a room or open area. They are not confined to a cage but this open area may be in a barn or poultry house rather than outside. Over 90% of the eggs found on our tables are from chickens raised in caged environments.

  • Free Range – In this case, the hens have access to the “outdoors”. “Outdoors” only means there is no roof. The area they have to range may be grass but could also be dirt or concrete.

  • Pasture Raised – This term implies that the hens actually spend time outdoors on grass and eat a diet partly, if not entirely, of bugs and plants. I think this is probably what most of us think of we think of free ranging or cage free chickens. However, we can now see that this may not be true.

  • Organic – For eggs to be labeled organic, the hens must be raised according to USDA National Organic Program guidelines. The hens must be allowed to range freely and given access to the outdoors. They must be fed an organic diet and, if they do not have access to a pasture area, they must be provided with sprouted grains or fresh plants on a daily basis.

Egg Dating – No matter which type of eggs you decide to purchase, you want them to be as fresh as possible. If you can buy them directly from a farmer or someone who raises backyard chickens, you can ask and be assured of their freshness. If you buy them from a supermarket, you have to rely on dates on the carton but what do they mean? You may see a “Sell By” or “Best By” or even an “Expiration” date. If the carton has a USDA shield on it and shows an Expiration date, that date cannot exceed 30 days beyond the pack date. If instead there is a “Best By” date, it can be no more than 45 days after the pack date.

Another date is the Julian date. This represents the day of the year that the eggs were packed – from 1 to 365. Here is an example from a carton I bought on March 31. They have a “Sell By” date of April 11. Their Julian date is 072, which is March 13. So, when I bought my eggs, it was 18 days after they were packed and I was told it was safe to continue to sell them for another 11 days — 29 days after packing.

Egg color – The color of the egg is determined by the breed of the hen. If you care to look at the hen’s ear, you can tell the color of the egg. If it has a white or light spot, that hen will lay white eggs. We have confirmed this as one of our hens has a bluish-green ear spot and she lays bluish-green eggs. Furthermore, there is no nutritional difference between different colored eggs.

Blood spots – This is one of the most misunderstood findings of an egg. Many people think a blood spot means the egg was fertilized and should be thrown away. According to the Egg Safety Center, “blood spots are caused by the rupture of a blood vessel on the yolk surface when it is being formed or by a similar accident in the wall of the oviduct in the hen’s reproductive tract.” As long as the egg is cooked properly, it is safe to eat.

Refrigeration – In the US, eggs are always refrigerated. However, in Europe, they are often sold at room temperature. The difference has to do with washing of the eggs. The USDA requires that all eggs sold in the US from farms with at least 3000 hens to be washed & sanitized. This removes the coating that is naturally found on eggs. In Europe, eggs are not required to be washed and thus, retain this coating. This allows them to be sold at room temperature.

Grading of eggs – Grading of eggs is actually voluntary and companies must pay to have the USDA grade their eggs. When grading, the characteristics that are looked at are the quality of the shell, white & yolk. The eggs can be graded from AA to A to B. The eggs that have the cleanest shells, the firmest whites and tallest-standing yolks get an AA rating. Grade B eggs may have a stain, bumps or an uneven shape. The white is watery and the yolk will be enlarged and flattened. Grade A eggs fall in between. If you want to know more specifics, here is a link to the USDA Grading Manual.

All are fine to eat but if appearance is most important, opt for AA. You will easily find both AA and A eggs in the supermarket while Grade B eggs are used commercially in powdered egg products or liquid eggs. I have never seen Grade B in my supermarkets but I must say I have not looked specifically for them. If you have seen them in your stores, let me know

 Eggs from our own backyard chickens Eggs from our own backyard chickens

There is much more to eggs such as how to test for freshness, size and how to get that silly shell off a hard-boiled egg without craters! Stay tuned for Part 2.

Cooking Tips · Ingredients

Liquid Sugars

Last week, I wrote about the importance of sugar and the various types of solid sweeteners. In this Cooking Tip, I would like to concentrate on liquid sweeteners. The main ones we probably have in our kitchen are honey, maple syrup, molasses and corn syrup. There are others, which I will also briefly discuss. With all these sweeteners, it is best to use recipes that have been created for that ingredient. However, if you want tips for how to swap these sweeteners for sugar, email me for recommendations.

Honey is said to be the world’s oldest sweetener. Its flavor varies greatly depending on the flowers and trees that the bees visit. If you have never tasted anything other than supermarket honey, I urge you to seek out and taste these different types of honey. I know the first time I did, I was totally amazed. The uniqueness of these different honeys can make a huge difference in the taste of your food item. If you are using honey in a very light and delicate dish, you are going to want to use a mild-flavored honey such as clover or orange blossom. Darker, more full-flavored honeys can overpower such a dish.

Generally, honey is sweeter than sugar. Although honey can be used in baking, you must do so with care as it is not a 1:1 substitution for sugar. Not only do you have to be concerned about the sweetness level but honey also adds liquid as well as acidity. Honey also browns very quickly and this needs to be taken into account. The types of baked goods that take to honey well are softer baked goods that do not require crispiness such as muffins, quick breads and cake. One advantage of using honey is that it is attracts water and thus, keeps your baked item moister.

Corn syrup is said to be only 65% as sweet as white sugar and is derived from cornstarch. One advantage of corn syrup is that, unlike other sugars, it does not crystallize. Note that regular corn syrup is not the same thing as High Fructose Corn Syrup (HFCS). The latter is something that only food manufacturers use; it is not what you find in the baking aisle of your supermarket. HFCS is mainly fructose and its sweetness level is on par with granulated sugar. Corn syrup is mainly glucose, along with water & other longer-chain sugars. It is these longer-chain sugars that tend to tangle up with each other, creating a more viscous product and they are what prevent crystallization of other sugars. That is why it is often used in items such as pecan pie, caramel sauce, chocolate truffles and frostings. Some producers may add HFCS to their corn syrup but Karo is one company that does not. If you have concerns, just check the label.

Corn syrup comes in light and dark varieties and it is best to use whatever variety is called for in a recipe. The dark version is actually light corn syrup with added molasses, caramel coloring and flavoring. The light syrup has a delicately sweet flavor whereas the dark syrup has more of a molasses flavor.

Maple syrup is made from the sap of the sugar maple tree. In 2015, the FDA issued regulations concerning the grading and terminology for maple syrup. Rather than Grade A or B, the industry now uses terms relating to the color. Here is a great infographic that will help you when looking at the choices in the supermarket. If you wish to see the actual FDA regulations, here is a link. The lighter syrups are probably more all-purpose but the stronger flavored dark syrups are best for cooking. Swapping out sugar for maple syrup has the same precautions as for honey although browning does not happen as quickly and it is less acidic than honey.

Molasses is a byproduct of the sugar refining process. It is the residue that remains after the sugar crystals are extracted during the boiling process. The flavor will vary from type to type and it can also have bitter undertones. This sweetener comes in light or dark varieties as well as what is known as blackstrap. The most common is Light (aka Barbados, first, mild, sweet) and is the sweetest and mildest in flavor. Dark molasses (aka full, robust, second) will be thicker, less sweet and stronger in flavor. Blackstrap is very dark, thick and bitter. Another term you may see is “Unsulphured”. Some molasses is treated with sulphur dioxide as a preservative. Because this chemical affects the flavor, most molasses on our shelves will be unsulphured. Molasses is best used in recipes where it is used in combination with spices and/or fall fruits and vegetables.

Cane syrup is a caramelized, concentrated version of pure cane juice. The juice is boiled down and evaporated to create cane syrup. It is said to have a “burnt caramel” flavor and preferred uses are fruitcake and other spiced baked goods.

Sorghum syrup comes from sweet sorghum grass. The juice is extracted from the plants, returned to the mill and cooked down into a syrup. It is made in very small batches and its flavor is very specific to each producer.

Golden syrup is something you are much more likely to see in the UK, where it is often called “Treacle” or “Light Treacle”. Lovers of this syrup call its flavor “butterscotch” or “toffee”. There is a product known as “Black Treacle”, which is much darker and thicker than light treacle. It is similar to our molasses and is great in Sticky Toffee Pudding but can be overpowering in lighter dishes.

Agave nectar comes from the blue agave plant. It is very mild and neutral in flavor. It has been touted as a less refined sugar but has come under more scrutiny that has caused doubts to arise as to that claim. I am not going to go into the arguments about this sweetener but, if you use it, you may want to do some research of your own.

There is no doubt that Americans eat too much added sugar, but as I said in my last Tip, it is an ingredient that must be in any cook’s kitchen. Between last week’s Tip on solid sugars and this one on liquid sugars, I hope you can gain a better understanding of your choices so you can use it properly without overdoing it.


Cooking Tips · Ingredients

Sugar — more than just sweetness

Although sugar has a bad name in the nutritional world, it is a necessary ingredient for your cooking and baking. It is such a simple word but it is far from a simple ingredient. In this Cooking Tip, I want to talk about why sugar is an important ingredient and about the many different types of sugar. This tip will be limited to solid sugars. Liquid sugars will have to wait for a subsequent Tip.

If you ask the average person what the purpose of sugar is, they will probably say to add sweetness to the dish/beverage. Certainly, sweetness is one of the major properties of sugar. It is not the only one, though. Sugar can also help balance other flavors. An example would be a tomato sauce made with less ripe tomatoes. A pinch of sugar can help mask some of the acidity and bitterness of that sauce.

In baking, sugar can add volume as well as texture. It actually acts as a tenderizing agent in baked goods. In bread making, it assists with the proper amount of gluten development and decreases stickiness. Sugar also acts as a preservative as well as aiding in moisture retention. Sugar is what gives stability to beaten egg whites so they maintain their volume while baking. It also is what is responsible for that crunch in your cookies. Those beautiful golden crusts on coffee cakes & other baked goods is also due to sugar. There is more but that gives you an idea of how important sugar is for the cook.

Most sugar is obtained from either sugar beets or sugar cane. They are processed similarly (although not identically) by extracting sugar juice from these plants. By adjustments in the processing steps, many different types of sugar can be produced. I want to spend some time discussing the different types.

White sugar contains little or no molasses as the naturally-present molasses has been removed during processing. Types include granulated sugar, powdered sugar, caster sugar, sanding sugar & pearl sugar.

  • Granulated sugar (aka table sugar) is what most of us think of when it comes to sugar. It is the most common type in our kitchens.

  • Powdered sugar (aka confectioners’ or icing sugar) is made by grinding granulated sugar to a smooth powder and mixing it with a small amount of cornstarch (to prevent clumping). In a pinch and need powdered sugar but you have none? Make your own by grinding 1 cup of granulated sugar with 1 teaspoon of cornstarch in a blender for a full 3 minutes. This is the type of sugar to grab for making icings, frostings and glazes.

  • Caster sugar (aka superfine sugar) is very finely ground and is best is recipes that need the sugar to dissolve quickly and completely. Examples include meringues or frostings.

  • Sanding sugars are those colored sugars with large crystals that we like to sprinkle on top of baked goods.

  • Pearl sugar (aka coarse or decorating sugar) is a white sugar with a coarse, hard texture and an opaque color. Because it holds it shape and doesn’t melt, it is normally used to decorate baked goods.

Brown sugar contains varying amounts of molasses.

  • Light and dark brown sugars are made by mixing white sugar with molasses – less for light and more for dark.

  • There are other brown sugars which are less refined. Turbinado sugar is a slightly refined cane sugar, retaining more of the naturally-present molasses. It has a caramel-like flavor and it has large crystals that do not dissolve well. Because of this, it doesn’t do well in light batters or doughs but may be fine in muffins. Because it has less moisture content than brown sugar, swapping one for the other is not recommended. If attempting to substitute it for white sugar, be aware that turbinado has more moisture, which shouldn’t be a problem in moist batters but this could be a problem in pastry dough recipes. Another problem with substituting one for the other is that a cup of turbinado with its larger crystals won’t be the same as a cup of white sugar. This is another reason to have a food scale in your kitchen as it will give you more accurate measurements. The best uses for turbinado sugar are stirring into your coffee/tea or sprinkling on top of baked goods for a crunch.

  • Demerara sugar is another less-refined variety. It has larger grains than turbinado, is amber in color and has a subtle molasses flavor. Again, because of the grain size, it is best used for beverages or as a topping on baked goods. Be aware that some companies use these two terms (turbinado & demerara) interchangeably.

  • Muscovado sugar (aka Barbados sugar) is unrefined cane sugar in which no molasses is removed. It comes in both light and dark varieties and has a more sticky, sandy texture than regular brown sugar. It can be very strong in flavor, especially dark muscovado.

Sugar can also be categorized by its source. If the bag claims it is “cane sugar”, it comes solely from sugar cane. If it does not state “cane”, it is probably either beet or a mixture of cane and beet sugar. Coconut sugar (aka coconut palm sugar) is made from the sap of the coconut plant. It has an earthy flavor. Palm sugar comes from the nectar of the sugar palm tree. It tastes similar to coconut sugar but may have more smoky, caramel notes. Date sugar is made from dehydrated ground dates and can be used as an alternative to brown sugar. Maple sugar is made from the sap of the maple tree and has a wonderful mapley (Is that a word? If not, it should be.) flavor.

Sucanat (a contraction of Sugar Cane Natural) is a sweetener that you may have heard about. It is essentially pure dried sugar cane juice. It is far less processed than other sugars and is considered by some to be truly unrefined. It has more flavor than granulated sugar and also retains much of the natural molasses, meaning it looks brown and has more of a molasses-type flavor. Because of this, it would not be a good choice for lighter baked goods but may be great in spice cakes and ginger cookies. Testers found its granular texture meant that it did not dissolve easily and, therefore, recommended grinding before using it. Its chemical content is also different from granulated sugar. The latter is pure sucrose where as Sucanat has small amounts of glucose, fructose and other molecules besides the sucrose. Because of this, it can react differently than regular sugar in recipes and cannot be substituted one for one on a volume basis. For every cup of granulated or brown sugar called for in your recipe, use 1¼ cups Sucanat. According to America’s Test Kitchen, you cannot scale this up/down exactly. Rather, they have put together a chart for conversion purposes. A similar product is called Rapadura. Some people also include in this category jaggery/gur and panela/piloncillo. They often come compressed into cakes or cones and must be chipped or grated. Jaggery can also be made from the date palm and is typically found in Indian markets whereas panela is usually found in Latin markets.

One caution – you may see the term “raw” sugar and think it refers to sugar that has not been refined. The term “raw” is mostly a marketing term to get you to believe just that. The truth is that it may be less refined than white sugar but it is certainly not totally unrefined – meaning nothing has been added or removed.

Well, if you thought sugar was a simple ingredient good only for sweetening food items, I hope you now see it is not nearly as simple as you thought – but just as delicious!