I have never been a fan of marshmallows. I do not even like them in my hot chocolate. That all changed, though, when I first made homemade marshmallows. They are such a different creature than store-bought and that is the subject of this Cooking Tip.
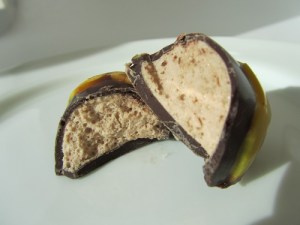
I was attempting to make a chocolate covered Easter egg filled with a light and fluffy center. I was using a recipe from Callebaut that had you mix some of their Gold chocolate (one of their specialty white chocolates containing caramelized sugar & milk) into the marshmallow mixture. I did not have that particular ingredient and so, used their milk chocolate. I tempered some chocolate to use in my Easter egg molds and filled them with this mixture. When I bit into them, I remembered how much I love homemade marshmallows. They reminded me of those marshmallow Easter eggs that you can buy but so much better.
According to Harold McGee in On Food and Cooking, these confections were first made in France from the gummy root juice of the marsh mallow, a relative of the hollyhock. Made by mixing this juice with eggs and sugar and then beaten to a foam, it was called pâte de Guimauve.
Making them is not difficult but does require working with gelatin and hot sugar syrup. Because of the latter, you do need to take some care to not burn yourself. Similarly, it is not a good project for children.
All recipes will call for you to soften gelatin in water (for a discussion on powdered vs leaf gelatin, see this Cooking Tip). You also make a sugar syrup with sugar, water and an invert sugar to prevent crystallization. Professional pastry chefs may use something called “trimoline”. Most home cooks use corn syrup or glucose syrup although honey may also be used. One caution with the latter, though, is that some honeys have such a strong flavor that it will dominate your marshmallow. If you want to try honey, use a lighter one. I used a clover honey and that worked wonderfully. The sugar syrup must be brought to a certain temperature (recall temperature adjustments when at high altitude). This mixture is then beaten in a mixer, the gelatin is added and mixing continues until you get a white and thick mixture that has doubled or tripled in volume.
Some recipes you will see call for whipped egg whites but most do not. The addition of whipped egg whites makes the marshmallows extra light, soft and fluffy as well as easier to pipe by slowing how quickly the marshmallows set up. The egg whites also change the mouth feel as well as shortening the life span of the finished product. Plus, there is the concern of ingesting uncooked egg whites.
The final mixture is very sticky and will start to set up fairly quickly. You can just spread it out on a baking sheet that has been sprayed with nonstick spray and coated with powdered sugar. The marshmallows should then be allowed to set up for a few hours or even overnight before cutting into your preferred shape. After cutting, toss them in either powdered sugar or a mixture of powdered sugar and corn starch. You can also pipe the mixture into shapes. Or, as I did, you can pipe it into chocolate shells.
Flavorings can be added. The most classic is just vanilla but as I mentioned, I added melted chocolate. A perusal of recipes showed peanut butter & jelly, mint, eggnog, berry-flavored, rose, birthday cake, lemonade, mocha, caramel, gingerbread and liquor flavored. Colors may also be added for variety.
Have you ever tasted homemade marshmallows? What did you think? Have you ever made them yourself? I’d love to know.