Cooking Tips · Techniques

Don't fear cooking seafood!

Cooking seafood often instills fear in people. I can understand why. Good seafood is not inexpensive and over-cooking it is all too common. I do enjoy a good seafood dish but I am unhappy when it is dry and overdone. In this Cooking Tip, I want to help you turn out that perfect plate of seafood. This Tip will not cover all seafood, just some of the most popular. Nor am I going to discuss the topics of sustainability, environmental concerns or mercury content. I will leave that for you to research and make your own decisions. I am merely going to talk about cooking seafood. Some of the links below are affiliate links and I may earn a commission if you decide to purchase.

The fattiness or leanness of the fish species helps to determine proper cooking methods. Cooking methods are broken into moist cooking and dry cooking. Moist cooking methods include poaching, steaming, cooking en papillote and simmering. Dry cooking methods include baking, broiling, grilling and sautéing – either with or without cooking fat.

Fatty fish are especially well suited to cooking with dry heat. For example, baking or broiling are a good choice and these methods actually help to cut down on the oiliness of the fish. You can also use the dry heat method with the addition of fat. Just do not use so much that you cause the fish to be greasy. However, fatty fish can also be cooked with moist heat.

Lean fish are best cooked with moist heat as it helps to preserve the moistness of the fish. If you wish to use a dry cooking method, consider basting the fish in butter or oil. Or, the lean fish can be sautéed or fried with the use of oil.

If you are not sure about the fat content of the fish, ask at the fish counter. Briefly, fatty fish include salmon, mackerel and herring. Trout is considered to have a medium level of fat. Lean fish include orange roughy, bass, cod, flounder, haddock, Mahi-Mahi, grouper, snapper, tilapia and tuna.

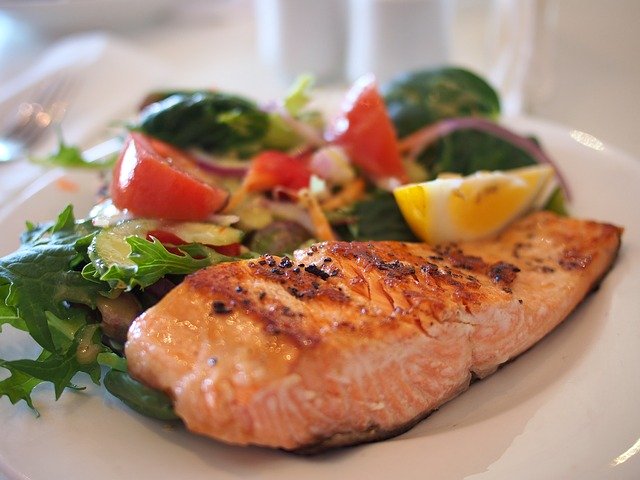
The main problem I see with cooking fish is overcooking it. Most fish do not take very long to cook. An average recommended cooking time is 8-10 minutes per inch of thickness. Remember that there is going to be some carry-over cooking and, therefore, you can remove it from the heat when it is just slightly underdone. You can gauge this by visual changes. It is easy to see the color change with salmon. It is more difficult with white fish. You may need to use a paring knife and look inside. If the flesh is still translucent, it is still underdone. Perfectly cooked fish should be opaque but still flaky and moist. Overcooked fish is dry and falls apart easily.

The FDA states that fish with fins should be cooked to 145° or until the flesh is opaque and separates easily with a fork. Shrimp, lobster, crab, and scallops should be cooked until the flesh is pearly or white, and opaque.

Thermoworks recommends the following:

  • Salmon – 125°
  • Halibut – 130°
  • Lobster – 140°
  • Scallops – 130°
  • Shrimp — 120°

Cook’s Illustrated recommends:

  • 120° for wild salmon
  • 125° for farmed salmon
  • 135° for whitefish

Let me discuss a few particular types of fish.

Salmon – I covered salmon in detail in a prior Cooking Tip. Refer to that article for more information.

Scallops – Scallops are wonderful, sweet and delicate but can easily be turned rubbery and unappetizing by improper cooking.

The experts will tell you to always choose “dry” scallops (vs. “wet” scallops) at the store. Wet scallops (aka treated scallops) have been soaked in a liquid solution containing phosphates that is supposed to prolong their freshness. However, the scallops also absorb the water, which you end up paying for since you buy them by the pound. This water evaporates as they cook, which can lead to the following problems. First, the water that is released causes them to steam and it makes it more difficult to get that nice caramelized crust. As the water evaporates, you end up with smaller and tougher scallops. The phosphate may impart a slightly soapy flavor to the scallops. It is generally easy to discern treated scallops as they will usually appear very white in color.

“Dry” is the seafood industry term for natural or untreated scallops. They look more tan in color. They are preferred because they are easier to sear and get the desired caramelization, they taste sweet & natural and you are not paying for added water. That said, I think it is very hard to find dry scallops in your supermarket. To obtain these, you probably need to visit a quality seafood market or order online.

Whatever scallops you purchase, they should be cooked quickly over high heat. Pat the scallops dry. To prevent more moisture from exuding from the scallop, hold off on salting until just before they go in the pan. Leave space between them so they do not steam and cook very quickly over high heat. A typical large scallop only needs about 90 seconds per side. Allow them to rest for a few minutes before serving.

Shrimp is another very popular type of seafood. If not done before you buy them, you need to peel and devein the shrimp before cooking. They can be broiled in as little as 2-3 minutes. Boiling is another common method of cooking shrimp. For a 1 pound of shrimp, bring 4 cups water along with 1 teaspoon salt to a boil. Add shrimp and simmer, uncovered, 1 to 3 minutes or until shrimp turn opaque, stirring occasionally. Drain and rinse shrimp in a colander under cold running water.

You may also cook them on the stovetop by heating a skillet over medium-high. Add oil to hot skillet and then add the shrimp. Cook 3 to 6 minutes until shrimp are pink and opaque.

Seafood is something all of us should increase in our diet. It is also such a quick and easy ingredient to cook, making it perfect for a quick weeknight meal. Just watch it and don’t overcook it. If you do that, I am sure you will enjoy a seafood meal!

Cooking Tips · Ingredients

Dried vs. Canned Beans – Is there really a difference?

Last week’s Cooking Tip was all about peas, a type of legume. Beans are another legume that most of us consume. This Cooking Tip will discuss the differences between dried and canned beans and how to cook them.

Beans can be categorized differently but one of the major categories is Dried vs Canned. Which do you use? Does it make a difference? Canned beans actually are dried beans but they have already been cooked. Therefore, you can use them without soaking or simmering them for hours. These are certainly more convenient but, as with most convenience foods, there is a downside. The canned beans sit in a brine in the can, which can draw out starches & proteins, leading to an alteration in texture and flavor.

Do you need to soak dried beans? This is usually recommended for dried beans as it softens them and decreases the cooking time. It is also thought that some of the elements that lead to gastrointestinal symptoms are leached out during the soaking. Serious Eats found that smaller beans with thin skins such as black beans actually do better without soaking. They did a testing with black beans by cooking them three ways. (Note that this test was only done with black beans and does not translate to all dried beans.)

  • Soaked in water overnight and then cooked in the soaking water.
  • Soaked, drained, rinsed and cooked in fresh water.
  • Cooked without any soaking.

Their results showed the following:

  • Time – un-soaked black beans only took an additional 20 minutes to cook.
  • Color – the darkest beans were those that were not soaked or were cooked in the soaking water.
  • Flavor – soaked and rinsed beans were the least flavorful. The other two methods yielded similar flavor. Another interesting finding is that if you add aromatics to the cooking beans, the most flavorful result was the un-soaked beans.
  • Texture – not much difference here but the beans that were un-soaked or those that were cooked in the soaking water were creamier due to the fact that you are not rinsing away the starch.

If you are cooking larger and thicker-skin dried beans, soaking is recommended. The age and quality of the bean are other factors as the lower quality they are and the older they are, the more they will need a soak. Since this is very difficult to assess when you are buying dried beans, it is probably smart to err on the side of soaking. Of course, the longer they sit in your pantry, the more they dry out and the more they will need soaking.

Should you salt the cooking water for dried beans? Serious Eats recommends salting, saying that the sodium helps to release magnesium & calcium from the beans. These elements give beans their rigidity and decreasing that leads to softer and creamier beans. They recommend that you season your soaking liquid with one tablespoon of kosher salt per quart of water. Drain and rinse the beans before cooking in lightly salted water. Cooks Illustrated agrees with this advice.

The procedure for cooking dried beans begins with sorting through the bag of beans and discarding any that are off-color or damaged as well as any stones you may find. Rinse them to remove any dust or dirt. Unless you are using black beans or you know you have very fresh beans, opt for soaking. Cover the beans with water. Since the beans will double (or more) in size, use enough water so they will stay submerged as they plump out. Add salt as discussed above. Allow to stand at room temperature for four to eight hours. If more than eight hours, refrigerate them. However, do not soak more than 24 hours. Drain and cook.

To cook, cover with fresh water and season with salt. Add flavorful aromatics such as onion, carrot, celery, garlic, leeks, fennel and herbs. Bring to a boil and then reduce heat to obtain a gentle simmer. More vigorous boiling can lead to disintegration of the beans. As you are cooking, skim off any foam that develops. It is difficult to recommend a definite cooking time. It is better to just test the beans periodically until they are tender without any firmness or graininess. When done, remove from the heat and allow them to cool in the water. If they are close to being over-done, put the pot in an ice bath and allow to cool.

One caveat about cooking dried beans at altitude. Because of the lowered boiling point at altitude, cooking beans will take longer than suggested in most recipes.

Some experts recommend adding a small amount of baking soda to speed up the cooking process. Do not use more than 1/8 teaspoon per pound of beans to prevent an off-flavor from developing.

There is a quick-soak method that some recommend. It is to cover the beans with salted water, bring to a boil, remove from the heat and allow to stand one hour before draining and cooking. This does shorten the overall time but it also results in decreased nutrient levels.

There are other methods such as using a pressure cooker, a slow cooker or your oven. Those that promote the oven method claim it is second only to the pressure cooker in quickness of cooking, it cooks the most evenly and is the least likely to burst the beans. Some say that soaking is not required with oven cooking but others still recommend it with larger and older beans as they do cook faster and more evenly. After draining the beans, put them in a large oven-safe pot with enough room for the expansion of the beans. Add seasoning and aromatics and cover with water by at least an inch. Bring to boil on the stove. Bake in a pre-heated 325° F oven for 75 minutes and check for doneness. Continue cooking until done, once again realizing that it may taker longer at altitude. The Kitchn cautions that with red kidney beans or white cannellini beans you should boil on the stove for 15 minutes to ensure toxins that are present in raw/undercooked beans are eliminated. Still others advocate a cooler oven (250°) and cooking for a longer time, 6-8 hours.

With a pressure cooker (something I do not own), it is said that presoaking is not necessary but if you do not soak, you are more likely to end up with beans that have split open. Here is a great source for using your pressure cooker (or Instant Pot) with a chart for cooking times. It even includes recommendations for altitude adjustments.

For a slow cooker, the same pros/cons of presoaking your beans apply. Drain and put the beans in your slow cooker and place aromatics on top. Cover with water by two inches. Add salt and stir to dissolve. Cover and cook on low for 6-8 hours (remember altitude may lengthen this). Start checking after about 5 hours and then every 30 minutes until done. Some people will cook on high, which results in the beans being done in less time. Sources do not recommend using the slow cooker for kidney beans due to the toxin issue. Here is a link to a source discussing this issue of Red Kidney Bean poisoning.

Cooking canned beans takes much less time. Be sure to drain and rinse them as they are in a very starchy and salty liquid. They should be cooked for at least 30 minutes to allow them to absorb the flavors of the recipe.

What if your recipe calls for dried beans but you only have canned beans? You need to know how to covert from one to the other. Cooks Illustrated recommends using 58 ozs of canned beans for every pound of dried beans.

Serious Eats tested a number of different types of beans and created the following chart.

Type of BeanWeight DriedEquivalent Cooked
Cannellini1 pound2 lb. 8 oz. (6.5 cups)
Chickpeas1 pound3 lb. 4 oz. (7 cups)
Red Kidney1 pound2 lb. 7 oz. (6.5 cups)
Pinto1 pound2 lb. 5 oz. (6.5 cups)
Black1 pound2 lb. 5 oz. (7 cups)
Black-Eyed Peas1 pound2 lb. 13 oz. (6.5 cups)

What’s your favorite way to use beans – baked beans, hummus, soups, stews? Whichever it is, I trust this Cooking Tip will help you on the way to success!

Cooking Tips · Techniques

Help in the Kitchen When You Need It!

As so many of us are trying to keep our distance from others and adapt to the new (albeit temporary) reality of working from home and having children off from school, I wanted to offer a bit of help in the kitchen. I am departing from the normal weekly Cooking Tip for this purpose.

First, I have written an article entitled “Great Tips to Improve Your Cooking.” You can find this free download on the Home Page of this website. It has tons of great tips to help you improve your cooking skills, produce great meals and have fun doing it.

To thank you for downloading it, I am offering $25 off a future cooking class. This can be done in the form of a gift card to be redeemed when we are all able to gather again. I can understand not wanting to meet in person right now. If anyone is interested in cooking instruction done via an alternate way such as telephone, email or even video, let me know and we can discuss how that might happen.

With the current situation, we all have an added incentive to cook at home. If you find yourself with a bit more time to cook, let me share an excellent recipe. This is from Cooking Light. It is a wonderfully flavorful and healthy dish called Mediterranean Chicken and Bulgur Skillet. It is a one-pan dish that is a meal in itself. It is also a great way to try bulgur if you have never tried it before. The dish does call for kale but I swapped this out for some fresh chard from my husband’s greenhouse garden. It was a quite yummy swap. It is easy to make, is filling, is healthy and is delicious. What more can you want? Let me know if you try it.

If you are indeed finding you have more time in the kitchen, you may want to make larger batches of meals that freeze well. I find this so helpful on those busy days when I have no time (or desire) to cook an evening meal. Why not try cooking or baking something you do not normally make? Perhaps some wonderful homemade bread. Maybe a special dessert when everyone is about to go stir crazy. Get the kids involved and make your own pasta or pizza dough.

There are so many ideas. Please let me know if I can help you during these trying times. Let’s all stay strong, help each other and maintain our faith. This will pass and the sun will shine on the other side!

Cooking Tips · Ingredients

Peas in a Pod

I was making a delightful pea salad the other day that contained three types of peas along with arugula. I also added some of my husband’s micro pea greens, which made it even better. With spring coming and the memory of this salad, I thought the subject of peas might make an interesting Cooking Tip.

A pea pod is actually a fruit and the peas inside are seeds. Some of the pods are edible, while others aren’t due to the fibrous and tough nature. There are three types of peas that you are most likely to find in your supermarket: English peas, sugar snap peas and snow peas.

When you say peas, most people will think of English or garden peas. These are the ones we find in the freezer section. Supermarkets rarely carry the whole, fresh pods as customers really do not want to shell them. They would rather have someone else do that for them. They must be shelled as the pods are too tough to digest.

If you are a gardener, there are many varieties (or cultivars) of garden peas that you can plant. In the store, though, the particular variety will not be listed.

Snow peas are also known as Chinese pea pods. They are flat and the pods are edible. The seeds inside are not allowed to plump out before harvesting. They can be eaten raw or briefly cooked. Just as with garden peas, there are a number of cultivars that can be grown.

Sugar snap peas are a cross between English peas and snow peas. Once you remove the strings, the entire pod is edible either raw or after blanching. The pods are sweeter and rounder than snow pea pods

Another word you will see on some packages of peas is “petite” or in the French, petit pois. As the name implies, they are smaller but they are also more tender and sweeter in flavor. This is my preferred variety.

In my local supermarket right now, I can buy fresh snow peas and fresh sugar snap peas. The only garden peas to be found are frozen. This is not a bad thing, though, as frozen vegetables are picked at the height of ripeness and quickly frozen to preserve their flavor and nutrient level. I think frozen vegetables are a great item to keep on hand and are not necessarily inferior to fresh varieties, especially out of season.

Peas are very easy to prepare. They can be boiled, steamed, stir fried, or microwaved. They can be added to foods such as salads, omelets, quiches and savory pies. They only require a brief cooking time and can even be eaten raw. Try not to over-cook them. One exception might be if you are making the very British dish – Mushy Peas. Although you can make mushy peas from garden peas, they are traditionally made from a variety called marrowfat peas, a large, starchy and mature pea that is left to dry outside in the field.

Are you a lover or hater of peas? If the latter, could it be you have only had inferior and over-cooked peas? I encourage to try some wonderful and tasty peas cooked to perfection. They are one of my favorite side dishes and are especially nice when the different varieties are combined in the same dish. Spring is coming. Enjoy the produce!

Cooking Tips · Ingredients

Microgreens – Tasty, Colorful & Packed with Nutrition

As many of you know, my husband has a full-time job but is also a part-time gentleman farmer. He keeps chickens and bees as well as growing fruit trees, berry bushes and all sorts of vegetables. He has a greenhouse, which keeps us in fresh greens for much of the winter. He has recently become interested in growing Microgreens and I thought that would make a good Cooking Tip topic.

Many of you have probably heard of baby greens, especially baby spinach. Baby greens are small versions of fully mature plants that are picked before they are fully grown.

My husband’s micro pea greens

Microgreens are similar but are cut even younger in their growing lives. They are the first, tiny shoots of herbs, lettuces and other greens. They are usually grown in soil and require sunlight. They are harvested between 7 & 14 days after germination and are under 3 inches tall. Because of their small form, the flavor is said to be more intense than the mature greens.

Microgreens are different than sprouts as the latter are obtained by sprouting seeds in water to achieve germination. They are harvested within 2-3 days. As you may have heard in the news, sprouts do carry a higher risk of bacterial contamination that can cause illness. This concern has not been found with microgreens although caution is recommended depending on how the greens are grown, harvested and stored. Be sure to wash them thoroughly before consuming.

It is said that all the nutrients that you would find in the mature plant are packed into the microgreen version. That makes it possible to amp up the nutritional value of your salads (or other dishes) by adding just a small amount of these greens. Therefore, they are said to be nutrient-dense. One caveat is that the nutrient content can vary widely depending on where the microgreens are grown, when they are harvested and the kind of soil used.

The U.S. Department of Agriculture and the University of Maryland conducted a scientific analysis of nutrients in microgreens. The results were published in the Journal of Agricultural and Food Chemistry and were summarized in The Salt in 2012.

According to the study, “The researchers looked at four groups of vitamins and other phytochemicals – including vitamin C, vitamin E, and beta carotene — in 25 varieties of microgreens. They found that leaves from almost all of the microgreens had four to six times more nutrients than the mature leaves of the same plant. But there was variation among them – red cabbage was highest in vitamin C, for instance, while the green daikon radish microgreens had the most vitamin E.”

Some caution, though, that the amount nutrients can vary depending on how and where it is grown, handled and harvested. Not only are additional studies needed to evaluate the effect of these agricultural practices on nutrient retention but also to compare microgreens to their mature counterpart. Finally, according to the Agricultural Research Service, “no known study has been conducted to evaluate whether consumption reduces cardiovascular disease risk factors.”

In a 2018 issue of The Journal of Agricultural and Food Chemistry, the authors state that not only are they easy to grow but, “microgreens are environmentally friendly and serve as excellent sources of various nutrients.” They conclude that, “based on existing literature, microgreens appeared to be excellent low-caloric sources of nutrients and bioactive components. Based on their chemical compositions, we propose that these nutrient-rich plants may provide health-promoting effects related to abilities to prevent the development of the vast array of inflammatory-related chronic diseases.”

They do end with stating that more studies need to be done “to fully realize the value of microgreens in human health.”

Here is just one list of popular microgreens.

AmaranthArugula
BasilBeets
BroccoliCabbage
CarrotsCelery
ChardChia
ChivesCilantro
DillFennel
Garden cressKale
MintMizuna
Mustard greensParsley
RadishRadish
SunflowerWatercress

Microgreens do have a very short shelf life, only a few days. They are not always readily available in grocery stores but they are easy to grow – even without a greenhouse.

There are many ways to include microgreens in your diet. We throw them on our salads but you can also add them to sandwiches and wraps as well as blended into smoothies. Add them to omelets or sprinkle them on pizza.

Whether you toss them on your salad for color, for taste or for nutrition, microgreens are a great addition!

Cooking Tips · Techniques

Buttercream – A Rich Delight

Buttercream – Just the word sounds rich, doesn’t it? Are you the type that licks the buttercream frosting off the cake because you think it is the best part? Or, is it too rich for you and you prefer the underlying cake? Whichever you are, how to make buttercream is an excellent skill to have and is the subject of this week’s Cooking Tip.

Buttercream is a type of frosting/icing that can be used as a filling, an icing or for decorating cakes or pastries. There are different types of buttercream that require different ingredients and techniques.

As the name indicates, butter is a major ingredient in buttercream. So, be sure to use a high quality butter. Unsalted butter is recommended to prevent your buttercream from tasting salty. The butter needs to be softened to incorporate properly. You should be able to press an indentation into the butter. According to Cooks Illustrated, softened butter sold be 65-67°F.

I like the way that Serious Eats categorizes buttercream. They put all buttercreams into two types.

  1. Beaten-butter method. This method has you adding some sort of sweet base into beaten butter. You start by beating softened butter until fluffy. Then, you add your base, which will differ according to which type you are making. (More details below) Finally, you mix in any flavorings you want. Examples include American, flour and German buttercream.

  2. Cubed -butter method. This is made by adding cubes of softened butter to a sweetened egg foam. These would be French, Italian and Swiss buttercreams.

The easiest and quickest type of buttercream is sometimes called Simple Buttercream or American Buttercream. It has three main ingredients: softened butter, powdered sugar and milk/cream. Some like to whip the butter before adding the powdered sugar and then add the cream. Others just cream the softened butter and powdered sugar together and then add milk/cream until the desired consistency is reached. The powdered sugar helps to thicken the mixture without the need for eggs. Flavorings such as vanilla may also be added. This is definitely the easiest buttercream but is also the sweetest. It is the firmest buttercream but the butter tends to melt in very warm environments. If you want to serve this outside on a warm day, this buttercream may not be your best choice.

Flour buttercream has a pudding base made of milk, sugar and flour. This is cooked but then cooled before being mixed into the whipped butter. It results in a buttercream this is less sweet and more stable in heat.

German buttercream uses a custard or pastry cream in place of the simple pudding as in the flour buttercream. Because the custard contains eggs, it will be more yellow than others. It tends to be softer than other buttercreams but you can use a thicker custard base to counteract this. It is another choice not well suited to warmer temperatures.

The buttercreams made by the cubed-butter method are also called European or meringue-based buttercream. Meringues are a topic in and of themselves and one on which I wrote an earlier Cooking Tip. There are three types of meringues – French, Swiss and Italian. peaks. For more detail, see this Cooking Tip. Each of these meringues can be used to create a different type of buttercream.

Swiss method – this starts by cooking egg whites and sugar over a hot water bath until the sugar has dissolved. This is whipped to peaks and then soft butter is beaten into the mixture until it is smooth. This method is quick and easy and yields a very light and fluffy buttercream. It is a very stable buttercream that can be used to ice a cake or pipe decorations.

French method – this is made by whipping whole eggs or egg yolks to a thick foam with a hot sugar syrup and then whipping in soft butter. As you are using eggs or yolks, it will yield a richer buttercream. Because of the egg yolks, this buttercream will be more yellow in color. It is a decadent buttercream but does not hold its shape very well, especially in warm environments.

Italian method – Similar to French with the substitution of egg whites for the whole eggs or egg yolks. Because there are no yolks, this buttercream will be whiter in color. It tends to hold up well in warm temperatures.

According to The Professional Pastry Chef, buttercream can be stored at room temperature for three to four days and in the refrigerator for up to two weeks. For longer storage, freezing is recommended. You will need to remove it from the refrigerator with enough time for it to soften before using it. To speed up the softening, you can break it into small pieces (as you would with cold butter) and place in a warm location. You may even warm these pieces in a bain marie, stirring vigorously until it is smooth and shiny. Continue to stir after removing from the heat as the bowl will remain warm and start to melt the buttercream on the sides of the bowl. Do your best to not overheat

Do you have a favorite buttercream? Or, does it depend on how much time you have or its intended usage?
Let me know.

Cooking Tips · Ingredients

Umami Flavors

As we grew up, we learned about the different tastes: sweet, salty, sour and bitter. More recently, people have begun talking about another taste – umami. That is the subject of this Cooking Tip – what is umami and how do we get umami in our foods.

Umami is a savory taste. It is actually a Japanese term that roughly translates to “good flavor” or “good taste”. It has also been thought of as a full-bodied, meaty flavor.

Umami was first studied in 1907 by isolating a compound thought to be responsible for this savory flavor. It was later identified as monosodium glutamate, a sodium salt that produces a strong savory taste. For a discussion on MSG, see this Cooking Tip.

MSG has often been added to foods to boost the umami flavor in foods. However, there are many foods that inherently have this taste, specifically those that contain a high level of the amino acid glutamate. Although not totally comprehensive, here is a list of many such foods.

  • Meat has high levels of glutamate
  • Soy sauce (to be forwarded a Cooking Tip on soy sauce, email me.)
  • Tomatoes, including sun-dried tomatoes
  • Miso
  • Anchovies
  • Mushrooms
  • Potatoes
  • Cheese with the more aged and stronger having more umami. For example, an aged parmesan.
  • Seaweed
  • Worcestershire sauce
  • Fish sauce
  • Coconut aminos (see this Cooking Tip)
  • Tree nuts such as walnuts and almonds. These are especially helpful to adding umami to vegetarian meals.

We know what most of these items are but I would like to elaborate on just a few.

Worcestershire sauce – each manufacturer has its own recipe but a typical list of ingredients is fermented anchovies, onions, garlic, vinegar, molasses, tamarind paste, salt, sugar, and a seasoning mixture that often includes coriander, mustard seed & cloves. It adds an umami punch to marinades, meat dishes, soups/stews.

Miso is a Japanese fermented paste and is typically fermented soybeans, a grain, salt, and koji (a mold). It can be fermented from a few weeks to several years. The most common use of miso is in Japanese-style miso soup, but also adds its unique flavor to marinades, ramen, or vegetable and tofu dishes.

Anchovies are a fatty fish that are most often served cured. After removing the head and inner parts, they are coated in salt, pressed and held in a temperature-controlled environment. During this time, chemical reactions occur which lead to flavor development. Being high in glutamic acid, they are full of umami. They are essential to a traditional Caesar dressing and are often added to Mediterranean dishes, meat dishes and pizza sauces.

Fish sauce is one of those ingredients essential to Asian (especially Thai) dishes. It is made from fermented (at least 12 mos) fish, typically anchovies. The fish breaks down and the salty liquid that forms is collected and filtered before bottling. It is both a condiment and an ingredient. Again, it is full of glutamates that result in a rich, savory taste and a brininess that brings out depth and flavor in everything from dipping sauces and soups to stir-fries and marinades.

Many recipes will call for some of the umami rich ingredients. However, you may also want to experiment on your own. Add a bit of soy sauce to that pasta sauce. Chop some anchovies and throw them in your beef stew. How do you up ramp up umami in your dishes? Let me know.

Cooking Tips · Techniques

Sweet Petals

As Valentine’s Day approaches, many people think of flowers and candy. In just a day, I am doing a demonstration for Hudson Gardens (a private garden and event center) that combines the two. The class is called Sweet Petals and in this Cooking Tip, I thought I would share some of what I will be teaching.

Just how can you combine candy and flowers? The first thing you could do is to make candy with floral flavors. Two of the most common are lavender and rose. To impart these flavors to your candy, you could use either the actual dried flowers or an extract/flavoring. For example, let’s look at chocolate truffles. To make a truffle, you first make a ganache, which is the interior of the truffle. This is then coated in more chocolate, cocoa powder, or other items. A ganache is usually made by pouring hot cream over chopped chocolate and then mixing those together when melted. Prior to doing this, you can infuse either dried lavender or rose buds into the warm cream. This imparts the floral flavor to the cream, the flowers are strained out and the result is lovely floral-flavored truffles. You might finish the truffle by sprinkling lavender or rose buds on the finished truffle. This helps the consumer know the flavor of that truffle.

If you do not want to use real flowers, you can also use flavorings. Taylor & Colledge offers a lavender paste. Savory Spice offers a lavender extract. Wild Flower Hibiscus Co offers rose and other floral extracts. Use these sparingly, though, as floral flavors can be overwhelming.

If you do not care for floral flavors in your chocolate, how about chocolate in the shape of a flower? There are numerous ways you can do this. The easiest is to use a mold such as this daisy-shaped lollipop mold.

You can also just form the chocolate into flower forms. One of my favorite projects involves making petals by coating the bottom of plastic spoons with chocolate, allow them to set up, remove from the spoon and form them into the shape of a flower.

If you wish to use true chocolate, you are limited to one color – brown. If you want color, you can use white chocolate and add food coloring. Or, you can use Candy Melts such as made by Wilton or Make ‘n Mold, which come in numerous colors. The other difference between using real chocolate and another product is that real chocolate will need to be tempered whereas candy melts do not. Tempering is a process whereby the chocolate crystals are aligned in such a way that you get a product that is shiny, snaps when you break it, does not melt in your hand, and importantly for this purpose, easily pops out of the mold. There is a trade-off between the ease of candy melts and the wonderful taste of real chocolate.

Hard candy is another category that pairs well with flowers. Once again, you could flavor your hard candy with floral flavors or make it in the shape of a flower.

You can even place edible flowers inside your hard candy. If using edible flowers, you want to be totally sure that the flowers you use are in the edible category. Not all flowers are edible and the entire plant may not be edible. Know where they come from and beware of insecticides and fungicides. Avoid flowers from florists, garden centers, nurseries or from the roadside. Another consideration is pollen, which may be a concern for people who have hay fever, asthma or allergies. Some experts recommend against eating flowers that have been exposed to untreated animal manure in the prior 4 months.

Making hard candy is not difficult but does require some adjustments if you live at a high altitude. See a prior Cooking Tip for a discussion on this topic.

Other fun things you can do is to roll out gumdrops and form them into roses. Place them on top of your cupcakes for a wonderful presentation. You can even use Starbursts to do the same if you gently soften them in the microwave first.

If you want actual recipes or links to these projects, let me know.

Have a very happy Valentine’s Day!

Cooking Tips · Ingredients

Unbleached Cake Flour

Last week’s Cooking Tip was all about the differences between Bleached and Unbleached all-purpose flour. In this week’s Tip, I want to discuss the same topic but as it relates to cake flour.

Cake flour is a fine-textured flour made from soft wheat. It has a very low protein content, usually around 7-8% as opposed to 10-12% for all-purpose flour. There is also something called pastry flour. It also made from soft wheat but has a protein content just above that of cake flour – about 8-9%.

Since cakes are meant to be tender, you want to reduce the gluten content. This is the purpose of the low-protein cake flour. Almost all cake flours are bleached with chlorine & bromated. (For a review of this topic as it relates to AP flour, see last week’s Tip.) Cook’s Illustrated’s science editor explains that “this process damages the starch molecules and allows for greater absorption of moisture and fat by the flour, which in turn results in moister, more tender baked goods.”

Recently, though, some manufacturers have begun to offer unbleached cake flour. A major player in this market is King Arthur Flour. This product supposedly simulates this moisture attraction without any chemicals. There were two other companies offering unbleached cake flour: Hodgson Mill and Bob’s Red Mill. Since writing this, the former company was sold and I know longer see this product as available. The latter recently discontinued their unbleached cake flour. (They do continue to carry unbleached pastry flours and they recommend their Unbleached White Fine Pastry Flour as a substitute.) I will still mention it below as it was the flour that was tested by one expert. August 2024 update – Although the Bob’s Red Mill pastry flour is no longer on their website, it appears you can still purchase it from Amazon and a few other online outlets.

When Cook’s Illustrated tested the King Arthur product, they found it performed just as well as bleached cake flour. Stella Parks of Serious Eats had a differing viewpoint. In this article, she lists a number of advantages of bleached (chlorinated) cake flour. Note, though, that her testing was only with angel food cake.

She states that the bleached cake flour is not only whiter in color but is also “conditioned”. The chlorine slows the rate of starch gelatinization in flour, thus improving gas retention. This results in a higher rise. It also raises the temperature of protein denaturation, once again giving the cake more time to rise. Additionally, it lowers the pH of cake flour from an average of 5.9 to about 4.8. The lower pH inhibits browning, an aspect that is great for an angel food cake.

When testing the unbleached cake flour, she found that the batter soaked up excess moisture and set too quickly. This inhibited the rise of the cake. Again, the discussion was only about angel food’s cake.

The Cake Blog did a testing of 6 different flours in making a traditional (not angel food) cake. This tester had a very positive view of the unbleached cake flours. A short summary of the results is shown in the following chart.

Type of FlourHeight of cakeTextureColorFlavor
Unbleached AP flourShortestCoarseDeep ivoryWheaty
Unbleached pastry flourModerateMildly coarsePale ivoryMildly sweet
King Arthur unbleached cake flourMediumMed-fine crumbMediumMildly sweet
Bob’s Red Mill unbleached cake flourMedium-tallFine crumbPaleMildly sweet
Softasilk bleached cake flourTallestFine crumbPaleMildly sweet

I must add one caution for those of us at high altitude. Baking cakes at higher altitude can certainly be a challenge. I have written a Cooking Tip on this problem. Using cake flour with its lower protein content may hamper getting good results at altitude. Some experts recommend staying totally away from cake flour. Others will use a mixture of cake flour & AP flour. Some recommend using half & half while others recommend 1/3 cake flour and 2/3 AP flour.

What to make of all this? If you want a great angel food cake, I would probably recommend going with a good bleached cake flour. If not, give one of the unbleached cake flours a try. Let me know what you think.

Cooking Tips · Ingredients

Flour – Bleached or Unbleached?

Flour is one of those pantry stables that most of us could not live without. I wrote an earlier Cooking Tip on all the different kinds of flours we have available to us. If you did not receive it and wish to read it, email me and I will forward it to you. For this current Cooking Tip, I want to focus on the difference between Bleached and Unbleached all-purpose flour. Cake flour is a different product, which I will address in an upcoming Tip.

There are two aspects to the debate on these flours. First, there are health concerns related to the use of chemicals added to flour. This is something that I leave to you to decide for yourself. The other aspect is how the flours act in our kitchens. That is what I will be discussing.

According to Harold McGee in On Food & Cooking, “freshly milled flour makes a weak gluten, a slack dough and a dense loaf.” These properties improve as the flour ages. Doughs made with aged flour will have more elasticity and structure.

Besides the structural differences, freshly milled flour tends to be yellowish in color. The aging process helps to change the color to white. Flour can be aged naturally but it takes 1-2 months. As millers began to understand this natural process, they began to use bleaching agents to chemically whiten the flour.

Some of the bleaching agents are banned in other countries. Although there may be limits on amounts, in the US, the FDA allows the use of many such chemicals. For a list, see this link.

The bleaching process does compromise some of the flour’s nutrients and results in a lower protein content, but these are often added back to the flour.

Another fact of which to be aware is that unbleached flour may also be treated with chemicals, usually potassium bromate, but it is treated with far less chemicals than bleached flour.

Bromated flour is flour which has been enriched with potassium bromate, a maturing agent which promotes gluten development in doughs. It is often used in bread production as it is said to make the bread stronger, more elastic and with bigger rises. It also bleaches the flour slightly. It is often used in low protein flours, which do not develop sufficient gluten. Some commercial bakers use this type of flour because it yields dependable results, and it makes a stronger, more elastic dough which can stand up to commercial baking tools. Ascorbic acid has replaced potassium bromate as a food additive in a number of areas as there is some concern that potassium bromate is a potential carcinogen. It has been banned in some countries and in California, the presence of potassium bromate requires a warning under Proposition 65. That regulation mandates warnings about the presence of chemicals that have been shown to cause cancer, birth defects or reproductive harm. The FDA lists it as an approved optional ingredient in bread.

In terms of how the flours act in our kitchen, the bleaching process produces a whiter and finer ground flour, which leads to baked goods that are softer in texture and brighter in color. Although not required, it is often recommended for cookies, pie crusts, quick breads, muffins & pancakes. Unbleached flour will have an off-white color and will not be as fine in texture. It is recommended when you want more structure such as yeast breads and pastries.

According to Cook’s Illustrated, “In baking tests, bleached flour was criticized for tasting flat or having ‘off’ flavors (texturally, the flours behaved the same). These characteristics, however, were much harder to detect in recipes with a high proportion of ingredients other than flour, such as cornbread or oatmeal cookies.” They did not find a discernable taste difference in savory applications such as thickening a sauce.

Cooking Light quoted Sharon Davis, of the Home Baking Association staff, “The difference between bleached and unbleached flour is basically indiscernible to the home baker. The bleaching process helps commercial bakers with consistency. Spread, texture, volume, and quality of grain must be exact each and every time but for the home baker, the only thing bleach has to offer is a whiter bread or cookie. “

They also did a testing among a panel of Cooking Light food editors and test kitchen professionals by testing four different recipes in a side-by-side comparison using bleached and unbleached flour. They tested sugar cookies, vanilla pound cake, buttermilk biscuits and brioche. The testers were unanimous in concluding that substituting unbleached flour did not compromise the result. In some cases, the tasters actually preferred the result with unbleached flour. They detected a slightly nutty, earthier flavor in the buttermilk biscuits made with unbleached flour as well as a slightly fluffier texture. They concluded that for the home baker, “bleached flour merely offers visual appeal – a whiter, brighter flour that only sometimes translates in the final baking product.”

In today’s stores, you can easily find unbleached flours. For some companies such as King Arthur Flour and Bob’s Red Mill, unbleached is the standard. King Arthur states that none of their flours contain any bleach, bromate, or artificial preservatives. Bob’s Red Mill says that their white flours are not bromated or bleached. Their white flour does contain malted barley flour, an ingredient they say has the same effect as bromating without adding chemicals. It does add a little extra sugar, which they say produces a stronger gluten reaction. Although King Arthur does not mention this, a look at the ingredient list shows that they also add malted barley flour. Bob’s Red Mill organic flour does not contain malted barley flour but King Arthur’s organic flour still lists this as an ingredient.

I tend to use King Arthur’s All Purpose flour and have not had a problem with it. What about you? What do you use? Have you noticed a difference in bleached vs unbleached flour? Why do you choose one over the other?

Let me know and as always —- Happy Baking!