Cooking Tips · Techniques

Making chocolate mousse

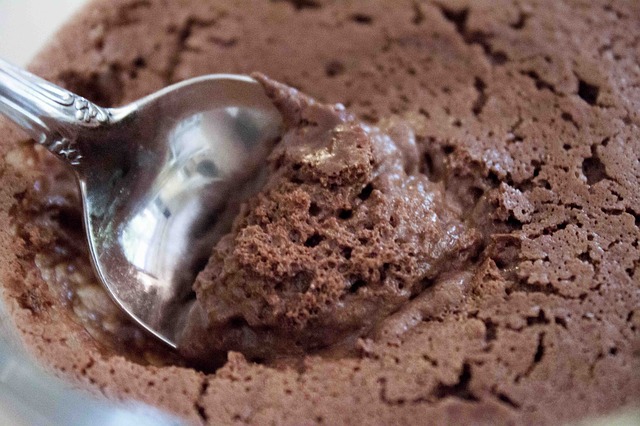
I am preparing to teach a class on French cooking. One of the desserts I will be doing is a classic chocolate mousse. It really is a wonderful dish to have in your repertoire for entertaining friends and family. There are a myriad of recipes out there but, in this Cooking Tip, I would like to explain the different styles of mousse so you can decide what would be best for you. These are general categories and you will find many variations on them. However, this will give you a solid start on understanding mousse.

A mousse always has two components. There is the base, which is the flavor, such as chocolate. Then, there is the lightener, which is something added to the base to make it airier, such as whipped cream or whipped egg whites.

The first style is called a Quick Mousse and that is just what it is. Start with melted chocolate and fold whipped cream into it. Mousse done!

A second style is Anglaise style. An additional step of making a crème anglaise is required. Crème anglaise is a custard sauce made from egg yolks, sugar, vanilla and dairy such as cream and/or milk. It is often the starting point for making ice cream. This warm anglaise sauce may be used to melt the chocolate. Alternatively, the chocolate may be melted on its own and then combined with the anglaise. After thoroughly incorporating the two, whipped cream is then folded into the mixture.

If you want to make a mousse without dairy, there is the Meringue-style mousse. In this case, you need to make a meringue with egg whites & sugar and then use that to lighten your chocolate base. The meringue can be either an Italian or Swiss meringue. I will discuss the different types of meringues in an upcoming Cooking Tip.

Pâte à bombe is similar to a meringue but is made from cooked sugar syrup and egg yolks (rather than whites), which are then whipped up into a light, creamy consistency. Add to melted chocolate and then fold in whipped cream.

A Pastry Cream mousse starts by making a pastry cream, which is a thick custard made with milk, eggs, sugar, cornstarch (or a mixture of flour and cornstarch) and flavoring. The resulting pastry cream can be used to melt the chocolate and then lightened with either whipped cream or whipped egg whites. This type of mousse works wonderfully as a filling for cakes, tarts or pastries.

A Bavarian mousse is great when you want to make decorative shapes. Because it is set with gelatin, you can unmold it and it will retain its shape.

Although you can make chocolate mousse from any of the above methods, the resulting taste and texture will be different. Which would be your favorite? You may just have to try them all before you can decide! If you do, be sure to let me know your thoughts.


Cooking Tips · Techniques

Is sous vide cooking for you?

A friend of mine decided to give her husband a sous vide machine for Christmas. She knew I had one and asked me how I liked mine. That sparked me to write this Cooking Tip for those of you who might be getting one yourself for Christmas or just want to know more about it.

Let’s start with basics – what is sous vide cooking? “Sous vide” is French for “under vacuum”. It refers to the method of cooking food in a sealed plastic bag (traditionally vacuum-sealed) in a water bath with very precise temperature control. Many high-end restaurants have long used this technique for producing perfectly-cooked and delicious food, especially steaks. With the advent of affordable home kitchen sous vide machines, this is now something that we can all use.

Why would you want to consider investing in one of these machines?

  1. No over-cooking – since the food is normally cooked at the temperature at which you will be serving that food, there is almost no risk of overcooking your food and ruining your dinner.
  2. Even cooking – since the food is surrounded by water at a precise temperature, the food cooks evenly without over-done or under-done spots.
  3. Hands-off – just like your slow cooker, most of the cooking time is “hands-off”. Great results with little effort!
  4. Less moisture loss – when cooking meat in a skillet, the outer layers get much hotter in a quicker time and this leads to moisture loss. It is why we rest meat after cooking to allow the meat to reabsorb this moisture. When cooking sous vide, there are no such “hot spots” and due to cooking at a lower and steady temperature, there is much less moisture loss and no need for a rest after cooking.

Tenderizing tough cuts – with sous vide cooking, you can hold tough cuts of meat at lower temperatures for longer periods of time, which leads to more tenderizing.

Are there any downsides to sous vide cooking?

  1. You need to purchase a sous vide machine. If you have a small kitchen with little storage, you need to consider if you would use it enough to justify the cost and the storage space.
  2. It is not quick cooking. Since the food is cooked in a gentle manner, it takes longer for the item to be cooked thoroughly. It is usually a matter of hours, not minutes. However, it is mostly hands-off time. Yes, you need to plan ahead but that is no different than if you were using a slow cooker.
  3. Sous vide cooking does not result in a nicely browned and crispy exterior. You will need to add a step – that of a quick, high-heat sear to obtain this result.
  4. Cooking sous vide precludes making a good pan sauce since very little fond develops when doing a quick sear. For a prior Cooking Tip on the importance of fond to sauce making, email me and I will send it to you.

If you are looking to get into sous vide cooking, some of the most highly rated machines for home cooking are the Joule, the Anova, and the Sansaire. Mine is made by Kitchen Gizmo and I have been very happy with it.

Here are some pictures of my set-up and then making a succulent,
perfectly cooked chicken breast for dinner.

Sous Vide Set-Up

Sous Vide with chicken breast cooking

Perfectly cooked (but pale) chicken breast

Perfectly cooked & then seared chicken breast

Do you have a sous vide machine?
If you do, let me know how you like it and what wonderful delights you have made with it!

Cooking Tips · Techniques

When should you buy organic?

Do you buy organic foods? If so, why do you buy them? Is it because you perceive they are healthier? Do you think they are safer? Do they taste better? Are they better for you? Organic foods are a huge industry in today’s world. They are usually more expensive than the non-organic version. Is it worth it? There are very strong feelings on both sides of the “organic vs conventional” debate. However, the only one who can answer “is it worth it” for you and your family is you. One caveat is that more research probably needs to be done and the results of any future research could alter the current thought on organic foods.

When speaking of produce, there are two lists with which you might want to be familiar. These lists – The Dirty Dozen and The Clean 15 – are put together by the Environmental Working Group (an organization of scientists, researchers and policymakers) to help consumers know when they should buy organic and when it is unnecessary. These lists were compiled using data from the United States Department of Agriculture on the amount of pesticide residue found on non-organic fruits and vegetables after they had been washed using high-power pressure water systems. (Note, these lists just address the presence/absence of pesticides/chemicals. They do not address taste, nutritional value or other concerns.)

The fruits and vegetables on “The Dirty Dozen” list, when conventionally grown, tested positive for at least 47 different chemicals, with some testing positive for as many as 67. All the produce on “The Clean 15” bore little to no traces of pesticides, and are considered safe to consume in non-organic form.

The top four items that this Working Group recommends buying organic are strawberries, spinach, nectarines & apples. On the cleanest list are avocados, sweet corn, pineapples & asparagus. To see the complete lists, here is a link to 2018 Shopper’s Guide to Pesticides in Produce.

It is interesting to note that organic farming does not mean that there are no pesticides used, only that the pesticides themselves are certified organic. This usually means that they are “natural” rather than “synthetic” but there are some synthetic chemicals that are allowed in organic farming. And, many scientists have concluded that organic pesticides pose the same health risks as non-organic ones.

As of now, no one can say for sure whether organic food is more nutritious than conventional food. Although some studies have shown higher levels of Vitamin C, some minerals & antioxidants, experts say the differences are too small to have an impact on overall nutrition.

When you are considering poultry, meat and dairy products, the main advantage to organic is that the animals are raised without antibiotics. There is some concern that antibiotic use might be leading to an increase in antibiotic-resistant bacteria. Reports also say organic milk contains about 60% more omega-3 fatty acids than non-organic.

What is the cost? A 2015 Consumer Reports study showed, that on average, organic foods are 47% more costly than non-organic. As this is an average, you will see a significant range of cost differences depending on the food and the store. Interestingly, a study in the Proceedings of the National Academy of Sciences found it only costs farmers 5-7% more to use organic methods.

Some industry professionals recommend concentrating more on “Buying Local” with the hopes that those fruit & vegetables are fresher and seasonal. Locally-grown produce does not mean it is necessarily organic although it may be depending on the farm. If you have the space & ability, there is no more local than growing your own produce. In that case, you will have no questions as to how or where it was grown.

As I said in the beginning, only you can decide if you want to go organic and to what extent. Just know there are arguments on both sides but the science, to this point, does not seem to support a strong preference for organic.

Most importantly, eat a diet high in fresh fruits and vegetables. The nutrients that are found in those items are so necessary in your diet and resulting health.

Cooking Tips · Ingredients

Paprika Galore

My husband wanted to smoke a chicken the other day and I was happy for him to do so! The poultry rub he was using called for paprika. When he went to my spice drawer, there were three different varieties from which to choose. How many do you have in your spice cabinet? My favorite spice store, Savory Spice, (This is an affiliate link and I may earn a commission if you decide to purchase.) sells six different paprikas. Another popular spice shop sells four. What is with all these different varieties and when do you use which one?

Paprika is a spice made from ground red peppers. It is not made from any one pepper and is often a variety of peppers. Its flavor can range from mild to pungent. Its color ranges from bright orange-red to deep blood-red. Most commercial paprika comes from Spain, South America, Hungary & California.

In the spice shop, you will see some paprikas labeled sweet, some hot, some smoked & others may have a combination of those terms. The difference comes from the specific variety of pepper and how the pepper is processed.

The most common is sweet paprika. It may also be called “Hungarian paprika” or just “paprika”. It is very deep red in color and has a subtle flavor. In actuality, the Hungarians list eight different varieties of Hungarian paprika ranging from mild to very hot. In the US, if you see a bottle labeled “Hungarian”, it will most likely be of the sweet, less hot variety.

Smoked paprika is a Spanish innovation and is produced by slowly smoking & drying the peppers over an oak fire. This gives the product a rich, smoky quality. You may see the term “Pimenton” when referring to this Spanish smoked variety. There are three versions:

  1. Dulce – sweet & mild

  2. Agrodulce – bittersweet, medium hot

  3. Picante – hot

Two varieties of pimenton (Pimentòn de Murcia & Pimentòn de la Vera) have actually been given “Protected Designation of Origin” by the European Union. This means they cannot be given these names unless they are produced using traditional techniques and come from these specific regions of Spain.

Another protected product is Piment d’Espelette. Although not truly a paprika, it is similar in that it is also made from ground peppers. These peppers are grown in the Basque region of southwest France. Its flavor is said to be bold & warm. The peppers are hung to dry in the sun for at least 15 days and up to 3 months. There is also a version from California, called Piment d’Ville.

When should you use which variety? If your recipe just calls for “paprika” and does not specify which kind, it is best to use the Hungarian, sweet variety. Smoked paprika is recommended for seasoning grilled meats or if you want to add a smoky flavor to your dish. The hotter varieties are great for soups, stews or chilis.

Have fun and experiment with the different paprikas. Whether you just want to add a dash of color, a mild spiciness or something more bold, there is a paprika for you!

Cooking Tips · Techniques

Egg White Foam

Have you heard of the term “Egg White Foam”? It is a culinary term that describes what happens when you beat egg whites – they increase in volume and turn into a foam. It is what you do when you want to make an angel food cake, a meringue or a soufflé. This tip will go over how to achieve the best foam, what could go wrong and the adjustments that those of us who live at altitude need to make.

If you read about how to whip egg whites, you will probably run across many Dos & Don’ts. As with so much cooking advice, these rules keep getting passed on without anyone stopping to test whether they are really true. In this Cooking Tip, I have sought out real research to help you have success.

  • The temperature of the egg whites can make a difference.
    Warmer egg whites may whip up faster but you can still easily whip cold egg whites. It may take slightly longer but it is not a game-changer.

  • The age of the egg whites can make a difference.
    There seems to be a debate among experts but the general consensus is that older egg whites whip up faster but the resulting foam will be less stable than if you had used fresher egg whites. So, decide based on which is more important to you –volume or stability. Or, just use what is in your refrigerator knowing that the age can make a difference.

  • Your bowl can make a difference.
    The basis for this rule is that plastic bowls may harbor grease on their surfaces which is hard to eliminate with washing. This grease may inhibit the forming of a great foam. If given the choice, it is best to use a glass or stainless-steel bowl. However, if plastic is all you have, just make sure it is clean. You will probably be OK.

  • Don’t add salt to your foam.
    Adding salt used to be recommended to help stabilize the foam. It has been shown that salt, in fact, can act as a destabilizer. If your recipe calls for salt, add it to the dry ingredients, not your egg whites.

  • Cream of tartar is a good idea.
    Cream of tartar helps to prevent overbeating of your egg whites, which can lead to a recipe failure.

  • Be careful of when you add sugar to your foam.
    If you add all the sugar at the beginning, it inhibits the foam’s capacity for holding air. If you add it slowly only after you have soft peaks & a significant increase in volume, you allow the foam to incorporate the necessary air. Also, adding it slowly helps to prevent the sugar crystals from popping your wonderful air bubbles.

  • Don’t overbeat your egg whites.
    This is one rule that is actually very important. Overbeating your whites is another thing that will lead to that dreaded recipe failure. Most recipes will specify what you should do – beat your whites to soft peaks or stiff peaks.

Soft peaks do not stand up on their own and will start to become glossy. Stiff peaks will be sharp and not droopy. Overbeaten whites will look dry or even lumpy. You may also see a watery mess at the bottom of the bowl. If this happens, there is no solution. You must dump them out and start over.

Once you reach soft peaks, it does not take much time to get to stiff peaks. It is so easy to overbeat. So, it is better to under-beat. This is especially true at altitude. Let me give you an example. Some recipes for soufflés call for you to beat to stiff peaks. However, if you do this, your soufflé will probably not rise. When you put it in the oven, all those beautiful air bubbles will pop and deflate before the surrounding cake has time to set.

If you beat only to soft peaks, you will get much better results. When you tilt the bowl containing the egg whites, they should still move just a tiny bit. These air bubbles can retain their volume while the surrounding cake sets – giving you a beautiful risen soufflé.

  • Beware of getting fat/yolk into your egg whites.
    As with so many things, this is partially true. Fat does inhibit creating a nice foam. It will take longer to beat up to peaks, the volume will be less and the resulting foam will be less stable.

The other side of this is that it depends on how much fat gets into your whites. Will a speck of yolk destroy your foam? No. Will a larger amount of yolk cause you problems? Yes, depending on how much yolk and how many whites you are beating. Here is a link to a great site with photos that actually tested this theory.

  • Don’t beat too quickly.
    For the best and most stable foam, start out beating slowly. Use a low or med-low speed. The whites will lighten in color, develop large air bubbles & look foamy. As you continue to beat at this speed, the foam will start to increase in volume, become whiter and the size of the air bubbles will decrease. As the bubbles become even smaller, you can increase to medium high to achieve your desired peak.

The holidays are a great excuse to make that wonderful, special dessert such as a meringue or a souffle. With these tips, I trust you will have success. Let me know and send me a picture of your results!

Cooking Tips · Ingredients · Techniques

Thanksgiving Left-overs — make sure they don’t make you sick!

Are you a lover or hater of leftovers? I’m definitely a lover – not only is the flavor of some dishes enhanced by a rest overnight in the refrigerator but it is great to have an easy & quick meal sitting there after a day of work. It makes life so much easier. One time that you will surely have left-overs is after a Thanksgiving meal. You can do so much with those left-overs but you need to store them in the best and safest way. That is what I will be talking about in this tip.

Hot foods (including leftover turkey) should be packaged and refrigerated within 2 hours after serving. (For turkey, after you cut the meat off the bones, save the bones to make a great turkey broth.) The concern for bacterial growth is when food is left in the “danger zone” between the temperatures of 40° and 140° for more than 2 hours (reduce this to 1 hour if the ambient temperature is above 90°). That is why it is important to keep your food hot (at least 140°) or refrigerate it so the temperature drops to less than 40° within 2 hours. For cold foods, keep it under 40° at all times.

For large pieces of meat, it is best to cut it into smaller pieces to quicken cooling. For a dish such as soup, you will want to portion it into shallow containers to allow faster cooling. You can place these items directly into the refrigerator or if you want more rapid cooling, use an ice water bath.

All leftovers should be wrapped well in air-tight packaging. This helps keep bacteria out while retaining moisture and preventing your left-overs from picking up other odors from your refrigerator.

Most left-overs can be stored safely in the refrigerator for 3-4 days. Here is a chart from the USDA about recommended refrigerator times. For longer storage, freeze the packaged left-overs. Generally, these items can be frozen for 2-4 months. Although you can safely freeze them for a longer time, the food does tend to lose moisture and flavor. Here is another USDA link that talks more about freezing with more specific recommendations for time.

When thawing them, you still need to be aware of the danger zone. That is why it is not recommended to thaw items by sitting at room temperature. Rather, thaw them overnight in the refrigerator. For faster but still safe thawing, use either a cold-water bath (make sure the leftovers are in a leak-proof package) or the microwave. Not all foods need to be thawed before re-heating. You can go directly from frozen to hot either on the stovetop or in the microwave.

One important caveat – when re-heating leftovers, you want to take them up to 165° as measured with a food thermometer. Not only will this temperature assure safety as far as bacteria is concerned but it will also be safe to re-freeze the item, if necessary.

How do you like to use your Thanksgiving left-overs?
Email me with your favorite ideas and I will share them with others!

Cooking Tips · Techniques

Dishwasher Dos and Don’ts

I presume that most of you reading this Cooking Tip have a dishwasher in your house. During the five years that we lived in England, I did not. I must say that I very much missed having that appliance. Even now, as I write this, my dishwasher is running contentedly in the background. Even though I use that dishwasher almost every day, I still do a fair amount of washing dishes by hand. That is because there are things that really shouldn’t go in the dishwasher. This Cooking Tip is about just that – what not to put in your dishwasher.

  • Knives & other utensils with sharp edges
    First, there is always the safety issue. What if you forget the knife while unloading or someone else unloads it not realizing the knife is in there? That is an accident just waiting to happen. Beyond that, though, it is terrible for your sharp utensils. Not only does it dull the sharp edges, it can also damage handles.

  • Pots/Pans
    I know what you are thinking – this is what I want my dishwasher to do for me. Clean those dirty pots/pans. Personally, I don’t put any of my pots/pans in the dishwasher. They cost too much and I don’t want to risk damaging them. Experts say that pots/pans that are fully stainless steel are probably OK to go in there. However, they strongly recommend against putting others in the dishwasher. That list includes cast iron, nonstick pans, enameled cast iron, copper pots & aluminum cookware.

  • Fine china, crystal or other fragile dishware
    Although it is possible to successfully run these through the dishwasher, do you want to take the risk of breakage?

  • Wooden items such as cutting boards, salad bowls & spoons
    It is obvious that wood is very porous and can be damaged by moisture & heat. I must admit, though, I do occasionally throw my wooden spoons in. After all, they are pretty inexpensive to replace.

  • Some plastics
    Although there is still debate among experts, some worry that repeated exposure of plastic items to the dishwasher (and microwave) can degrade the plastic and could possibly be a health hazard. Only you can decide if that is an issue for you. Beyond that, though, the high heat of the dishwasher can warp some plastic items.

  • Items with hollow handles or thermal insulation
    This includes whisks, old-fashioned ice cream scoops, thermos bottles, pans with hollow handles, etc. I must admit that this was a new risk to me. What happens is that water can seep into the hollow space and then, when it is later heated when you are using it on your stove, the water turns to steam and if enough steam builds up, it can blow out of the hollow space. One person reported this happening with a stainless-steel pan that they had repeatedly put in the dishwasher. Upon using it on the stove, it exploded and shot across the room. This sounds a bit extreme but, even if it doesn’t explode, the water could still lead to rusting, the development of mold and/or the destruction of the insulation.

  • Bottles with labels/adhesive on them
    These labels will come off during the cycle and can clog or damage your dishwasher.

  • Graters/zesters
    The dishwasher never gets those holes clean and can damage the sharp grating edges.

So, yes, use your dishwasher. It is certainly well-used in my kitchen. However, it will never, unfortunately, totally replace having to hand wash some items.

Sigh!!

Cooking Tips · Techniques

Boiling, simmering, poaching — what is the difference?

When you read a recipe, you will often see instructions to bring something to a boil, cook at a simmer, poach in a liquid or so forth. Have you ever thought what those terms mean or if they really make a difference? When my husband (who is a good cook) insists that any bubbles means it is boiling, I tell him that the amount and vigorousness of the bubbling makes a difference. Even though he is often right (don’t tell him I said that), this is one time he is not totally correct.

As you heat water in a pan on the stove, you will first see bubbles at the bottom of the pan. These bubbles rise slightly in the pan but then collapse. As the water gets hot not only on the bottom but throughout, these bubbles rise all the way to the surface before it collapses. This is the point at which your water is considered boiling. If you live at or near sea-level, this will be at 212°F. As I mentioned in a prior tip, that number drops by 2° for every 1000 feet above sea level. For example, at 5000 ft water will boil at approximately 202°F. Once it reaches true boiling, the temperature of the water will not increase despite what you do with the heat level of your burner. So, to decrease the chances of boiling over the pot, decrease your heat source to keep the liquid at a gentle boil. As long as it remains at a boil, the temperature of the water will be the same.

What foods do you cook in boiling water? Pasta, some grains and even vegetables. Cooking vegetables quickly in boiling water helps to retain their flavor and color. This is called blanching and is often followed by a dunk in ice water to prevent over-cooking. Boiling is great for reducing the volume of a liquid such as when you want to concentrate it. Boiling should not be used for more delicate foods which might be harmed by the agitation of the boiling water.

The term “simmering” is sometimes called a “gentle boil” although some experts will argue with that term and say it is not a boil at all. It may be defined as “just below a boil”. You may see bubbles on the sides and bottom of the pan but they should disappear if the liquid is stirred with only an occasional bubble breaking the surface. The water temperature is usually around 180°–200°. It is used to cook foods more slowly and gently. It is also what you aim for when making soup or stock. Simmering over a period of time creates a depth of flavor in those dishes that you will not get in quicker cooking.

Poaching is a technique of cooking a food item in a liquid. The liquid should be just barely simmering and the temperature should be around 160°-180° depending on what food you are poaching. If you are poaching fish or chicken, you want to aim nearer 160° as the meat will get tough and dry at higher temperatures. If you are poaching an egg, you will need water about 180°.

Depending on the dish you are cooking, a visual inspection of your water may be all you need. However, it is definitely worth investigating in a good instant-read thermometer. There are many good ones out there but I love the Thermapen from Thermoworks.

Who would have thought there was so much to learn about boiling water? The next time someone tells you they can’t even boil water, think of all you can teach them!

Cooking Tips · Ingredients

MSG — What is the truth?

Most of you have probably heard about MSG, an abbreviation for monosodium glutamate. What you have heard has undoubtedly been negative. I decided to look at some of the research about this substance so you can make an intelligent decision about whether you want to use it in your kitchen.

This substance has long been used to create a taste called umami, which is a savory taste. Think eating a steak or the taste of soy sauce in your dish – that’s umami. The Japanese & Chinese have long used it as a flavor enhancer. In today’s world, though, we are cautioned against ingesting it. It has been supposedly linked to headaches, breathing issues and other problems. As early as the 1960s, people began talking about Chinese restaurant syndrome. This was the presence of certain physical symptoms after ingesting food containing MSG. In full disclosure, when I was in school, I participated in a clinical trial to determine if these health issues were related to ingesting MSG. I don’t recall the results of that particular study; all I remember is that I did not personally react to it in any way.

An interesting article published in U.S. News & World Report sheds some light on this. As they point out, monosodium glutamate is composed of sodium and glutamate. The latter is an amino acid that can be found naturally in foods such as tomatoes, Parmesan cheese and mushrooms. They comment that in the 1990s, scientists began questioning this supposed syndrome partly because Chinese people did not suffer from it despite ingesting it much more heavily than Americans. More studies such as the one I had participated in were done and they demonstrated that most people did not have any symptoms from MSG. These researchers concluded that there is no scientific evidence for the Chinese restaurant syndrome.

One possible benefit from MSG is that it contains two-thirds less sodium than table salt and, therefore, might decrease the need for salt while still enhancing the flavor of your dish.

I am not advocating that you use MSG. There are still some sources that do not believe that it is safe. I am just pointing out that the scientific evidence does not support the relationship between MSG and health issues. Our own FDA considers it GRAS (Generally Recognized as Safe).

If you do want to try it, just don’t overdo it. For a pound of meat, only use ½ teaspoon of MSG. For 4-6 servings of soup and vegetables, ½ teaspoon MSG is best. Adding more than the suggested amount of MSG will not make the food taste better.

If you have no interest in adding this to your food, consider the umami-boosting ingredients such as tomatoes, mushrooms, Parmesan cheese, soy sauce, etc. For example, adding just a small amount of soy sauce to your Thanksgiving gravy can enhance the meaty flavor.

Have fun, do some experimenting and keep cooking!

Cooking Tips · Ingredients

Cooking with Alcohol

You have probably noted that many recipes call for some type of alcohol, whether it be wine, a liqueur or other type of spirit. You may have wondered if the alcohol is necessary or whether you could either leave it out or substitute another liquid. There is also some misinformation out there on how much of the alcohol cooks off with heat. In this tip, I will help you with some of these conundrums.

Alcohol does a number of things in your dish. Here are a few:

• It adds flavors, not only the flavor of the alcohol but it also causes chemical reactions, which produce new flavors.

• It adds acidity.

• The sugar in the alcohol can caramelize, adding a different flavor.

• It can soften harsh flavors & highlight others.

• The fermentation intensifies & concentrates the fruit essence of liqueurs, cordials, brandies & wine.

So, yes, the recommended alcohol generally makes a difference in your cooking. Let me give you an example. I have a recipe for a delicious cake that is filled with a raspberry mixture. It calls for 6 tablespoons of a pear liqueur – not much for the entire cake. One time I made it without the liqueur because I couldn’t find any to purchase. The cake was nothing special and I wondered if I had done anything wrong. The next time I made it I used the liqueur and all the flavor & brightness that I was expecting returned. So, could I make the cake without the alcohol? Yes. Would it taste the same? No.

Can you substitute another liquid such as chicken broth, fruit juice or even water? Yes, but do not expect the end dish to be the same. That doesn’t mean it will necessarily be bad but it won’t be the same. That is why I encourage you to try the recipe as written with the alcohol before you attempt any substitutions.

You do not have to buy the most expensive wine or other alcohol. You may have heard the adage: “Don’t cook with a wine you wouldn’t drink.” That is not true. A 2007 New York Times expert did an experiment cooking different dishes with different wines – all at different price points. What the author found was that “wines that I would have poured down the drain rather than drink were improved by the cooking process, revealing qualities that were neutral at worst and delightful at best.” “Wines of complexity and finesse were flattened by cooking or, worse, concentrated by it, taking on big, cartoonish qualities that made them less than appetizing.” One caution the author made was to avoid wines with abundant tannins as they can concentrate during cooking and become very astringent and even bitter. There are some general recommendations and if you want those, email me. If you shop at a place where the staff knows the alcohol, ask them for recommendations.

One last item I want to cover is that contrary to popular belief, alcohol does not easily cook off. A study done by the US Department of Agriculture showed that even after cooking an item for 30 minutes, 35% of the alcohol remained. After 2½ hours, 5% remained. If you want to read the actual study, email me.

I understand that some people just don’t want to buy alcohol. Neither I or my husband drink any alcohol. However, because of its amazing qualities in the kitchen, I always have some available.