Cooking Tips · Ingredients

Unusual Vegetables

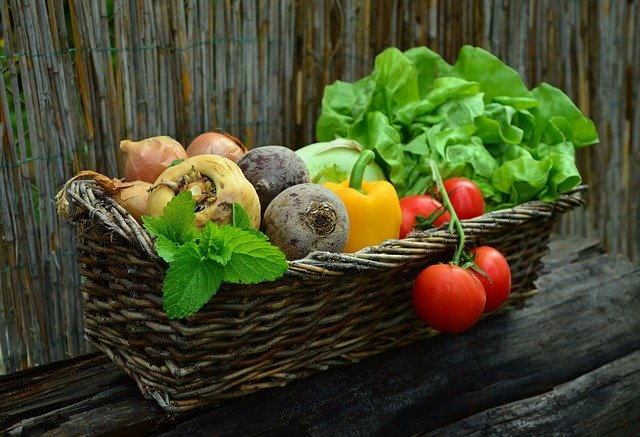
I have written a fair amount about fresh produce in prior Cooking Tips. Now, I would like to talk to you about what some people might call “Unusual” vegetables. They are only unusual in that many people either do not know what they are or have never tasted them before. In this Cooking Tip, I hope to encourage you to seek them out and give them a try.

Fennel

This is a crunchy veggie with a refreshing and complex flavor. Because it is often mislabeled “sweet anise”, many people shy away expecting it to taste like licorice. However, the flavor is sweeter and more delicate than anise and when cooked, becomes even lighter. Fennel is not anise. They are unrelated plants. One large difference is that the entire fennel plant is edible but only the seeds of the anise plant are edible.

There are two types of fennel. The one I am discussing is called “Florence Fennel” or “Finocchio”. It is cultivated in the Mediterranean, and has a broad, bulbous base with wispy fronds. (Fennel pollen is the golden powder taken from blooming fennel flowers.)

The other kind of fennel is common fennel. This is where we get fennel seeds. The plant does not have a bulb. Rather, the stems and greenery are used just as with the Florence variety and is considered more of an herb rather than a veggie.

To prepare it, cut off the stalks and trim a thin slice from the base of the bulb. Halve it from top to bottom, through the root end. Cut out and discard the triangular piece of core in each half. Peel off and discard any outer, wilted layers. Now, you may cut each half in half again and then slice crosswise. You may also use a mandoline to get very thin, shaved slices. The fronds may be chopped and sprinkled as a garnish. It may be eaten raw or cooked.

Fennel is freshest from late fall to early spring. Look for firm, tightly packed bulbs with fresh, unwilted fronds. Avoid any with bruises or brown spots. After purchasing, it can be refrigerated in a plastic bag for up to 5 days
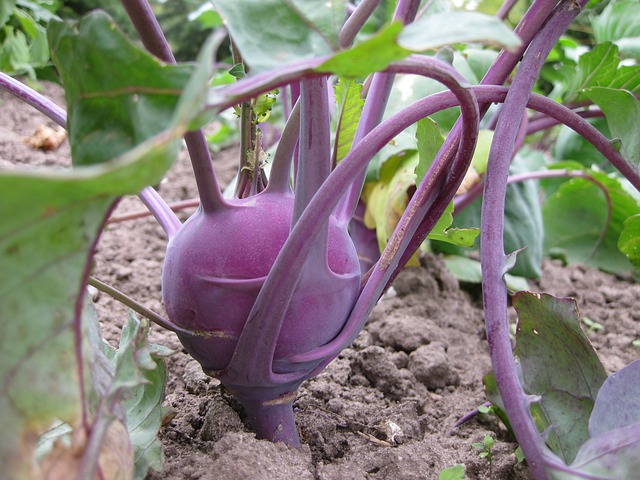
Kohlrabi

This is a version of the basic cabbage plant in which the main stem swells to several inches in diameter. It is a member of the turnip family. In fact, the name comes from the German for “cabbage turnip”.

There are two varieties: Green & Purple. The green version has a pale green bulb and green leaves with light green veining whereas the purple has a purple root, stems and purple veining on green leaves. Both varieties have a creamy white flesh. One source says its flavor is reminiscent of a “sassy-sweet blend of mild broccoli and celery root”.

Both the bulb-like stem and the greens are edible. Young kohlrabi are tender enough to eat raw or cooked briefly. The leaves or stems are also edible and can be used in sautés and stir-fries. The leaves are said to have a flavor similar to collard greens. Kohlrabi is most often sold without leaves. If the leaves are still attached, separate the bulb from the leaves. The bulb should be peeled and sliced prior to being consumed. The smaller bulbs won’t need to be peeled, while the larger bulbs tend to have less flavor, with a thicker, chewy peel.

It can be sliced or shredded and tossed in your salad in its raw form, where it will add a fresh, crisp texture with a sweet yet mild peppery bite similar to a radish. It can also be roasted, stir fried or added to a soup or stew. The greens may be cooked just as you would kale, turnip, or beet greens with just a quick sauté.

To prepare it, cut off the stems and any leaves. Cut it in half down through its center and slice into quarters. Use the tip of your knife to cut at an angle through the core and discard it. Using a sharp vegetable peeler, peel off any tough skin. At this point, slice off the top and then slice the quarters into your desired size. For thinner slices, a mandoline may be used.

Choose a kohlrabi that is heavy for its size but no wider than 3 inches. The green leaves should be firm and deeply colored. Avoid soft spots with yellowing leaves. When stored properly in the crisper drawer of the refrigerator, kohlrabi can last for weeks. The leaves can be refrigerated for up to 4 days.
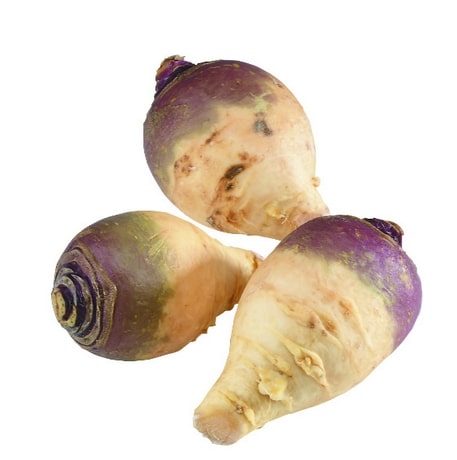
Rutabaga

Rutabagas are also known as Swedes and they are a root vegetable that’s related to both the cabbage and the turnip. Some people confuse rutabagas with turnips. They are related, but rutabagas are generally larger, have a more yellowish flesh and are more mild tasting. They are also denser than turnips and will require a longer cooking time.

Due to being related to both turnips and cabbage, they share flavor characteristics. They can have the peppery, bitter bite of turnips but can also be creamy and sweet if roasted.

Cooking them is easy. They can be cooked until tender and then added to mashed potatoes. They may also be roasted or pureed into a soup.

It is recommended to choose smaller roots (under 5 inches in diameter) to ensure they’re tender. Avoid cracks, bruises, soft spots, or wrinkles. Rutabagas are freshest in the late fall and winter. They may be white or yellow.

As many rutabagas are sold waxed, be sure to scrub the outside before peeling it. Then, just cut into your desired shape.

Pick out rutabagas that are firm, smooth and heavy for their size. They can be refrigerated in a plastic bag for 2 weeks.

Parsnip

Although parsnips look like carrots and are related to them, they are a different root vegetable. They can be eaten raw although they are usually cooked.

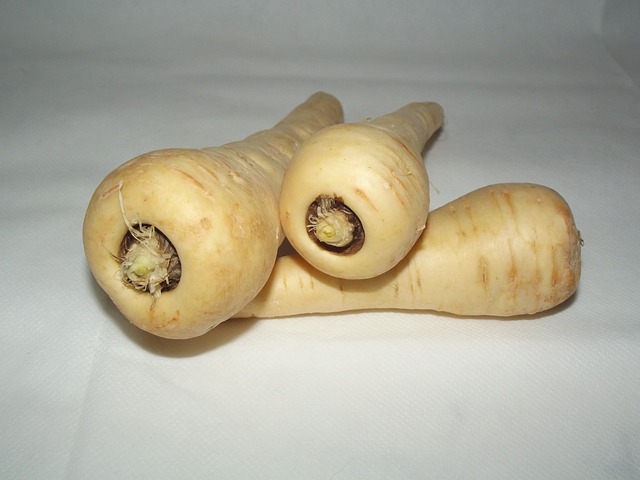
Some chefs recommend only giving them a thorough scrubbing rather than peeling as they say most of the flavor is right below the skin. The larger ones have a woody core. I like to cut this out although Cooks Illustrated finds this to be unnecessary if you are going to puree them rather than another application such as roasting. Popular ways of using parsnips include mashing, baking, broiling or pureeing them into a soup.

They are at their peak from fall through early spring. They accumulate more starch than carrots but then they convert it to sugar when exposed to cold temps. This results in the winter roots being sweeter than autumn roots.

Look for ones that are small to medium in size with an ivory color and a firm texture. Avoid any that are soft, shriveled or blemished.

Experts say you can store them in the refrigerator for up to 3 weeks although I find they don’t last quite that long.

Celery root

Also known as celeriac, this is another root vegetable that has a crisp & firm texture. Its roots project from a knobby surface that requires deep peeling.

It tastes somewhat like celery because it has similar aromatic compounds as celery but the flavor sweetens with cooking. It can be grated or cut into fine matchsticks and added to a salad but it really shines when made into a mash (either on its own or in combination with other veggies), baked or roasted.

Choose small, firm ones with a minimum of knobs. They are not the easiest to peel and you may find that a knife works better than a veggie peeler.

It can be refrigerated in a plastic bag for 7-10 days

There are other even more unusual vegetables. These, though, are ones that you can probably find in your grocery store. If you haven’t tried them, I encourage you to do so. You may just find a new favorite veggie!

Cooking Tips · Techniques

Water-Based Ganache

I am taking my own advice and that which I shared with you in a prior Cooking Tip. That advice is to try a new recipe. I have been wanting to experiment with water-based ganache and I decided there is no better time than now. My experience is the subject of this Cooking Tip.

I’m sure you have heard the old adage (and I’m sure I have even repeated it) that you should not get water in chocolate or it will seize. Well, as it turns out, that is only partially true. I began to wonder about this when I first learned that the chocolates from one of my favorite chocolate shops, The Chocolate Therapist in Littleton, Colorado made their signature “meltaways” with a water ganache. So, I decided to do a bit of research.

It is true that if you get water into your chocolate, it will seize and turn grainy. Many “experts” will tell you that if that happens, there is nothing you can do. You must throw it away and start again. As I said, that is only partially true. If you get a small amount of water into your chocolate, it will indeed turn grainy. However, if you add a bit more water and stir, it will turn into a beautiful glossy mixture. Why is that? If you want a scientific discussion of this phenomenon, see this link from Fooducation.

Why use water rather than cream for your ganache? The pure & simple answer – Flavor. Dairy actually mutes the flavor of chocolate. By not using cream, the true flavor of the chocolate shines through. Of course, that means you want to use a high quality chocolate. There are so many artisan chocolate makers around today and their chocolates have complex & varied flavors. With a water ganache, you can actually taste those wonderful flavors.

Another reason is for your lactose-intolerant friends or family members or for those who choose not to eat dairy. As long as you use a good quality dark chocolate without any milk in it, they also can enjoy these treats. A final advantage is that the caloric content is 40-50% less than in a cream-based ganache.

The method for making water-based ganache is similar to that based on cream. Start by chopping your chocolate into very small pieces. You can heat your water (or other liquid), pour it over the chocolate, allow it to melt the chocolate and stir vigorously. Alternatively, you can melt your chocolate, heat your liquid and then mix together.

The ratio of chocolate to water you use depends on the final product you want. Some will tell you to start with a 1:1 ratio and that will work if you want a pourable chocolate. However, if you want something that you can turn into a truffle, you will need a minimum of 2:1 (chocolate to water) or even a bit higher.

You can also add a bit of fun by using not just plain water but flavored waters in all forms. For instance, citrus-infused water, steeped tea, juices or even liqueurs.

My first attempt was with white chocolate and lemon juice. The person who shared that recipe with me said it reminded her of lemon curd and they truly do taste like that.

I next tried dark chocolate with orange. Instead of juice, I used an orange liqueur. However, I felt like I wasn’t getting enough orange flavor. I did not want to add more liqueur as it would thin out the chocolate and make the result taste a bit too alcoholic. So, I used just a bit of orange oil and that did the trick.

My final truffle was chai flavored. I brewed very strong chai tea and used that as my flavoring liquid. The chai flavor was evident but not extremely pronounced. I may try another method that I found. Put your chocolate in a plastic container and add the dry tea to that container. Since I only use loose-leaf tea, I would put it into a disposable spice bag or something similar. Leave it for about a week, stirring it around every so often. The tea flavor is said to infuse into the chocolate. When you are satisfied with the aroma, use hot water to make your ganache and enjoy.

Let me know if you try these. I enjoyed them so much that I am not sure if I will ever go back to the cream-based ganache!

Cooking Tips · Techniques

Cook Without a Recipe — Part Three

This is the final in a series on Cooking Without a Recipe. After stocking your pantry, learning about tasting and how to cook grains (Part One) and learning how to cook proteins and make a sauce (Part Two), we now turn to two final subjects – Vinaigrettes and Pizza.

Vinaigrettes are something that are wonderful to make at home and, after learning some basics, you can have fun and never have to look at a recipe. The most basic formula for making a vinaigrette is one part vinegar or other acid to 3-4 parts oil. This is not an absolute rule, though. Adjust it to your tastes. I know I prefer a little less oil. I often do only a 1:1 ratio or, at times, I eliminate the oil entirely.

This is one of those recipes that have very few ingredients. Therefore, you want the best quality ingredients you can get. Here are the basic ingredients that you will need.

Oil – Most commonly, you will use extra virgin olive oil (EVOO). You may use other oils with a flavor you like or even a combination of oils.

Acid – Use whatever you like and matches your salad. It can be any type of vinegar, even flavored vinegars. Other acids are citrus juices as well as fruit purees/nectars. I often like to combine a fruit flavored vinegar with some of the actual fruit. For example, I use a peach vinegar along with pureed peaches.

Seasonings – This might just be salt and pepper but could also be minced garlic, minced shallots, mustard, spices or herbs. You may want to add a touch of sweetness in the form of honey, maple syrup, sugar, agave, etc.

No matter your choice of ingredients, the technique is the same. Start by putting the acid & seasonings in a bowl and mix well. Now, you want to force the oil (if using) to mix with the water-based liquid. This is called emulsifying. You can do this by vigorously whisking, shaking in a jar or even using a blender. One caution is that some experts think that putting EVOO in a blender leads to bitterness. Others disagree. Once it is emulsified, taste and adjust to your preference. You can taste it on its own or you may wish to dip of piece of lettuce into it and taste that way.

A final topic I would like you to consider is Pizza. Pulling together a homemade pizza night is something that is so helpful to have in your arsenal of quick and easy meals.

Although you do need a recipe for the dough (if you want one, let me know), you can have fun after that. I try to make pizza dough, divide it into pizza balls and freeze them. Whenever I want pizza or a quick meal, all I have to do is to remember to take the pizza balls out of the freezer and allow to thaw. I can then make a pizza from whatever I have on hand.

The first thing to think about is that you do not always need a sauce. Just a brush of a good olive oil can take the place of a sauce. If you do want a sauce, you can always grab some store-bought sauce although I hope you wouldn’t do that. Simply grab a jar of roasted red peppers, blitz them in a blender and spread on your pizza crust. You can also simply blend tomatoes (fresh or canned) but you will get better flavor if you marinate those tomatoes with some olive oil, garlic, herbs and seasonings before using them. Or, how about pesto as your sauce? Again, it would be great if you make your own but you can buy it in the store. Generally, the refrigerated version is better than the canned.

On to toppings. A basic recommendation is about 1 cup of topping per pizza. I love caramelized onions on almost any pizza but those do take some time. When you have the time, make and refrigerate them. They really are wonderful on pizza. Other veggies such as bell pepper, red onion, mushrooms and zucchini will also work. Even potatoes (I like to par-boil them first), asparagus, broccoli and squash. You may or may not want to sauté them a bit first. If you want a protein, add whatever you like – cooked chicken, shrimp tossed in olive oil, cooked sausage or other ground meat, cooked bacon or pepperoni. Most people think a pizza is not a pizza without cheese although you can make great pizzas without any cheese. If you want cheese, branch out and try something new. The classic is mozzarella but there is also provolone, fontina, asiago, feta, goat cheese and so forth. Finally, add herbs and spices as you desire. You can use dried herbs and spices or fresh. If using fresh, put them on at the last moment before serving. I think I am hungry for pizza!

I hope this series on Cooking Without A Recipe has been helpful to you and you have learned some new skills and make some great meals. If so, let me know. I would love to hear what you are making!

Cooking Tips · Techniques

Cook Without a Recipe — Part Two

This is the second in a series of Cooking Tips on how to Cook Without a Recipe. Part one talked about stocking your pantry, how to taste and how to cook grains without a recipe. This Part Two will delve into cooking proteins without a recipe.

Unless you are a vegetarian or vegan, most people would like some animal protein served with their grain or veggies. Knowing some techniques will help you cook these proteins without a recipe. No matter what protein you are cooking, your goal is a piece of protein that is cooked properly but not over-cooked. As I have discussed before, there is no better way of achieving this than an instant-read thermometer. Knowing to what temperature to cook a piece of protein is important but if you do not want to memorize, by all means use a chart. Here is one (Temp Chart) produced by the FDA.

There are multiple cooking techniques for proteins and you should understand these to help you decide how you want to cook your piece of meat. If you want to cook stovetop, there is searing and sautéing. Searing uses a high heat with a bit of oil. It is preferable to coat your protein with oil rather than putting the oil in the pan. The meat is usually seasoned but there is no coating of any kind. Searing produces a brown coating on the meat with fond left in the pan – the basis of a sauce you can subsequently make.

With sautéing, you use a medium-high heat with oil put in the pan. The meat is usually cut into bite-sized pieces and often (though not always) dredged in flour or cornmeal. This is method that is great for meat that you are going to then add to a dish such as pasta, rice, a bowl meal and so forth.

Animal protein may also be cooked in the oven. This is a nice more hands-off method but you do not get the great browning and resulting fond. Because of this, you may start your meat on the stove with a quick sear and finish in the oven.

Another important concept to remember in cooking meat is that meat needs to rest after coming off the heat. The meat will continue to cook off heat for a few minutes before the temperature starts to drop. Ideally, you want your final resting temperature to be about 5° less than the maximum temperature. How long this takes depends on the size of the meat. For a chicken breast or a steak that is about 1½ inch thick, it will be about 10 minutes. For a very large piece of meat, it could need about 45 minutes. Resting also allows the liquid to stay within the meat rather than leaking out when you cut it, giving you a moister result.

One of the easiest ways to produce a flavorful meat dish without a recipe is to create a Pan Sauce. You need to remember some basic steps but then you can vary it to your heart’s content. Here are the basic steps.

  • Sear meat
  • Add aromatics
  • Deglaze
  • Add liquid & reduce
  • Finish with butter and adjust seasonings

Start by searing your meat and when done, remove to a plate and keep warm. Hopefully you will have some wonderful fond in the bottom of the pan, which represents flavor. You may pour off any excess oil that is in the pan but do not scrape out or clean the pan. Lower your heat to medium and add aromatics such as shallots, garlic, and/or spices. Cook until these are softened and aromatic. Now you want to deglaze the pan with a liquid. This allows you to scrape up the fond and incorporate it into the sauce. The most typical deglazing liquid would be wine or other alcohol. Continue to cook until the alcohol is almost totally cooked off. At this point, add a liquid such as stock and reduce it again. When it is reduced to a sauce consistency, take it off heat and add a pat of butter. This thickens the sauce and adds a wonderful richness to the pan sauce. Taste and season as necessary. You are aiming for a creamy, thick and opaque sauce. That’s it to a basic pan sauce.

Now, dress it up as you wish. What can you do? Add mushrooms along with the aromatics. Add a touch of mustard with the butter. You may add fresh herbs to complement the rest of your dish. A squeeze of lemon or lime juice will add brightness.

Another option is to make a Gastrique rather than a pan sauce. The definition of a gastrique is a sweet & sour sauce or a savory caramel sauce. Rather than being made in the meat cooking pan with the fond, it is made in a totally separate saucepan.

You start your gastrique by making a “caramel” sauce. Put ¼ cup of sugar and 3 Tbsp water in a pan over low to medium heat and cook until you have a caramel sauce. Now, add an acid in equal parts to the sugar. For example, add ¼ cup vinegar, fruit juice, wine, etc. Stand back as the sauce will bubble vigorously. It will also harden but continue to cook and it will return to a more liquid state. Add whatever flavors you want – herbs, ginger, caramelized shallots, fresh fruit/berries, citrus peels, chilis. Simmer to what is termed “nappé”, which merely means a consistency that will lightly coat the food. When done, serve with your choice of protein.

To get you started, here are a few ideas.

For a Cherry Sauce, try:

  • Apple cider vinegar
  • Champagne vinegar
  • Cherry liqueur
  • Dried cherries

For an Apricot Sauce, use:

  • Rice wine vinegar
  • Orange zest and juice
  • Ginger
  • Dried apricots

Another option to serve with your meat is a Salsa. It could be a tomato-based salsa but with meat & seafood, a fruit-based salsa can be wonderful. Use your favorite fruit or combination of fruit. Other great additions are red onion, shallots, chili paper, bell pepper and herbs. After combining everything, it helps to chill to allow the flavors to develop. Just remember to taste and adjust the seasonings before you serve it.

Your challenge this week is to grab your favorite protein, cook it and make either a pan sauce or salsa. Let me know what you make and what you think!

Cooking Tips · Techniques

Cooking Without a Recipe

As we continue our state of being home-bound and we continue to cook at home more than ever, I thought a Cooking Tip to help you practice Cooking Without A Recipe might be fun. I must admit that I am a recipe lover and normally use recipes as I am always testing different ones for use in future classes. However, when one of you booked a class with me to help her to be able to cook without always relying on a recipe (Thanks, Patty!), I thought it was time to organize my thoughts on this subject. If anyone else is interested in booking a similar class for when we can gather again, just let me know.

I will be breaking this topic up into three separate Cooking Tips. In Part One, I will discuss some basics of cooking/ingredients along with a discussion of cooking grains. Part Two will be cooking proteins and Part Three will be about vinaigrettes and pizza.

To be able to cook without a recipe, you need to have a well-stocked pantry. There are all sorts of lists that you can find online but here is one (Pantry essentials) that I put together that works for me. This list is generic in that it doesn’t contain an abundance of ethnic ingredients. If you tend to eat quite a bit of ethnic cuisine, you are going to want to add those sorts of ingredients to your pantry essentials list. Make it a list that works for you and your pantry. Then, try to keep these ingredients on hand as much as you can.

You also want to taste your dish throughout the cooking process, not just at the end. Because you are not using a recipe where the ingredients and amounts of those ingredients have been thoroughly tested to result in a well-balanced and tasty dish, you need to taste all the time. Only with tasting can you make necessary adjustments to get the flavor you want.

The next question then becomes is how to adjust. Generally, you want to adjust in the following order:

  • Salt
  • Acid
  • Balance sweetness, bitterness, fat & umami
  • Adjust the aromatics to give you the proper bite and texture

As you are tasting your dish and saying, “Hmm, it needs something”, the answer is usually salt. After that, try a little acid such as lemon/lime juice, vinegar, wine, etc. Still not right? Add a little sweetness such as sugar or honey. An ideal result would be a balance of all these flavors. Don’t forget texture. Add something to give it a bit of crunch. Cooking without a recipe gives you an ideal time to play around with these ingredients and flavors to see how they work and interact with each other.

Knowing how to cook multiple kinds of grains is very helpful to getting a meal on the table. Expand your view of grains. It is not only rice but is also farro, barley, quinoa, millet, couscous, wheat berries and more. And, with rice there are many kinds such as white, brown, long grain, medium grain, short grain, jasmine, basmati, arborio. For an earlier Cooking Tip all about rice, see this link.

Cooking all grains is basically the same – cooking them in boiling water until they are tender. The questions that we often have is what is the ratio of water to grain. Believe it or not, you can cook all grains by the pasta method. This is cooking the grain in abundant boiling, salted water until it is tender. Check frequently so you do not over-cook it. Drain, put the lid back on and let the grain steam for a just a few minutes. If you prefer to cook in a more standard way, there are tons of grain-to-water ratio charts online. Here is a link (Water to Grain Ratios) to just one.

You might say that anyone can cook grains, which is true. Learning to cook without a recipe, though, involves turning those grains into your own delicious dish. This can be done in a number of ways – none of which involve an actual recipe.

First, try cooking your grains not just in water but something more flavorful. Depending on what final flavor you want, it might be broth, orange juice, coconut water or jasmine tea. When you first try it, you may want to try part water and part other flavorful liquid. You could also add aromatics such as onion, garlic, bay leaves, citrus zest, etc. to your grain as it is cooking. Gently toasting the grain before adding your liquid is another trick.

Next would be add-ins to give flavor, color and texture to your grain. Fresh herbs are a wonderful idea. Dried fruit or nuts, cooked veggies, pesto, salsa and cheese are all other ideas for add-ins.

Maybe instead of a grain you want a starch such as potatoes. Potatoes on their own are wonderful and they can be baked, roasted or mashed – no recipe required. To make them your own, try adding other veggies such as parsnips, celery root, carrots, squash and so forth. Add-ins as we discussed with grains are another idea to enliven your potato dish.

So, get your pantry in order and let’s be creative. Keep your cookbooks closed. Don’t rely on the internet. See what sort of delightful grain dish you can come up with and let me know. Stay tuned for next week where I will help you cook that protein without a recipe.

Cooking Tips · Techniques

Don't fear cooking seafood!

Cooking seafood often instills fear in people. I can understand why. Good seafood is not inexpensive and over-cooking it is all too common. I do enjoy a good seafood dish but I am unhappy when it is dry and overdone. In this Cooking Tip, I want to help you turn out that perfect plate of seafood. This Tip will not cover all seafood, just some of the most popular. Nor am I going to discuss the topics of sustainability, environmental concerns or mercury content. I will leave that for you to research and make your own decisions. I am merely going to talk about cooking seafood. Some of the links below are affiliate links and I may earn a commission if you decide to purchase.

The fattiness or leanness of the fish species helps to determine proper cooking methods. Cooking methods are broken into moist cooking and dry cooking. Moist cooking methods include poaching, steaming, cooking en papillote and simmering. Dry cooking methods include baking, broiling, grilling and sautéing – either with or without cooking fat.

Fatty fish are especially well suited to cooking with dry heat. For example, baking or broiling are a good choice and these methods actually help to cut down on the oiliness of the fish. You can also use the dry heat method with the addition of fat. Just do not use so much that you cause the fish to be greasy. However, fatty fish can also be cooked with moist heat.

Lean fish are best cooked with moist heat as it helps to preserve the moistness of the fish. If you wish to use a dry cooking method, consider basting the fish in butter or oil. Or, the lean fish can be sautéed or fried with the use of oil.

If you are not sure about the fat content of the fish, ask at the fish counter. Briefly, fatty fish include salmon, mackerel and herring. Trout is considered to have a medium level of fat. Lean fish include orange roughy, bass, cod, flounder, haddock, Mahi-Mahi, grouper, snapper, tilapia and tuna.

The main problem I see with cooking fish is overcooking it. Most fish do not take very long to cook. An average recommended cooking time is 8-10 minutes per inch of thickness. Remember that there is going to be some carry-over cooking and, therefore, you can remove it from the heat when it is just slightly underdone. You can gauge this by visual changes. It is easy to see the color change with salmon. It is more difficult with white fish. You may need to use a paring knife and look inside. If the flesh is still translucent, it is still underdone. Perfectly cooked fish should be opaque but still flaky and moist. Overcooked fish is dry and falls apart easily.

The FDA states that fish with fins should be cooked to 145° or until the flesh is opaque and separates easily with a fork. Shrimp, lobster, crab, and scallops should be cooked until the flesh is pearly or white, and opaque.

Thermoworks recommends the following:

  • Salmon – 125°
  • Halibut – 130°
  • Lobster – 140°
  • Scallops – 130°
  • Shrimp — 120°

Cook’s Illustrated recommends:

  • 120° for wild salmon
  • 125° for farmed salmon
  • 135° for whitefish

Let me discuss a few particular types of fish.

Salmon – I covered salmon in detail in a prior Cooking Tip. Refer to that article for more information.

Scallops – Scallops are wonderful, sweet and delicate but can easily be turned rubbery and unappetizing by improper cooking.

The experts will tell you to always choose “dry” scallops (vs. “wet” scallops) at the store. Wet scallops (aka treated scallops) have been soaked in a liquid solution containing phosphates that is supposed to prolong their freshness. However, the scallops also absorb the water, which you end up paying for since you buy them by the pound. This water evaporates as they cook, which can lead to the following problems. First, the water that is released causes them to steam and it makes it more difficult to get that nice caramelized crust. As the water evaporates, you end up with smaller and tougher scallops. The phosphate may impart a slightly soapy flavor to the scallops. It is generally easy to discern treated scallops as they will usually appear very white in color.

“Dry” is the seafood industry term for natural or untreated scallops. They look more tan in color. They are preferred because they are easier to sear and get the desired caramelization, they taste sweet & natural and you are not paying for added water. That said, I think it is very hard to find dry scallops in your supermarket. To obtain these, you probably need to visit a quality seafood market or order online.

Whatever scallops you purchase, they should be cooked quickly over high heat. Pat the scallops dry. To prevent more moisture from exuding from the scallop, hold off on salting until just before they go in the pan. Leave space between them so they do not steam and cook very quickly over high heat. A typical large scallop only needs about 90 seconds per side. Allow them to rest for a few minutes before serving.

Shrimp is another very popular type of seafood. If not done before you buy them, you need to peel and devein the shrimp before cooking. They can be broiled in as little as 2-3 minutes. Boiling is another common method of cooking shrimp. For a 1 pound of shrimp, bring 4 cups water along with 1 teaspoon salt to a boil. Add shrimp and simmer, uncovered, 1 to 3 minutes or until shrimp turn opaque, stirring occasionally. Drain and rinse shrimp in a colander under cold running water.

You may also cook them on the stovetop by heating a skillet over medium-high. Add oil to hot skillet and then add the shrimp. Cook 3 to 6 minutes until shrimp are pink and opaque.

Seafood is something all of us should increase in our diet. It is also such a quick and easy ingredient to cook, making it perfect for a quick weeknight meal. Just watch it and don’t overcook it. If you do that, I am sure you will enjoy a seafood meal!

Cooking Tips · Ingredients

Dried vs. Canned Beans – Is there really a difference?

Last week’s Cooking Tip was all about peas, a type of legume. Beans are another legume that most of us consume. This Cooking Tip will discuss the differences between dried and canned beans and how to cook them.

Beans can be categorized differently but one of the major categories is Dried vs Canned. Which do you use? Does it make a difference? Canned beans actually are dried beans but they have already been cooked. Therefore, you can use them without soaking or simmering them for hours. These are certainly more convenient but, as with most convenience foods, there is a downside. The canned beans sit in a brine in the can, which can draw out starches & proteins, leading to an alteration in texture and flavor.

Do you need to soak dried beans? This is usually recommended for dried beans as it softens them and decreases the cooking time. It is also thought that some of the elements that lead to gastrointestinal symptoms are leached out during the soaking. Serious Eats found that smaller beans with thin skins such as black beans actually do better without soaking. They did a testing with black beans by cooking them three ways. (Note that this test was only done with black beans and does not translate to all dried beans.)

  • Soaked in water overnight and then cooked in the soaking water.
  • Soaked, drained, rinsed and cooked in fresh water.
  • Cooked without any soaking.

Their results showed the following:

  • Time – un-soaked black beans only took an additional 20 minutes to cook.
  • Color – the darkest beans were those that were not soaked or were cooked in the soaking water.
  • Flavor – soaked and rinsed beans were the least flavorful. The other two methods yielded similar flavor. Another interesting finding is that if you add aromatics to the cooking beans, the most flavorful result was the un-soaked beans.
  • Texture – not much difference here but the beans that were un-soaked or those that were cooked in the soaking water were creamier due to the fact that you are not rinsing away the starch.

If you are cooking larger and thicker-skin dried beans, soaking is recommended. The age and quality of the bean are other factors as the lower quality they are and the older they are, the more they will need a soak. Since this is very difficult to assess when you are buying dried beans, it is probably smart to err on the side of soaking. Of course, the longer they sit in your pantry, the more they dry out and the more they will need soaking.

Should you salt the cooking water for dried beans? Serious Eats recommends salting, saying that the sodium helps to release magnesium & calcium from the beans. These elements give beans their rigidity and decreasing that leads to softer and creamier beans. They recommend that you season your soaking liquid with one tablespoon of kosher salt per quart of water. Drain and rinse the beans before cooking in lightly salted water. Cooks Illustrated agrees with this advice.

The procedure for cooking dried beans begins with sorting through the bag of beans and discarding any that are off-color or damaged as well as any stones you may find. Rinse them to remove any dust or dirt. Unless you are using black beans or you know you have very fresh beans, opt for soaking. Cover the beans with water. Since the beans will double (or more) in size, use enough water so they will stay submerged as they plump out. Add salt as discussed above. Allow to stand at room temperature for four to eight hours. If more than eight hours, refrigerate them. However, do not soak more than 24 hours. Drain and cook.

To cook, cover with fresh water and season with salt. Add flavorful aromatics such as onion, carrot, celery, garlic, leeks, fennel and herbs. Bring to a boil and then reduce heat to obtain a gentle simmer. More vigorous boiling can lead to disintegration of the beans. As you are cooking, skim off any foam that develops. It is difficult to recommend a definite cooking time. It is better to just test the beans periodically until they are tender without any firmness or graininess. When done, remove from the heat and allow them to cool in the water. If they are close to being over-done, put the pot in an ice bath and allow to cool.

One caveat about cooking dried beans at altitude. Because of the lowered boiling point at altitude, cooking beans will take longer than suggested in most recipes.

Some experts recommend adding a small amount of baking soda to speed up the cooking process. Do not use more than 1/8 teaspoon per pound of beans to prevent an off-flavor from developing.

There is a quick-soak method that some recommend. It is to cover the beans with salted water, bring to a boil, remove from the heat and allow to stand one hour before draining and cooking. This does shorten the overall time but it also results in decreased nutrient levels.

There are other methods such as using a pressure cooker, a slow cooker or your oven. Those that promote the oven method claim it is second only to the pressure cooker in quickness of cooking, it cooks the most evenly and is the least likely to burst the beans. Some say that soaking is not required with oven cooking but others still recommend it with larger and older beans as they do cook faster and more evenly. After draining the beans, put them in a large oven-safe pot with enough room for the expansion of the beans. Add seasoning and aromatics and cover with water by at least an inch. Bring to boil on the stove. Bake in a pre-heated 325° F oven for 75 minutes and check for doneness. Continue cooking until done, once again realizing that it may taker longer at altitude. The Kitchn cautions that with red kidney beans or white cannellini beans you should boil on the stove for 15 minutes to ensure toxins that are present in raw/undercooked beans are eliminated. Still others advocate a cooler oven (250°) and cooking for a longer time, 6-8 hours.

With a pressure cooker (something I do not own), it is said that presoaking is not necessary but if you do not soak, you are more likely to end up with beans that have split open. Here is a great source for using your pressure cooker (or Instant Pot) with a chart for cooking times. It even includes recommendations for altitude adjustments.

For a slow cooker, the same pros/cons of presoaking your beans apply. Drain and put the beans in your slow cooker and place aromatics on top. Cover with water by two inches. Add salt and stir to dissolve. Cover and cook on low for 6-8 hours (remember altitude may lengthen this). Start checking after about 5 hours and then every 30 minutes until done. Some people will cook on high, which results in the beans being done in less time. Sources do not recommend using the slow cooker for kidney beans due to the toxin issue. Here is a link to a source discussing this issue of Red Kidney Bean poisoning.

Cooking canned beans takes much less time. Be sure to drain and rinse them as they are in a very starchy and salty liquid. They should be cooked for at least 30 minutes to allow them to absorb the flavors of the recipe.

What if your recipe calls for dried beans but you only have canned beans? You need to know how to covert from one to the other. Cooks Illustrated recommends using 58 ozs of canned beans for every pound of dried beans.

Serious Eats tested a number of different types of beans and created the following chart.

Type of BeanWeight DriedEquivalent Cooked
Cannellini1 pound2 lb. 8 oz. (6.5 cups)
Chickpeas1 pound3 lb. 4 oz. (7 cups)
Red Kidney1 pound2 lb. 7 oz. (6.5 cups)
Pinto1 pound2 lb. 5 oz. (6.5 cups)
Black1 pound2 lb. 5 oz. (7 cups)
Black-Eyed Peas1 pound2 lb. 13 oz. (6.5 cups)

What’s your favorite way to use beans – baked beans, hummus, soups, stews? Whichever it is, I trust this Cooking Tip will help you on the way to success!

Cooking Tips · Techniques

Help in the Kitchen When You Need It!

As so many of us are trying to keep our distance from others and adapt to the new (albeit temporary) reality of working from home and having children off from school, I wanted to offer a bit of help in the kitchen. I am departing from the normal weekly Cooking Tip for this purpose.

First, I have written an article entitled “Great Tips to Improve Your Cooking.” You can find this free download on the Home Page of this website. It has tons of great tips to help you improve your cooking skills, produce great meals and have fun doing it.

To thank you for downloading it, I am offering $25 off a future cooking class. This can be done in the form of a gift card to be redeemed when we are all able to gather again. I can understand not wanting to meet in person right now. If anyone is interested in cooking instruction done via an alternate way such as telephone, email or even video, let me know and we can discuss how that might happen.

With the current situation, we all have an added incentive to cook at home. If you find yourself with a bit more time to cook, let me share an excellent recipe. This is from Cooking Light. It is a wonderfully flavorful and healthy dish called Mediterranean Chicken and Bulgur Skillet. It is a one-pan dish that is a meal in itself. It is also a great way to try bulgur if you have never tried it before. The dish does call for kale but I swapped this out for some fresh chard from my husband’s greenhouse garden. It was a quite yummy swap. It is easy to make, is filling, is healthy and is delicious. What more can you want? Let me know if you try it.

If you are indeed finding you have more time in the kitchen, you may want to make larger batches of meals that freeze well. I find this so helpful on those busy days when I have no time (or desire) to cook an evening meal. Why not try cooking or baking something you do not normally make? Perhaps some wonderful homemade bread. Maybe a special dessert when everyone is about to go stir crazy. Get the kids involved and make your own pasta or pizza dough.

There are so many ideas. Please let me know if I can help you during these trying times. Let’s all stay strong, help each other and maintain our faith. This will pass and the sun will shine on the other side!

Cooking Tips · Ingredients

Peas in a Pod

I was making a delightful pea salad the other day that contained three types of peas along with arugula. I also added some of my husband’s micro pea greens, which made it even better. With spring coming and the memory of this salad, I thought the subject of peas might make an interesting Cooking Tip.

A pea pod is actually a fruit and the peas inside are seeds. Some of the pods are edible, while others aren’t due to the fibrous and tough nature. There are three types of peas that you are most likely to find in your supermarket: English peas, sugar snap peas and snow peas.

When you say peas, most people will think of English or garden peas. These are the ones we find in the freezer section. Supermarkets rarely carry the whole, fresh pods as customers really do not want to shell them. They would rather have someone else do that for them. They must be shelled as the pods are too tough to digest.

If you are a gardener, there are many varieties (or cultivars) of garden peas that you can plant. In the store, though, the particular variety will not be listed.

Snow peas are also known as Chinese pea pods. They are flat and the pods are edible. The seeds inside are not allowed to plump out before harvesting. They can be eaten raw or briefly cooked. Just as with garden peas, there are a number of cultivars that can be grown.

Sugar snap peas are a cross between English peas and snow peas. Once you remove the strings, the entire pod is edible either raw or after blanching. The pods are sweeter and rounder than snow pea pods

Another word you will see on some packages of peas is “petite” or in the French, petit pois. As the name implies, they are smaller but they are also more tender and sweeter in flavor. This is my preferred variety.

In my local supermarket right now, I can buy fresh snow peas and fresh sugar snap peas. The only garden peas to be found are frozen. This is not a bad thing, though, as frozen vegetables are picked at the height of ripeness and quickly frozen to preserve their flavor and nutrient level. I think frozen vegetables are a great item to keep on hand and are not necessarily inferior to fresh varieties, especially out of season.

Peas are very easy to prepare. They can be boiled, steamed, stir fried, or microwaved. They can be added to foods such as salads, omelets, quiches and savory pies. They only require a brief cooking time and can even be eaten raw. Try not to over-cook them. One exception might be if you are making the very British dish – Mushy Peas. Although you can make mushy peas from garden peas, they are traditionally made from a variety called marrowfat peas, a large, starchy and mature pea that is left to dry outside in the field.

Are you a lover or hater of peas? If the latter, could it be you have only had inferior and over-cooked peas? I encourage to try some wonderful and tasty peas cooked to perfection. They are one of my favorite side dishes and are especially nice when the different varieties are combined in the same dish. Spring is coming. Enjoy the produce!

Cooking Tips · Ingredients

Microgreens – Tasty, Colorful & Packed with Nutrition

As many of you know, my husband has a full-time job but is also a part-time gentleman farmer. He keeps chickens and bees as well as growing fruit trees, berry bushes and all sorts of vegetables. He has a greenhouse, which keeps us in fresh greens for much of the winter. He has recently become interested in growing Microgreens and I thought that would make a good Cooking Tip topic.

Many of you have probably heard of baby greens, especially baby spinach. Baby greens are small versions of fully mature plants that are picked before they are fully grown.

My husband’s micro pea greens

Microgreens are similar but are cut even younger in their growing lives. They are the first, tiny shoots of herbs, lettuces and other greens. They are usually grown in soil and require sunlight. They are harvested between 7 & 14 days after germination and are under 3 inches tall. Because of their small form, the flavor is said to be more intense than the mature greens.

Microgreens are different than sprouts as the latter are obtained by sprouting seeds in water to achieve germination. They are harvested within 2-3 days. As you may have heard in the news, sprouts do carry a higher risk of bacterial contamination that can cause illness. This concern has not been found with microgreens although caution is recommended depending on how the greens are grown, harvested and stored. Be sure to wash them thoroughly before consuming.

It is said that all the nutrients that you would find in the mature plant are packed into the microgreen version. That makes it possible to amp up the nutritional value of your salads (or other dishes) by adding just a small amount of these greens. Therefore, they are said to be nutrient-dense. One caveat is that the nutrient content can vary widely depending on where the microgreens are grown, when they are harvested and the kind of soil used.

The U.S. Department of Agriculture and the University of Maryland conducted a scientific analysis of nutrients in microgreens. The results were published in the Journal of Agricultural and Food Chemistry and were summarized in The Salt in 2012.

According to the study, “The researchers looked at four groups of vitamins and other phytochemicals – including vitamin C, vitamin E, and beta carotene — in 25 varieties of microgreens. They found that leaves from almost all of the microgreens had four to six times more nutrients than the mature leaves of the same plant. But there was variation among them – red cabbage was highest in vitamin C, for instance, while the green daikon radish microgreens had the most vitamin E.”

Some caution, though, that the amount nutrients can vary depending on how and where it is grown, handled and harvested. Not only are additional studies needed to evaluate the effect of these agricultural practices on nutrient retention but also to compare microgreens to their mature counterpart. Finally, according to the Agricultural Research Service, “no known study has been conducted to evaluate whether consumption reduces cardiovascular disease risk factors.”

In a 2018 issue of The Journal of Agricultural and Food Chemistry, the authors state that not only are they easy to grow but, “microgreens are environmentally friendly and serve as excellent sources of various nutrients.” They conclude that, “based on existing literature, microgreens appeared to be excellent low-caloric sources of nutrients and bioactive components. Based on their chemical compositions, we propose that these nutrient-rich plants may provide health-promoting effects related to abilities to prevent the development of the vast array of inflammatory-related chronic diseases.”

They do end with stating that more studies need to be done “to fully realize the value of microgreens in human health.”

Here is just one list of popular microgreens.

AmaranthArugula
BasilBeets
BroccoliCabbage
CarrotsCelery
ChardChia
ChivesCilantro
DillFennel
Garden cressKale
MintMizuna
Mustard greensParsley
RadishRadish
SunflowerWatercress

Microgreens do have a very short shelf life, only a few days. They are not always readily available in grocery stores but they are easy to grow – even without a greenhouse.

There are many ways to include microgreens in your diet. We throw them on our salads but you can also add them to sandwiches and wraps as well as blended into smoothies. Add them to omelets or sprinkle them on pizza.

Whether you toss them on your salad for color, for taste or for nutrition, microgreens are a great addition!