Cooking Tips · Techniques

Candy Making at Altitude

The temperatures outside are definitely telling us that Fall is here. And, with possible snow showers on the horizon, some of you may be beginning to think about the holidays. If you love to cook, that often means making holiday food gifts. What do you like to make for holiday gifts – cookies, candied nuts, chocolate truffles, caramels or something else? For those of us that live at a higher altitude, some of the items can prove challenging. In this tip, I will explain how altitude can affect your candy making and how to make adjustments.

Making candies such as caramels or hard candies is much more scientific than savory cooking. You must pay attention to proportions of ingredients, the techniques involved and, especially, temperature. The latter is where we get into trouble at altitude.

At sea level, water boils at 212°F. For every 1000 feet above sea level, that number drops by 2°F. For example, I live at 6000 feet. My water boils right around 200°. These 12 degrees can make the difference between a soft chewy caramel and a dangerous weapon.

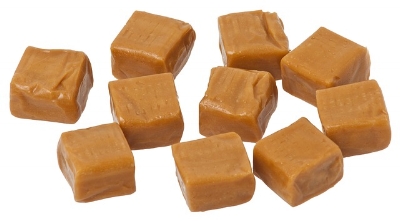
When making candy, the recipe almost always directs you to cook the mixture to a specific temperature. For example, one of my favorite recipes for Apple Cider Caramels calls for cooking the ingredients until they register 248°F on a thermometer. That may work in San Diego, California but if you do that here, you end up with little rocks – not what your Christmas gifts are meant to be.

To have success, you need to lower your desired temperature 2°F for every 1000 feet above sea level. In my kitchen, that means I cook it only to 236°F. Then, I end up with those yummy, soft and chewy delights that will make your recipients smile!

There are many other ways in which altitude wreaks havoc with your cooking & baking. We will cover some of those in future tips. In the meantime, you can always email me with your questions.

Happy Baking & Happy Candy Making!

Cooking Tips · Techniques

Your best roast turkey ever!

Thanksgiving is just around the corner. Do you always want a roast turkey on your table? Does the time involved in roasting a turkey frustrate you? I want to introduce you to a different way to roast your turkey (or a chicken) that will not only take less time but will also produce less dry and more tender results. That method is Spatchcocking or Butterflying your bird.

Part of the problem of roasting a turkey is that the white meat is often overcooked and dry by the time the dark meat is done. There have been many suggestions made to resolve this problem; some work better than others and some are much more work than others. One method that is relatively easy and works wonderfully is butterflying (or spatchcocking) your turkey so it lies flatter in the oven.

This involves cutting out the back bone with good poultry shears, turning the bird over, flattening the breasts and roasting on a rack set over a rimmed baking sheet. If it is difficult to visualize this, take a look at this video.

Thanksgiving is such a wonderful time of the year but getting Thanksgiving dinner on the table can also be one of the most stressful times. There are strategies for combating this stress and they involve advanced planning, having a schedule that takes you from planning the menu to your shopping trips to the actual cooking to the finished dinner. Along with this, having an easier and better way to cook your turkey will lead to smiles all around the table.

Happy Thanksgiving to you and your families!

Cooking Tips · Techniques

Sauces demystified

I recently taught a class entitled “Mastering Sauces”. Since sauces are such an important part of cooking, I thought I would share just a bit about sauces from that class. There are many different methods of making a sauce. Let’s just cover a few.

Reduction sauces may be the easiest and are the basis of what is called a “Pan Sauce”. I have written a prior Cooking Tip on this. If you didn’t receive it and wish to, please email me.

Another type of sauce is “Starch Bound”. These are sauces that are thickened with the use of a starch such as flour, cornstarch, arrowroot, etc. The basis of these sauces is usually a roux. Roux is just a mixture of flour and fat, 50/50 by weight. For example, you melt 2 ozs of butter and then whisk in 2 ozs of flour. When you mix this roux into a liquid, it will do its magic and thicken the sauce.

Examples of these kinds of sauces are Béchamel and Velouté and their many derivatives. Béchamel is a white sauce where you thicken milk with a white roux. This is the lovely sauce that is often used in lasagna or mixed with cheese to make a macaroni and cheese. Velouté is made from white stock thickened with a white roux. This is what we normally call gravy.

What type of starch you should use depends on what results you want. A grain-based starch (flour, cornstarch, rice) gives you great thickening but does look slightly opaque when it is cool. It can actually set up into a gel that can be sliced or molded. It can be re-heated without thinning out but should not be frozen as it can get watery when thawed.

A root or tuber starch (arrowroot, potato starch, tapioca starch) is great when you want the product to be clear and glossy when set. Although it thickens well, it does thin some when it cools. It will thin if reheated but does freeze and thaw well.

Here is a little chart so you know how much starch to use.

STARCH Amount for 1 cup medium sauce

GRAIN STARCHES (opaque gel)
Cornstarch 1 Tbsp + 1 tsp
Flour 2 Tbsp
Rice starch 1 Tbsp + 1/2 tsp

ROOT & TUBER STARCHES (clear gel)
Arrowroot 1 Tbsp + 1 tsp
Potato starch 2 1/4 tsp
Tapioca starch 1 Tbsp + 1 tsp
Quick tapioca pudding 1 Tbsp + 1/4 tsp

There is so much more to making great sauces but this little teaser should, at least, help you to make that great Thanksgiving gravy!

Cooking Tips · Techniques

Take your bread for a whirl in your food processor

When a recipe calls for bread crumbs, do you grab for a canister from your pantry? While that may be OK in a pinch, homemade bread crumbs are so very easy and a much better choice. This is especially true if, like me, you have a partial loaf of bread on your counter that is starting to dry out.

All you have to do is to tear your bread into chunks, toss into your food processor & whirl it into crumbs. Some like to cut off the crust but others like the color & texture from including the crusts. Package the crumbs into zip-lock bags and store in your freezer. That way, you will always have bread crumbs for when you need them.

It is nice to toast part of the crumbs to make dry bread crumbs while processing the rest as fresh crumbs. To make toasted bread crumbs, preheat oven to 250ºF. Cut your bread into large chunks. Put on a baking sheet in a single layer and bake for about 10 minutes or until the bread is completely dried out. In a very humid environment, some suggest turning off the oven after baking for 10-15 minutes and letting the baking sheet sit in the oven overnight. Be sure to label your bags as to whether the crumbs are toasted or not.

What if your recipe calls for one slice of bread, processed into crumbs and all you have available are your great, homemade frozen crumbs? It is hard to come up with an equivalency because of the variables of type of bread, size of the slice, how finely processed, etc. However, one source I trust has produced this chart.

1 slice bread, 1.5 oz Frozen Crumbs Frozen, toasted crumbs

Finely processed 2/3 cup 1/3 cup

Coarsely processed 1 cup 2/3 cup

What about those Panko breadcrumbs? Panko is lighter, crispier, and airier than regular breadcrumbs. Because of this, it is especially nice for breading fried foods although that is not the only use. Since these are made from a type of Japanese white bread that is cooked in a special way, most experts say it is next to impossible to re-create in your home kitchen. You will find recipes, though, that attempt to do just this. Let me know if you try them and what you think!

Cooking Tips · Techniques

Improve your bread baking

Are you an avid bread baker? Are you always looking for ways to improve your bread baking? Are you willing to do some simple math? If so, this Cooking Tip is for you. For the rest of you, hang in there and next week’s Tip may be just what you are looking for.

If you bake much bread, you know that temperature matters. Recipes will often give you a general guideline for the temperature of the water. The recipe may list an actual number or may just say something like “lukewarm”. Expert bread makers know that there is an ideal temperature for the bread dough and how to get to that temperature.

The temperature of your ingredients (flour, water) as well as your room temperature will affect the final dough temperature. Another factor is what is known as the “friction factor”. That is how much the temperature of your dough increases during mixing and kneading. This can actually be measured but for the purposes of this tip, we will approximate it. (If you want the technique for measuring it, email me.)

For most wheat-based yeast dough, you want to aim for a final dough temperature of 75-78°. Multiply this temperature by 3. From that number, subtract your room temperature, your flour temperature & the friction factor. If you use a stand mixer to mix/knead your dough, estimate the friction factor of 22-24°. If mixing by hand, use 6-8°. When you subtract those three figures, you end up with your desired water temperature.

Let’s look at an example. Say you want a final dough temperate of 78°. For this example, we will presume your room temperature is 71°, your flour temperature is 72° and your friction factor is 22.

Here’s your formula:

78 X 3 = 234
234 – 71 – 72 – 22 = 69°.
This is what you want your water temperature to be.

A couple of caveats. First, there is a different formula if you are using a preferment, such as sourdough. If you are interested in that, email me. Also, it is best for this to use instant yeast, which will still activate in cool water. However, stir your yeast into the flour and do not add it directly to water under 70°. That is another great thing about instant yeast – there is no need to proof it. Just mix it in with your flour and you are good to go.

What difference in your final bread does this make? Well, with a consistent dough temperature, you will get consistent bread results despite varying room temperatures from day to day or season to season. Also, your bread will end up with the best rise, a great crumb structure and wonderful taste.

Try it and see what you think. Just be sure to share some of that yummy homemade bread with me!

Cooking Tips · Ingredients

Parmesan Cheese — what is it and how do you use it?

Some people love all kinds of cheese; some have a more limited palate and then some of us (including me) have definite likes and dislikes but tend towards the former. One cheese, though, that most of us probably enjoy is Parmesan – and I am not talking about powdered stuff that comes in a green can!

Parmesan is a hard, dry cheese made from skimmed or partially skimmed cow’s milk. It is made in multiple countries but the most famous and sought-after is Parmigiano-Reggiano from Italy. To be called that, there are very strict controls as to how it is made and from where it is made. Not only that, but in 2008, European courts ruled that this Parmigiano-Reggiano is the only cheese that can be called Parmesan. Most of the world followed this ruling but not the US. Here, you fill find a parmesan-style cheese called Parmesan but to be called Parmigiano-Reggiano, it must come from that specific area of Italy.

There are so many wonderful cheeses out there to eat and with which to cook. Many are European but we also have excellent cheese makers here in the US. More and more of our supermarkets are expanding their specialty cheese selection. Get out there and try some. There are bound to be cheeses that will please everyone!

Cheese lovers will tell you that you should only use the “real” thing – Parmigiano-Reggiano. If you choose a cheese labeled as such, you won’t disappointed but it will cost you more than other cheeses just labeled “Parmesan”. I encourage you to do taste tests and decide for yourself. Also, it may be worth the higher price for a cheese board but it might not if all you are doing is grating it on pasta. The choice is yours – and isn’t it wonderful to have such choices?

Another bit of advice for you is not to throw away the rind when you are finished with your Parmesan cheese. When you are finished, toss the rinds in an airtight plastic bag and put in the freezer. Then, when you are making a pot of minestrone or other soup, toss in a rind. Another ingenious use is to make a stock out of the leftover rinds. Here is a link to a recipe to do just that. Once you have the cheese broth, use it in your risottos, pasta dishes or meat dishes.

Cooking Tips · Ingredients

Onions — techniques & applications

Onions – do you love or hate them? Onions are such a ubiquitous ingredient in so much of our savory cooking. When a recipe calls for chopping or slicing them, do you stop to think how you should do this or do you just grab your onion and knife and go to it? In this Cooking Tip, I want to explain why how you do this simple task can make a difference in the final dish.

The first question is whether you want your onions to just melt into your dish such as you would want in a soup or sauce. Or, do you want some texture remaining as you would for French Onion soup or caramelized onions?

If you want the onions to soften, you should cut them crosswise into small pieces. Here is a link to a video on how to do this. (One caveat: I think making the horizontal slices first followed by the vertical is easier.) If you want texture, you should slice pole to pole. This video also demonstrates that.

How you cut up your onion will also change the resulting taste. When you cut crosswise, you cut through more onion cells and this leads to a stronger onion aroma/flavor. When cutting pole to pole, fewer cells are ruptured, leading to a softer/sweeter flavor.

If you say how can an onion taste sweet, you have obviously never tried caramelizing your onions. If you had, you would admit that they can taste almost as sweet as candy – no kidding! To do that, slice your onions thinly pole to pole. Start heating a skillet with some butter and/or oil. Toss in your onions, add a sprinkle of salt (some prefer to add the salt when the cooking is finished) and stir. Cook until the onions start to turn brown; then turn down the heat to low and cook the onions until soft, brown and sweet. This will take anywhere between 30 and 60 minutes.

If they start to brown too quickly, add a splash of water and scrape up the brown bits. Turn down the heat and continue to cook. I like to cook them with a lid on the pan but just be sure to watch so they don’t burn. Some methods will have you start with more water and let it evaporate. Others will add a small amount of sugar to kickstart the caramelizing process. Some even add a bit of baking soda. I prefer the old-fashioned, longer process described in the prior paragraph but, do some experimenting to find your favorite method.

Toss these yummy caramelized onions on a pizza or your favorite grilled cheese sandwich.
You won’t regret it!