Cooking Tips · Ingredients

Proteins on a healthy diet

We are moving forward in this series on cooking/eating healthy. After discussing some general tips, grains, breads and veggies, in this Tip I want to look into the subject of proteins. According to a 2018 Gallup poll, only 5% of U.S. adults consider themselves to be vegetarian. Therefore, I will mostly be discussing meat/seafood. I will not be discussing cooking methods in this Tip but will leave that for the next one.

There are a couple of general recommendations that almost all experts will give. First is to avoid processed meats such as lunch meats, hot dogs, bacon, sausage and jerky. Second is to eat smaller portions of fish and meats. Given that, let’s move on to the sources of animal protein.

I am sure that most of you have heard that you should limit, or even eliminate, your intake of red meat. This includes beef, pork and lamb. Why is that? That recommendation is based on the fact that red meats have more saturated fat than other protein sources. I will note that there are some people out there that do not agree with this recommendation and feel that red meat is not as bad as everyone says. However, most experts feel that consuming red meat is often linked with cardiovascular disease.

When you do consume red meats, the recommendation is to eat leaner cuts. See the following chart for the USDA’a definition of lean versus extra-lean. These numbers are based on a 3½ ounce serving and will help you when looking at the nutritional labels in the store.

 LeanExtra-lean
Fat10 gm5gm
Saturated fat4.5 gm2 gm
Cholesterol95 mg95 mg

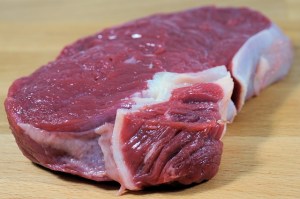
For beef, another recommendation is to choose “Choice” or “Select” cuts as they will have less fat than “Prime” cuts. For example, if you look at one of the most popular (although one of the fattiest) cuts of beef – Ribeye Steak – the fact content is 50% higher for Prime than Choice. For ground beef, choose a package that is labeled at least “90% lean” and, if you can find it, 93% or 95% lean.

A look at the nutritional label of different cuts can be enlightening. A package of Choice Sirloin steak shows 10 gm total fat and 3 grams of saturated fat, putting it into the “Lean” category. The same serving size of a Choice Ribeye contains 17 grams of total fat and 8 grams of saturated fat.

The reason the fattiest cuts are more popular is that fat contributes to flavor and moistness. When choosing the leaner cuts, you need to take care when cooking so they do not dry out. I will discuss this more in my next Tip.

For pork, the leanest choices are pork loin and pork tenderloin.

The leanest cuts of lamb are loin, leg and shanks.

Poultry

When most of us think of healthy meat, we think of poultry. The most common poultry we eat is chicken although turkey is another excellent choice. Much of the fat found in poultry is in the skin. The same serving size of skin-on poultry can have three times or more as much fat as skinless. Because the skin can protect the meat from moisture loss, many chefs will leave the skin on when cooking but remove it before eating.

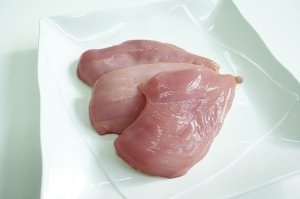
Breasts will be the leanest type of poultry. Without the skin, chicken breasts have under 2 grams fat per 3 ounce serving and less than ½ gram of saturated fat. Chicken thighs can have twice as much fat as breast but would still qualify as lean. Many feel they have more flavor and are moister. Similar cuts of turkey will have even less fat than chicken although at these low levels, the difference is minimal. The lower fat content does, though, tend to make turkey drier.

Seafood

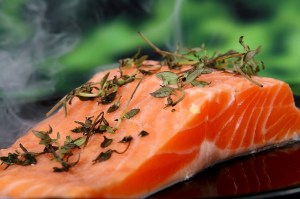
Seafood is something that most of us probably do not eat as often as we should. Although seafood can be relatively high in fat, it contains some very heart-healthy polyunsaturated fats known as omega-3 fatty acids. In fact, seafood is considered the best (but not the only) source of this type of fat. Other good sources of omega-3 fatty acids are flaxseed oil, flaxseeds, walnuts and chia seeds. There is another type of fatty acid known as omega-6 that is often discussed in tandem with omega-3. I will wait on the discussion of this fatty acid for an upcoming Tip on Fats.

Although the above mentioned fatty fish may be healthy, they are higher in total fat than other types of seafood. If you are in the market looking at the seafood, the flesh color will give you an indication of fat content. The leaner choices are those that are lighter in color whereas the darker ones are going to contain more fat, albeit healthy fats. Below is a chart showing you the fat content in a 3 ounce serving. The amount of omega-3 fatty acids in seafood also varies with the fattier kinds containing more omega-3s. Examples include salmon, herring, mackerel and sardines. If you want more detail on this, see this article from Seafood Health Facts.

Fat ContentTypes of Seafood
High Fat (10 grams or more)Herring, Mackerel, Sardines, Salmon (Atlantic, Coho, Sockeye and Chinook)
Medium Fat (5 to 10 grams)Bluefish, Catfish, Rainbow Trout, Swordfish
Low Fat (2 to 5 grams)Tilapia, Halibut, Mussels, Ocean Perch, Oysters, Pacific Rockfish, Salmon (Chum, Pink)
Very Low Fat (less than 2 grams)Crab, Clams, Cod, Flounder/Sole, Haddock, Hake, Lobster, Mahi-mahi, Pollock, Scallops, Shrimp, Tuna

Plant sources of protein are great in that they do not contain saturated fats. Examples are beans, peas, lentils and nuts. They also provide dietary fiber and other nutrients.

Unless you are a committed vegetarian or vegan, it is good to know that both plant-based and animal protein have benefits and drawbacks. Animal foods are denser in essential amino acids and are more easily digestible.

Plant-based protein is often low in calories and high in fiber. It is, though, a little less digestible. Plant proteins rarely contain all the essential amino acids. This is not to say that you can’t get all the nutrients you need from plant foods; only that it takes effort and planning.

We all need protein although getting sufficient protein is not really a problem for most Americans. Learning how to pick and choose the best proteins is essential to a healthy diet. I hope this Tip combined with the next one on Cooking Methods will help you make better choices.

Cooking Tips · Ingredients

Veggies can be exciting!

We are now on to Tip #4 in this series of Cooking Tips on cooking/eating healthy. In this Tip, I want to talk about a very important part of everyone’s diets – Vegetables. We all should be eating more veggies but it would help if we could make them a bit more exciting without sacrificing nutrition.

All veggies are high in important nutrients such as vitamins, minerals and antioxidants. They are also high in fiber while being low in sugar, fat and sodium. There are some differences, though, in vegetables. Veggies can be divided into starch and non-starchy. Starch breaks down into glucose in our bodies and these veggies are higher in calories than non-starchy and lower in fiber.

It is recommended that we eat all types of veggies but we should consume more of the non-starchy, especially if you are diabetic or pre-diabetic.

Non-starchy vegetables contain only a small amount of starch. Here are some of the most common. One caveat – beets and carrots straddle the line between starch and non-starchy. So, if you are trying to decrease your intake of starchy veggies, you should limit these two items.

  • Artichoke
  • Asparagus
  • Beets
  • Broccoli
  • Brussels Sprouts
  • Cabbage
  • Carrots
  • Cauliflower
  • Celery
  • Chard
  • Cucumber
  • Eggplant
  • Fennel
  • Greens (Collard, Kale, Mustard)
  • Green Bean
  • Jicama
  • Kohlrabi
  • Leeks
  • Mushrooms
  • Okra
  • Onions
  • Pea Pods And Sugar Snap Peas
  • Peppers
  • Radishes
  • Rutabaga
  • Salad greens
  • Summer Squash (Yellow, Zucchini)
  • Tomato
  • Water Chestnuts

Starchy veggies contain more starch but they also have abundant nutrients. Some examples are:

  • Potatoes
  • Corn
  • Lentils
  • Parsnips
  • Peas
  • Sweet potatoes
  • Winter Squash (acorn, butternut)

The best form to eat vegetables are either fresh and frozen. Frozen is a great option as they are picked at the height of ripeness and then quickly frozen. Be careful, though, that the frozen package you pick up does not contain a sauce or seasonings. These often contain added sugars and sodium. Watch out for canned vegetables as they also often contain sodium and sugar. As I have said in my prior Tips in this series, you should become adept at reading the nutritional facts labels. Make sure the only ingredient on the label is the vegetable.

Unless you are eating canned or frozen veggies, you need to clean them. The USDA recommends washing your produce under cold running tap water to remove any dirt & reduce bacteria. If there is a firm surface, such as on apples or potatoes, the surface can be scrubbed with a brush. Do not use detergent or soap as these are not approved for use on foods. You could ingest residues from soap or detergent absorbed on the produce. Note that the recommendation is just for plain water. You don’t need any special type of produce spray. If you really want to do more than just plain water, make a mixture of 1 part distilled white vinegar to 3 parts water. This is really not necessary, though.

There is a bit of debate over washing pre-washed, bagged greens. Although some recommend washing these items, many others say you are more likely to introduce contamination from your kitchen by doing so. Also, any pathogens left on pre-washed greens are probably so tightly adhered that washing them again in your kitchen is probably not going to do anything. The latter is the opinion of the USDA.

What about peeling your veggies? It is generally accepted that the peels are full of beneficial nutrients that you will lose if you peel them. So, if you are able to just scrub your veggies and eat/cook them without peeling, you are better off. There are some peels, though that are just too fibrous to eat or they are too difficult to clean properly. In that case, wash them first and then peel them. By washing them first, you are not transferring debris/pathogens from the outside to the inside. Most pesticide residue can be removed by washing. However, if you are concerned about this, peeling will give you an extra measure of comfort.

Now that we know which veggies we should eat often, which ones we might limit somewhat, and how to clean them, how do we make them tasty? There are those people, like my husband, who just love veggies in the purest form. If you are not one of those, let’s look at some ways you can increase your interest.

Having a salad every day is one of the healthiest habits you can form, whether it is before dinner each night (as we do) or as the main part of the meal. It is a great way to get a variety of veggies in one dish. Start with a mixture of greens such as lettuce, spinach, arugula, microgreens or more. Add in fresh veg such as celery, carrots, cucumber, bell peppers and green onions. One drawback for me in making sure we eat salads every day is all the prep – slicing and dicing all those ingredients. Something I do to make this easier is to prep ahead for a few days. If I am making a salad for Monday night, I also set out small bowls for the next three nights. I then cut up enough veg for each of those nights and put them in the small bowls. Now, for the next three nights, I just have to put my greens in a salad bowl and dump in the contents of those bowls of precut veg. Voila – instant salad!

Sometimes we will eat our veggies raw but other times, we want them cooked. Cooking veggies can alter them in the following ways.

  • Texture – caused by the fiber in the veggies
    • Fiber is made firmer by:
      • Adding acids such as citrus juice, vinegar or tomato products.
      • Sugars – this is more often used when cooking fruit
    • Fiber is softened by:
      • Heat – the longer you cook veggies the softer they become.
      • Alkalis – this is why you do not want to add baking soda to your veggies as it will make them mushy.
  • Flavor – flavor can be lost in the cooking liquid and with prolonged cooking times
    • Cook your veggies in as short of time as possible to limit flavor loss.
    • Some veggies where a bit of flavor loss is preferable is with strongly flavored veggies such as onions, cabbage, Brussels sprouts, cauliflower, broccoli, turnips and rutabagas.
  • Color – there are white, red, green & yellow/orange veggies
    • White
      • Potatoes, onions, cauliflower
      • Other veggies may not be white on the outside but are on the inside. Examples are cucumbers, zucchini and celery.
      • Acid helps to keep the whiteness. So, if you are cooking your veggies in water, add a small amount of lemon juice.
      • Cooking for shorter amounts of time helps preserve the color.
    • Red
      • Red cabbage, beets
      • Acids turn them brighter red.
      • Alkalis turn them blue or blue-green.
      • Over-cooking leads to loss of the red color.
    • Green
      • Acids lead to loss of the green color.
      • Overcooking turns bright green veggies to an unappealing olive green.
    • Yellow/Orange
      • Carrots, corn, winter squash, sweet potatoes, some bell peppers
      • Yellow & orange pigments are very stable. Acids and/or alkalis do not cause much of a color change.
      • Overcooking can dull the color.
  • Nutrients — nutrients are often lost by overcooking or cooking in a lot of water.

The main ways of preparing veggies (other than eating them raw) are boiling, microwaving, steaming, sauteing, grilling or roasting. Here is a colorful guide from Cooksmart.com showing you which veggies do best with which methods of cooking. The same website has a great section on how to prep veggies if you are not familiar with how to get them ready for eating.

Boiling

This is not the best method as it is so easy to overcook the veggies and much of the flavor and nutrients can be lost in the water.

Steaming

This method leaves your veggies crisp and there is less loss of flavor. It works great for porous vegetables such as asparagus, broccoli and cauliflower.

Microwave

This is one area where your microwave is a useful tool, especially (but not exclusively) for frozen vegetables. A few minutes in the microwave and your veggies are ready for the table.

Sautéing

Sauteing is a great way of cooking veggies as it allows you to get some color on them. You can use a nonstick pan or you will need to add a bit of oil if using a regular pan. Heat your pan, add a small amount of oil and heat until hot. Before adding the veggies, add some aromatics such as shallots, garlic, or ginger. These will add great guilt-free flavor to the veggies. After sautéing the aromatics, add the veggies and cook until done. If the pan gets too dry during the cooking process, you may add a splash of water/broth. Add a bit of salt to taste as you are cooking and, if desired, finish with some acid such as lemon juice. Optional toppings include a grating of parmesan or pecorino cheese, nuts or seeds.

You can even do a combination of the above two if you are cooking raw veggies. Start them in the microwave with a touch of water to soften them – no more than about 3 minutes. Then, toss them in a hot pan (beware of splattering) as above and finish by sautéing.

You can even do a combination of the above two if you are cooking raw veggies. Start them in the microwave with a touch of water to soften them – no more than about 3 minutes. Then, toss them in a hot pan (beware of splattering) as above and finish by sautéing

Roasting

Roasting veggies requires you to preheat the oven and takes longer (~30-45 minutes) than other methods. However, as moisture is driven off in the oven, it does concentrate flavors and leaves you with crispy edges.

Something that is helpful to get crispy results is to put your sheet pan in the oven as you preheat it. That way, your veggies start to cook and sizzle as soon as you put them on that hot pan. Oven temperature recommendations vary but are usually pretty hot — 400° to 500°. I will prep my veggies, put them in a bowl, season them with salt and fresh herbs (rosemary, thyme) and toss them in a small amount of olive oil. You can even add a bit of balsamic vinegar. Carefully remove the hot pan from the oven, add the veggies and roast until tender and crisp.

Grilling/Charring

I am not a fan of most grilled foods and so, we do not own an outdoors grill. However, I do like to grill or char veggies stovetop. For that, I use either a grill pan or a cast iron pan. After preheating the pan, I add the veggies and cook them until they are brown and just a bit charred. I normally toss them first in a small amount of olive oil, salt and pepper. When cooking them on the pan, space them apart so they will char. If you place them too close together, they will steam, which is not the result you want with this method. I especially like this method for zucchini and Brussels sprouts.

None of these methods require you to add anything to the cooked veggies before eating. However, you can consider a small grating of a flavorful cheese such as parmesan, pecorino or asiago or a sprinkling of nuts such as slivered almonds. Just to be sure to watch how much you add. Some like to add a pat of butter (although this is a saturated fat) or a drizzle of olive oil. You can get butter-flavored olive oil or herb-infused oil for more flavor.

I hope this Tip will encourage to eat veggies every day whether it be in a salad, as a side dish or even both. They can be extremely tasty and are certainly a necessary part of a healthy diet.

Cooking Tips · Techniques

Bread — Delicious but can it be healthy?

Do you love bread as much as I do? I made some wonderful “Honey Butter Yeast Rolls” for Christmas dinner. Yes, they were fun to make. Yes, they were delicious. However, healthy they were not. Are you able to eat a healthy diet and still consume bread? That is the subject of this Cooking Tip, the 3rd in my series on Healthy Cooking & Eating.

Let me start with the disclaimer that I am not a dietician or a nutritionist. Also, I will acknowledge that there are those who feel we should never eat bread of any kind. Starting from the viewpoint that never consuming bread is not realistic for most of us, let’s try to see if some bread is better to eat than other kinds. I am also limiting this discussion to wheat bread, not gluten-free alternatives.

In my 1st Cooking Tip in this series, I mentioned a definition of healthy foods from the American Fitness Professionals Association. “Healthy foods … are those that are close to how we would find them in nature, have undergone few industrial processes, and contain few to no additives.” How does that apply to wheat bread?

When you find grains of wheat in nature, they are composed of an outer bran layer, an inner core called the endosperm, and the germ.

  • The bran is a fibrous outer layer that has abundant B vitamins, insoluble fiber, antioxidants and phytochemicals as well as a small amount of protein. This layer also contains most of the minerals in grain, such as iron, copper, zinc and magnesium.
  • The endosperm makes up about 85% of the kernel. It is about 50-75% starch and protein although it also contains some iron, B vitamins and soluble fiber. This is the part that becomes white flour.
  • The germ is high in fatty acids, a small amount of protein, trace minerals, B vitamins, vitamin E and phytochemicals.

To make white flour, the bran and the germ are removed leaving only the white endosperm. Because that process removes so many of the natural nutrients, the flour is then “enriched” by adding back in some of these nutrients. Minimum standards of how much should be added is set by the FDA. The whole grain also contains something called “phytochemicals”, the most important being antioxidants. According to Science Direct, “phytochemicals are defined as bioactive nutrient plant chemicals in fruits, vegetables, grains, and other plant foods that may provide desirable health benefits beyond basic nutrition to reduce the risk of major chronic diseases.” It is thought that over 75% of these are removed from the wheat kernel when making white flour. The healthy fatty acids in the germ are also removed to improve shelf life.

There are those that feel enriched white bread is not a bad choice because so many of the nutrients are put back into the flour. There are others that feel that the nutrients that are added in are not as healthful as they are not “natural” to the wheat. Most of those added nutrients are vitamins and minerals (although not all of them are replaced) and not the phytochemicals. One item that is definitely less in white flour is fiber but, once again, some feel the difference in fiber content between white flour and whole wheat flour is not significant. You will have to determine what is important for your family and yourself.

There is what is known as “ancient wheat”. This is a type of wheat that has been grown since the ancient times. One variety is called “Einkorn” and is felt by many to be far superior to our modern wheat. I have personally known people who cannot eat our processed flours who have no problem with einkorn. This even includes those with celiac disease. It is not a trial you should undertake, though, without your doctor’s advice. Still considered “ancient” but slightly different than einkorn are “Durum” and “Emmer” wheat.

How do you use all of this information? Whether you bake your own bread or buy bakery bread, you need to learn to read food labels. Even among the same type of flour or bread, the ingredients will vary according to brand. Let’s start with flours.

If you like white flour but want it enriched, it will be easy for you. Most of the standard supermarket brands will be enriched. If you would prefer to stay away from enriched flours, you need to look at the labels carefully to make sure they don’t list those items. For example, Gold Medal All-Purpose flour’s label shows this: “Bleached Wheat Flour, Niacin, Iron, Thiamin Mononitrate, Riboflavin, Enzymes, Folic Acid”. That is obviously enriched.

On the other hand, King Arthur All-Purpose flour has this ingredient list: “Unbleached Hard Red Wheat Flour, Malted Barley Flour”. No enrichment there. Bob’s Red Mill is another brand that has chosen not to enrich their white flour. A third one you can sometimes find in the stores is from Arrowhead Mills.

If you would rather get your nutrients in a whole form, opt for whole wheat flour. There should be at least a few options available where you shop. Baking with whole wheat flour, though, is not as simple as swapping it one-for-one for white flour. You should find recipes meant for whole wheat flours and do some experimenting.

Some people say they do not like the taste of whole wheat products as they are heavier and nuttier. There is a product called White Whole Wheat although not all companies make this. This type of flour is made from a different type of wheat but is still whole-grain. Baked goods using this will be lighter in texture and flavor. Not all brands make this product but King Arthur Flour does. I also saw a listing for a Kroger white whole wheat.

There are some wonderful whole wheat/grain bread recipes if you have the time to bake your own. Here are two that I have tried and liked.

If you do not want to make your own bread but just want to buy something acceptable, turn to the labels once again. Do not pay attention to the name of the bread as it can be confusing. The name might say whole wheat, multi-grain, all-natural, etc. This doesn’t really tell you much. What you want to see on the ingredient list is “whole grain” or “whole wheat”. Preferably, choose a bread where it says “100% whole-grain” or “100% whole-wheat”. At a minimum, you want the first ingredient to be whole wheat even if there are other ingredients following that. Even among different 100% whole grain products, look at the fiber content and buy the one that is highest. Try to avoid ones with added sugars. Looking at a number of 100% whole wheat breads in my local market showed the sugar content to vary from 1 gm to 4 gm per serving.

Just as you should check the labels on the store-bought bread, you should also check the nutritional facts for your home-made bread. Other than the preservatives (which I prefer to avoid) that are in the store-bought versions, the other nutritional facts may not be that different. For example, let’s look at this comparison. As you look at these, please note that one serving is one slice although the size of that slice might differ.

RecipeKing Arthur 100% Whole Wheat BreadKroger 100% Whole Wheat BreadPrivate Selection 100% Whole Wheat Bread
Serving Size1 slice/55 grams1 slice/34 gm1 slice/45 grams
Calories14090130
Total Fat4 grams1 gram1.5 grams
Saturated Fat2 grams0 grams0 grams
Trans Fat0 grams0 grams0 grams
Cholesterol10 mg0 mg0 mg
Sodium230 mg200 mg270 mg
Total Carbs23 grams18 grams24 grams
Dietary Fiber4 grams2 grams4 grams
Total Sugars4 grams2 grams4 grams
Protein5 grams3 grams6 grams

I think most of us would agree that bread is delicious and very satisfying. It is not something, though, that should be eaten with abandon on a healthy diet. I hope with this information, you will be able to make the best choices for you.

Cooking Tips · Ingredients · Techniques

Whole Grains can be very tasty!

In this Part 2 of my Cooking Tips series on healthy cooking, I want to talk about one very important thing you can do and that is to eat more Whole Grains. I will not be talking about flours and bread in this Tip. That will be in a future Tip. For this one, I will concentrate on grains we may serve as a side dish. All recipes I note are ones that I have tested and find very tasty. Try these recipes as a way to get more whole grains into your diet in a delicious way but also as a starting point to experiment.

What are whole grains? Grains are the edible seeds of plants and for it to be “whole”, it must contain all of the main three parts of the seed.

  • Bran – fiber-rich outer layer with B vitamins, minerals, antioxidants and phytochemicals. The latter are naturally found in food and are felt to be important in disease prevention.
  • Germ – the core of the seed that is rich in healthy fats, vitamin E, B vitamins, antioxidants and phytochemicals.
  • Endosperm – the interior layer composed of carbohydrates, protein and small amounts of B vitamins and minerals.

When you are shopping, you need to pay attention to the nutritional facts label. It is not always straightforward. A 2013 study by Public Health Nutrition looked at products considered Whole Grain and evaluated them to see what would be most useful for the consumer as far as labeling. What they found was that just looking for the term “whole grain” can be misleading. You should see “whole grain” on the label and try to pick products where it is at the top of the ingredient list. However, also look for products with more fiber but less sugar, sodium and trans-fat.

There are many wonderful whole grains out there. Although you can get all of them online, I am going to limit my discussion to those you are most likely to find in your local supermarket. Some of these are gluten free and others are not. I will note that in the description.

Before discussing the individual grains, I want to talk about cooking them. I tend to cook whole grains with the “pasta method.” Cover the grains with liquid, bring to a boil, cover, reduce to simmer and cook until done. Here is a chart from the Whole Grains Council that will give you more specifics. If you are one of us that lives at high altitude, review this Tip on Cooking at High Altitude. You will need more water and more time to cook most of these whole grains.

To liven up the final dish, here are a few ideas.

  • Cook using low/no sodium broth. Can also cook in fruit juice but those are high in sugar. Vegetable juice is another alternative.
  • Toasting the grains before you cook them heightens the flavor. Those that take toasting well are amaranth, millet, oats, quinoa & wheat berries.
  • Add nuts, seeds, citrus zest and/or dried unsweetened fruit.

Now to the actual grains.

  • Amaranth
    • Gluten Free
    • These are the tiny seeds of the amaranth plant. The seeds are not a true grain.
    • When cooked, they resemble brown caviar and remain crunchy.
    • It has a strong, grassy flavor.
    • Cook it up like grits or make a porridge.
  • Barley
    • Can be whole (hulled) or pearled. The hull is very tough and must be removed.
    • Only the hulled is considered “whole”. However, it is harder to find and takes longer to cook.
    • Can be served as a side dish or added to soups/stews.
  • Bulgur
    • Wheat kernels that are boiled, dried, husked and cracked. Also known as cracked wheat.
    • Because bulgur is precooked, it is quick to prepare. You are essentially just rehydrating it.
    • Often added to soups, stuffed veggies and salads. Tabbouleh is one very characteristic bulgur-containing dish.
  • Corn
    • Gluten Free
    • Whole kernels are ground into cornmeal, which is then often used in baking.
    • Popcorn is a different strain of corn but is still a whole grain.
    • Polenta, toss fresh corn in salads, soups and quiches.
  • Couscous
    • This is not really a grain but a pasta made from semolina flour, and therefore, is not a whole grain. There are whole grain varieties that are made of whole wheat durum flour. They are much harder to find in stores but are readily available online.
  • Farro
    • This is a high-fiber, high-protein wheat that can be found in three forms.
      • Pearled – the bran & outer husk is removed but still retains some fiber. It has the shortest cook time and is the most common in our stores.
      • Semi-pearled – part of the bran is removed. It is sort of a middle ground in terms of nutrition and cooking time.
      • Whole – the whole grain remains intact. It has the longest cook time.
    • It has a chewy texture and a nutty flavor.
  • Millet
    • Gluten Free
    • A small, round ivory grain with a mild flavor.
    • Has a mild flavor and mixes well with other foods.
    • Use like rice.
  • Oats
    • Gluten Free but some companies process their oats on the same machinery as other gluten-containing grains. So, be sure they are certified gluten free.
    • Contains a special variety of fiber that’s felt to be helpful in lowering cholesterol.
    • Both old-fashioned & steel-cut are whole grains.
    • Steel cut is chewier and nuttier.
  • Quinoa
    • Gluten Free
    • A small, light-colored round pseudo-grain. It is not a true grain but is in the same family as spinach and chard.
    • It is naturally coated with a bitter and soapy layer, called saponin, that is to deter animals. It should be removed by rinsing in water before cooking. Some brands will be pre-washed when you buy it.
    • It is quick cooking.
    • Comes in white or red varieties.
    • It has a mild flavor, is chewy and slightly nutty.
    • Good in pilafs, salads, casseroles, soups.
  • Rice
    • Gluten Free
    • Limit your intake of white rice but, instead, choose brown, red, black or wild.
    • Brown rice can be long-, medium- or short-grain. Two of the most popular rices, basmati & jasmine, also come in brown versions.
    • Pigmented rices – black, purple, red, mahogany. The color is caused by the anthocyanin pigments in the outer bran. This makes them very high in antioxidants.
    • Wild rice is not true rice. It is an aquatic grass.
  • Wheat berries
    • The whole kernels of hard red spring wheat before it is ground into flour.
    • Because they are whole and firm, they take a while to cook. It is often recommended that you soak them overnight to shorten the cooking time.
    • Cook them in simmering liquid for anywhere from 30 minutes to an hour or cook them in a slow cooker.
    • It is chewy & nutty.
    • Add to soup, chili, salads, side dishes.

That is quite a bit of information but just scratches the surface on whole grains. I hope you are intrigued and challenged to try some of these whole grains. I know my favorites are bulgur and farro. What about you? Do you have a favorite?

Cooking Tips · Techniques

Healthy Resolutions

We all know that January is a popular time for trying to improve one’s health. People join gyms, they start fitness routines and they promise themselves they will start to eat healthier. These are great goals and I want to discuss the latter goal – eating healthier. One of you asked me how to make healthy food tasty as she has some health conditions that require her to watch what she eats. As I researched her concerns, I realized that what her diet advises is also a very healthy way for us all to eat. I will be writing a few Cooking Tips that will help you to cook/eat healthy but in a way that does not sacrifice flavor and satisfaction. In this first Tip, I want to discuss some general principles. In subsequent ones, I will dig deeper into some of these points. I do want to caution you, though, that you should always check with your health care provider about his/her recommendations. They may wish you to alter some of what I am going to say

If you have been reading these Tips for very long, you know that my purpose is not to provide you with recipes. Rather, I want to encourage you to seek out quality ingredients and learn good cooking techniques. With that, you can cook whatever you want to cook. It is the same with cooking healthy. You do not need any special ingredients or equipment. You probably have everything you need; you just need to cook with some guidelines in mind. I will, though, be giving you some recipe ideas in the upcoming Tips.

Cook from scratch

The number one thing you can do to cook healthier is to eliminate as many prepared or processed foods as you can. If you cook mostly from scratch, you will automatically be cooking healthier.

Limit processed foods

There are so many convenience (aka processed) foods on the shelf and in most of our pantries and refrigerators. That convenience comes at a cost. I like The American Fitness Professionals Association’s definition of healthy foods – “Healthy foods … are those that are close to how we would find them in nature, have undergone few industrial processes, and contain few to no additives.”

What does that mean? It means not using boxed mixes for dishes. No Hamburger Helper. Rather, make your own pot of pasta and fresh sauce with healthy ingredients from your pantry and refrigerator. Add herbs and spices that you like. Just a sprinkling of a good quality, flavorful cheese on top before serving. By doing this, you are decreasing the sodium of the meal along with many additives and preservatives, which are in those boxed items. If you choose to make a whole grain pasta, you are upping the fiber content. Not only is this healthful but will also make you feel fuller longer.

Another example is purchased salad dressings. A worthy goal is to eat more greens and veggies. A simple way to do this is to have a salad before each dinner. If you drown those greens in a high sugar and processed store-bought salad dressing, you are not doing yourself any favors. If, instead, you make your own vinaigrette, you are using minimal ingredients and those that you do use are minimally processed. You do not need to sacrifice flavor to do so. A simple vinaigrette is easy to make and can be very tasty. See this prior Cooking Tip for how to do this.

Cook a wide variety of foods

It is so easy to get into a rut of making and eating the same things all the time. Not only is this monotonous but you are missing out on so much. Don’t eat just white rice. Branch out and experience brown, red, black and wild rice.

There are also so many other grains out there that will be better for you than white rice and do not take much more effort to cook. Try quinoa, farro, barley, couscous or bulgur. Cook them in a low-sodium broth rather than just water. Add interest with herbs/spices, nuts and unsweetened dried fruit.

Go for whole foods

As much as you can, cook with whole foods such as fruits, veggies and whole grains. Try to include these at most of your meals. Remember that frozen fruits and veggies are just as good if not better than the fresh variety as long as they are not packaged in a sauce or had sugar, salt or other ingredients added to them.

Fruits can be incorporated into your cooked dishes. Many meats are complemented nicely with a light sauce that includes fruit. Pork and apples is a classic but you can also use fresh figs, peaches, grapes, pears, etc.

As mentioned before, incorporating a salad into your lunchtime or evening meal is a great idea. For more variety, try roasting, grilling or sauteing veggies as a side dish.

Have fun with herbs and spices

Experiment with adding herbs and spices to your dishes. They will add a pop of color and flavor to your grains, meats etc.

Use smaller amounts of some foods

Rather than opting for a low-fat variety of something or trying to eliminate the ingredient entirely, just use smaller amounts of the full-fat variety. For example, choosing an extra sharp cheddar cheese will allow you to use less and still have amazing flavor. Many low fat cheeses are not a good idea. They do not taste as good and often have a binder added to improve texture. Another example is cutting down on the amount of oil called for when cooking. Don’t just dump in whatever the recipe calls for. Start with less and then, if you need more, you can add a bit more.

Fats and sugar

Which of these is worse for you? That continues to be somewhat of a debate but there are a few things we know. As for fats, limit your use of saturated fats. These are fats that are solid at room temperature such as butter and lard. Saturated fats are also found in animal products such as most meats & dairy products and also in tropical fats. When cooking, opt for monounsaturated and polyunsaturated oils such as olive, canola, safflower or sunflower. Swap out your beef and pork for seafood.

A type of fat you should try to completely eliminate is trans fats. Although there is a very small amount that can be found naturally in nature, most come from a certain type of food processing. Therefore, once again, you will automatically decrease your intake of it when you cook from scratch. Also, food labels are required to list the amount of trans fats. Note that foods containing less than 0.5 grams of trans fats per serving are labeled as having 0 grams of trans fats.

With sugar, the most important thing is to limit your use of added sugar. Pay attention to food labels for sugar content. Recently, the FDA updated the requirements for food labels and they must now show not only sugar content but “added sugars”. This should help you make smarter choices.

Consider some meatless meals

You do not have to be a vegetarian but you can make a concerted effort to have at least some meals without meat. A fun and tasty way to do this is with Grain Bowls (aka Buddha Bowls). Although these bowls can contain meat, many do not. Here is a prior Cooking Tip with more information on this dish.

Keep your pantry and freezer stocked

If you have what you need to cook healthier already in your pantry and/or freezer, it will be much easier to follow through.

Finally, have the attitude that almost nothing is forbidden but many things should be eaten in moderation. One example is butter. I love to finish a pan sauce with just a small pat of butter. This adds a richness both in terms of flavor and texture. If you only use a small amount, you can do this without feeling guilty.

If you have made a resolution to cook and eat healthier this year, I wish you the best of luck. You can do it and it is not that difficult to do so. I hope these few tips will help you get on the right track.

Cooking Tips · Techniques

Cooking Resolutions

I am not much of a fan of New Year’s resolutions. I personally do not make them. Rather, I just continually strive to improve myself in all sorts of areas. However, I know many people find resolutions motivating. I thought to myself, if I wanted my readers to make any cooking-related resolutions, what would they be? That is the subject of this Cooking Tip – what you could do this next year that would improve your cooking.

  • Read the recipes – Be sure to take the time to read your recipe thoroughly.
    • Carefully look at the list of ingredients so you know what you have and what you need to buy. Also, look out for commas. For example, there is significant difference between “1 cup flour, sifted” and “1 cup sifted flour.” If you do not know the difference, email me and I will help you.
    • Read all the steps in the recipe all the way through. If possible, read it twice before starting your cooking. This will allow you to know how you should progress, what equipment you will need and if there are any surprises waiting for you – such as the step calling for you to “chill mixture for 2 hours”. If you do not know that, it can throw a serious wrench in your plans.
  • Look at the number of servings the recipe makes. If you need to decrease or increase, do the math for each ingredient and write the new amount right on the recipe. This will prevent you from starting out good by adjusting the first couple of ingredients and then forgetting to do the same for the rest – a real recipe ruiner.
  • Take mise en place seriously. Taking the time to gather your ingredients & equipment as well as measuring out those ingredients as well as prepping those that require some prep (such as chopping or slicing) may seem like a waste of time. However, in reality, it makes your cooking go smoother and helps to prevent errors.
  • Be careful about substituting ingredients. Some will work fine but others not so much. For example, if it calls for fresh herbs and you only have dried, you should not make a 1-1 substitution. Use only ⅓ to ½ the amount of dried herbs as fresh. Not every vinegar tastes the same and if you substitute whatever you have in your pantry for what it calls for in the recipe, do not expect it to necessarily work.
  • If you are a baker, seriously consider weighing your ingredients rather than measuring by volume. You will get much better and more consistent results.
  • Invest in a good instant-read thermometer. Not only will this help you to cook your meat to a more edible and safe result but it can also help with baking bread, making custard and it is essential to successful candy making.
  • Use the correct type of measuring cups. Use liquid cups for liquids and dry cups for dry ingredients. You may think that is silly but there is real research demonstrating the inaccuracy of measuring when using the wrong cup.
  • Date your spices. Get rid of outdated ones and replace them with fresh. If they do not smell like the spice they are, they won’t impart much flavor in your dish. Instead of buying large quantities of spices you do not use very regularly, buy smaller ones. This ensures the freshness of your spices and saves you money in the long run as you do not have to throw items away because they have gone stale.
  • Taste as you go. For the best results, taste your dish as you go, adjusting seasonings as needed. At the very least, taste before you serve it. Do you really want to serve a dish to family/friends that you have no idea what it tastes like? I didn’t think so!
  • Try something new whether it is just a new food, a new recipe, a new cuisine or something else. If you do not know where to start, book a class for what you want to learn and let’s have fun with it.
  • Finally, just cook more. It is so much healthier and less costly to cook at home. Learn to plan ahead, make freezer meals, challenge yourself to use whatever is in your refrigerator rather than throw it out. Learn how to Cook without a Recipe to help with this. I can teach you many tips and techniques to assist you.

Do you have any specific Cooking Resolutions?

Let me know. I would love to hear what you want to work on this next year.

Cooking Tips · Ingredients · Techniques

Luscious Caramel Sauce

When you want caramel sauce to pour over your ice cream, do you run to the store and buy a pre-made bottle? We have all done that but did you know you can make your own so very simply? How to do that is the subject of this Cooking Tip.

Why would you want to make your own? First, you avoid a run to the store. Second, you know what exactly is in the sauce. Here is the ingredient list for a couple of major brands.

Ghirardelli Premium Caramel Sauce – Corn syrup, water, high fructose corn syrup, sugar, skim milk, heavy cream, salt, natural flavor, pectin, disodium phosphate.

Torani Caramel Sauce — Corn Syrup, Sugar, Invert Sugar, Heavy Cream, Water, Butter, Nonfat Milk, Natural Flavors, Salt, Lecithin, Sodium Bicarbonate.

What is the ingredient list for homemade caramel sauce? It is usually just sugar, water & dairy. That is a much shorter ingredient list without any artificial ingredients.

There are two main methods of making caramel – wet and dry. In the wet method, the sugar is dissolved in water whereas in the dry method, the sugar is melted without the addition of water. The wet method takes longer as the water must evaporate but you are less likely to burn the sugar than with the dry method.

Even though recipes will give you amounts of ingredients, the timing and resulting caramel will vary depending on such variables as the size/type of pan used as well as the type of cooktop and its heat. It is something that you need to use your eyes and nose for as the color of the sugar changes and the aroma develops. It is also something that takes just a bit of practice to get it just where you want it.

In the wet method, you add the sugar and water and stir until dissolved over medium-low heat. After the sugar is dissolved, raise the heat to high and let it cook without further stirring. Keep an eye on it as after a few minutes, it will start to turn a light amber and then darker amber. The longer you cook it, the darker the color and the deeper the caramel flavor. Be careful, though, as it can quickly go from dark amber to burnt. After it is at your desired color, very carefully add heavy cream (it will bubble vigorously) and whisk to combine.

Note that the longer you cook the caramel, not only does the color darken but the harder the resulting caramel will be when it cools. If it ends up too hard, you can gently re-heat it and add more liquid to thin it. On the other hand, if it is too thin, make a second batch, cook it slightly longer than the first batch and combine the two.

For a dry caramel, sprinkle a thin layer of sugar into your pot, not reaching to the edges. Over medium-high heat, cook it and watch as the sugar starts to dissolve. It will then start to turn amber around the edges. At that point, gently and carefully swirl it to distribute the sugar. Once most of it has turned amber, add another thin layer of sugar and continue to cook until amber. Repeat until you have added all the sugar and reached the desired color. Remove from the heat and immediately and carefully add your cream.

What about butter? Some recipes call for it whereas others do not. Butter produces a very nice mouthfeel due to the high fat content. However, as butter is solid at room temperature, your caramel sauce will be firmer when cooled, especially after being in the refrigerator.

Many pastry chefs will tell you that you can use either of these methods interchangeably and get similar results. Others will say that since with the wet method, you must take time to evaporate the water, the sugar cooks longer resulting in more complex flavors.

The biggest problem people have is that the sugar can crystallize, making the sugar syrup very grainy. If it does this, take it off the heat, add a couple tablespoons of water and heat again until the crystals dissolve.

The following are recommended methods to prevent crystallization in the first place.

  • Use a wet pastry brush to wipe down any sugar crystals on the side of the pan. Not all chefs do this and say they have no problems.
  • Although not as common, some will lightly oil the sides of the pan before starting so the sugar does not stick to the pan.
  • Another method involves putting a lid on the pot if you see any crystals on the side. This will produce steam and dissolve the crystals.
  • Add a different type of molecule. Crystallization is most common in what is called a “pure solution”. By adding a different type of ingredient such as corn syrup (mostly glucose) or a few drops of acid (lemon juice, vinegar, cream of tartar), you can prevent crystallization.
  • A common recommendation is to not stir as the sugar is cooking, particularly before the color starts to change. Then, only stir if spots are getting too dark. I must say that there are pastry chefs, though, who do some careful stirring without resulting crystallization.

Another problem is that the caramel gets too dark or even burns.

  • Use a heavy gauge stainless steel pot. With a thin pan, you are more likely to experience uneven cooking and a higher likelihood of burning.
  • Try to not to use a pot with a dark interior as it is much harder to judge the color.
  • A wide saucepan or even a deep skillet is better than a tall and narrow pot. With the latter, there is less surface area, which slows down the caramelization process.
  • Have a bowl of cold water ready. When you reach the desired color, submerge the bottom of the pan into the cold water to quickly stop the cooking process.
  • Quickly add your cream as the cold cream will cool down the solution. Just be careful as it will bubble vigorously as you do this. Stand back and then whisk together.

Once you get the correct color, there will be almost no water left. As this cools, it will become rock hard. You need to add moisture to get the desired consistency. The more liquid you add, the thinner it will be. If you add too much, just put the pot back on the heat to evaporate some of the water. If it is too thin, add more liquid.

Remember that cooked sugar is extremely hot and can cause serious burns. Always be careful when making caramel or anything that requires you to melt sugar. Use heavy oven mitts and long sleeves. Many experts recommend that you put a bowl of ice water nearby in case any of the mixture splashes onto your hands. If so, immediately put them into the ice water. NEVER taste it until it has fully cooled!

Homemade caramel sauce is a delightful concoction. Although it does take a bit of practice, once you master it, there will be no more quick runs to the store for that pre-made sauce.

Cooking Tips · Techniques

Want a quick meal? Try a stir fry!

We all have those days when we have very little time to get dinner on the table or just don’t want to cook. I have written a series of three Cooking Tips (Tip 1, Tip 2, Tip 3) about how to put a quick meal on the table without resorting to a recipe.

One technique I did not include in those Tips but is a great one is Stir Fries. As I was making a yummy chicken and corn stir fry for dinner last night, I decided to make sure you knew about this technique.

According to The New Food Lover’s Companion, the definition of stir fry is a cooking method where you quickly fry small pieces of food in a large pan over high heat while stirring the food. There are tons of stir fry recipes out there but it is also a technique that once you master it, you can put together your own delicious creations. Here are few tips for you.

Almost all stir fries have 4 main components.

  • Protein – use tender, quick-cooking meats such as chicken, shrimp, scallops, lean pork/lamb. Use 12-16 ozs for 4 servings. Can also use about 10-12 ozs extra-firm tofu.
  • Vegetables – use about 4 cups per 4 servings. Fresh veggies such as bell peppers, zucchini, carrots, broccoli, onions, pea pods, cabbage, spinach, asparagus, mushrooms and bok choy are common. Some like to also add canned Asian veggies (bamboo shoots, water chestnuts, baby corn). If you wish to use these, decrease some of the fresh veggies.
  • Aromatics – garlic, ginger, shallots, green onions.
  • Sauce – although you can buy premade stir fry sauces, I encourage you to make your own. They are very simple to mix together and you can make them into whatever flavor you want. Typical sauce ingredients include soy sauce, oyster sauce, rice vinegar and brown sugar. Many will add cornstarch, which helps to thicken the sauce. Other options are citrus juice, sesame oil or ingredients that will create a desired flavor profile. For a Thai flavor, use curry paste and fish sauce. For sweet/sour, use ketchup. Use your imagination. A good place to start is about ⅔ cup per 4 servings.

Although some chefs or recipes may have their own way of doing stir fries, the following is a standard technique.

  1. Do your mise en place. Have all your ingredients out and cut appropriately into similarly sized pieces before you start cooking. As you are cooking over high heat, you want everything ready to go so you do not have to stop and cut something before adding it to the pan. This includes mixing together your sauce.
  2. Have your rice or noodles cooked beforehand as the stir fry process is very quick.
  3. Put a wok or sauté pan over medium high heat and allow it get very hot. Swirl in a neutral oil with a high smoke point such as peanut, canola or safflower. The food should sizzle when added to the pan.
  4. Add meat. Since you want to get some browning, do not stir constantly. Allow some time to sear in between tossing the meat around the pan. When brown on all sides, remove from the pan and set aside.
  5. Add the densest veggies (carrots, broccoli, cauliflower, green beans, bell peppers) and cook until tender-crisp. Don’t overcook the veggies as you want them to have a bit of bite to them.
  6. Add in quicker cooking veggies (snap peas, onions, celery, corn, snow peas, mushrooms, zucchini, bok choy) and cook briefly.
  7. Whether it is the protein or the veggies, do not overcrowd the pan. If need be, cook in batches. If you overcrowd, your food will steam rather than sauté.
  8. Add in aromatics and briefly cook until fragrant. Some chefs will start the entire process with the aromatics so they flavor the oil before adding the meat. However, it is very easy for the aromatics to burn and so, many will wait to add them at the end and only cook until fragrant.
  9. Return meat to pan and pour in sauce. Cook until bubbling.
  10. Garnish as desired with fresh herbs, citrus juice, green onions or nuts.
  11. Adjust seasonings to taste.

My chicken and corn stir fry followed this basic outline. My protein was chicken thighs. My veggies were red onion and corn. My aromatics were garlic, ginger and red pepper flakes. My sauce was composed of oyster sauce, rice wine vinegar and toasted sesame oil. One departure from the general technique is that the chicken was tossed in cornstarch rather than adding it to the sauce. It all came together in under 15 minutes and when served with hot rice, it was a very satisfying meal that took me almost no time.

I encourage you to give stir fries a try in your kitchen. If you have never done it before, you may want to start with some pre-done recipes. After you feel comfortable with the process, have fun with it!

Cooking Tips · Techniques

Great gifts from your own kitchen!

I have written prior Cooking Tips on great stocking stuffers for a cook as well as culinary books that would make a great gift. Those contain wonderful ideas but sometimes the best gift is one you make yourself in your kitchen. Yes, you can certainly go with cookies, brownies or bread. However, why not try something a bit different? That is the subject of this Cooking Tip. Read on for some great suggestions for all cooking levels.

Nuts

Probably one of the easiest holiday food gifts is nuts. Not just plain nuts but flavored nuts. You might want to flavor them with sweet and holiday-like spices such as cinnamon, nutmeg and orange. Or, you might want to go the savory and even spicy route. Any nut can be used but almonds, pecans and cashews are especially tasty. Flavored nuts might be made stove-top or in the oven or sometimes, a combination of the two methods.

Bark

Another easy but impressive food gift is chocolate bark. Melt your desired chocolate, pour into a lined pan and smooth out. It is fun to do two layers – one of dark chocolate and one of white. Also, add-ins make all the difference. Try crushed-up peppermint canes, dried fruit or nuts. Some people even add potato chips or breakfast cereal. Not sure I would like the latter but someone would.

Use a good quality chocolate and not a chocolate coating. Ideally, you would temper the chocolate but I have found you can get by without this step. Just realize that the bark might melt a bit in your hand and not be quite as shiny.

Hot Cocoa Bombs

These became popular a few years ago and are still going strong. They do take a bit more work but are worth it. You will need some sort of mold that you use to make the exterior shell. Once again, I prefer to use a great tasting chocolate but that does require the tempering step. If you are not into that, try a quality coating chocolate such as Ghirardelli or Merckens.

Put whatever hot cocoa mix you like inside but to make it extra-special, make your own mixture and use that. Mini-marshmallows are a must for most people. Decorate them as you wish, box them up and watch the smiles!

Hot Cocoa Mix

It is so easy to assemble your own hot cocoa mixes using quality cocoa and chocolate. When packaged festively along with directions on how to use, it makes a great gift.

Toffee and Brittle

These are a bit more labor intensive and definitely require the use of a candy thermometer. For those of you who live at high altitude, take a look at this Tip for adjustments you will need to make. These two items are very similar with the major difference being that toffee uses butter whereas brittle usually does not or at least not as much.

Chutneys

Take a break from the candy-like gifts and give something like a homemade chutney. Chutney is a savory condiment typically made from fruits, veggies and/or herbs with vinegar, sugar and spices.

I make a great holiday-themed chutney with fresh cranberries, apples, raisins, sugar, orange juice and fresh ginger. Not only is it delicious, it also looks very festive especially when packaged in a beautiful gift jar.

Spice Mixtures

If you have read my Cooking Tip on spices, you will know I prefer to make my own spice mixtures rather than buy pre-made ones. Why not take that a step further and package up your favorite mixtures as gifts? It can be anything but a BBQ mixture is always popular. Other possibilities are Jerk Seasoning, Fajita Seasoning, Cajun Seasoning and Lemon Pepper. You can get pretty little spice jars and make your own tags to make this gift extra-special.

Flavored Syrups

A sugar syrup is just a mixture of sugar and water that is cooked until the sugar is dissolved. When you add things such as candied ginger or herbs to it, it takes it to another level. Or, use a fruit juice such as pomegranate juice for all or part of the water. Give your gift recipients ideas on how to use it such as in drinks or drizzled over ice cream or desserts.

Homemade Marshmallows

If you have never tasted a homemade marshmallow, you need to make some just for yourself. After you do, you will see how they could make a delightful holiday gift. They are so different than store-bought ones both in terms of flavor and texture. For more info, see this prior Cooking Tip.

These ideas just scratch the surface of Homemade Holiday Food Gifts. Let me know if you try any of them or have your own favorites. Your friends and family members will thank you!

Cooking Tips · Techniques

Embrace your leftovers — but do it safely.

Are you a lover or hater of leftovers? I’m definitely a lover – not only is the flavor of some dishes enhanced by a rest overnight in the refrigerator but it is great to have an easy & quick meal sitting there after a day of work. It makes life so much easier. One time that you will surely have left-overs is after a Thanksgiving meal. You can do so much with those left-overs but you need to store them in the best and safest way. That is what I will be talking about in this Tip.

Hot foods (including leftover turkey) should be packaged and refrigerated within 2 hours after serving. (For turkey, after you cut the meat off the bones, save the bones to make a great turkey broth.) The concern for bacterial growth is when food is left in the “danger zone” between the temperatures of 40° and 140° for more than 2 hours (reduce this to 1 hour if the ambient temperature is above 90°). That is why it is important to keep your food hot (at least 140°) or refrigerate it so the temperature drops to less than 40° within 2 hours. For cold foods, keep it under 40° at all times.

For large pieces of meat, it is best to cut it into smaller pieces to quicken cooling. For a dish such as soup, you will want to portion it into shallow containers to allow faster cooling. You can place these items directly into the refrigerator or if you want more rapid cooling, use an ice water bath.

All leftovers should be wrapped well in air-tight packaging. This helps keep bacteria out while retaining moisture and preventing your left-overs from picking up other odors from your refrigerator.

Most left-overs can be stored safely in the refrigerator for 3-4 days. Here is a chart from FoodSafety.gov about recommended refrigerator times. For longer storage, freeze the packaged left-overs. Generally, these items can be frozen for 2-6 months. Although you can safely freeze them for a longer time, the food does tend to lose moisture and flavor. Here is another USDA link that talks more about freezing with more specific recommendations for time.

The USDA also has a FoodKeeper app that you can download. You can look up almost any kind of food and it will give you safe storage information specific to that food.

When thawing food (including leftovers), you still need to be aware of the danger zone. That is why it is not recommended to thaw items by sitting at room temperature. Rather, thaw them overnight in the refrigerator. For faster but still safe thawing, use either a cold-water bath (make sure the leftovers are in a leak-proof package) or the microwave. Not all foods need to be thawed before re-heating. You can go directly from frozen to hot either on the stovetop or in the microwave.

One important caveat – when re-heating leftovers, you want to take them up to 165° as measured with a food thermometer. Not only will this temperature assure safety as far as bacteria is concerned but it will also be safe to re-freeze the item, if necessary.

So, be happy about left-overs from your Thanksgiving meal. How do you like to use your left-overs? Email me with your favorite ideas and I will share them with others!