Cooking Tips · Ingredients · Techniques

Lentils – Not just for vegetarians!

So many of us are trying to cook and eat in a more healthful manner. I wrote an entire series of Cooking Tips on how to do that. Here is the first one in that series. One way we could all do that is to increase our intake of foods that I suspect we do not eat regularly. One such food is Lentils. What lentils are and what to do with them is the subject of this Cooking Tip.

Some people think lentils are a type of grain. However, they are part of the legume family, similar to beans, peas, and chickpeas. Lentils are a nutritious source of fiber, protein, and other nutrients.

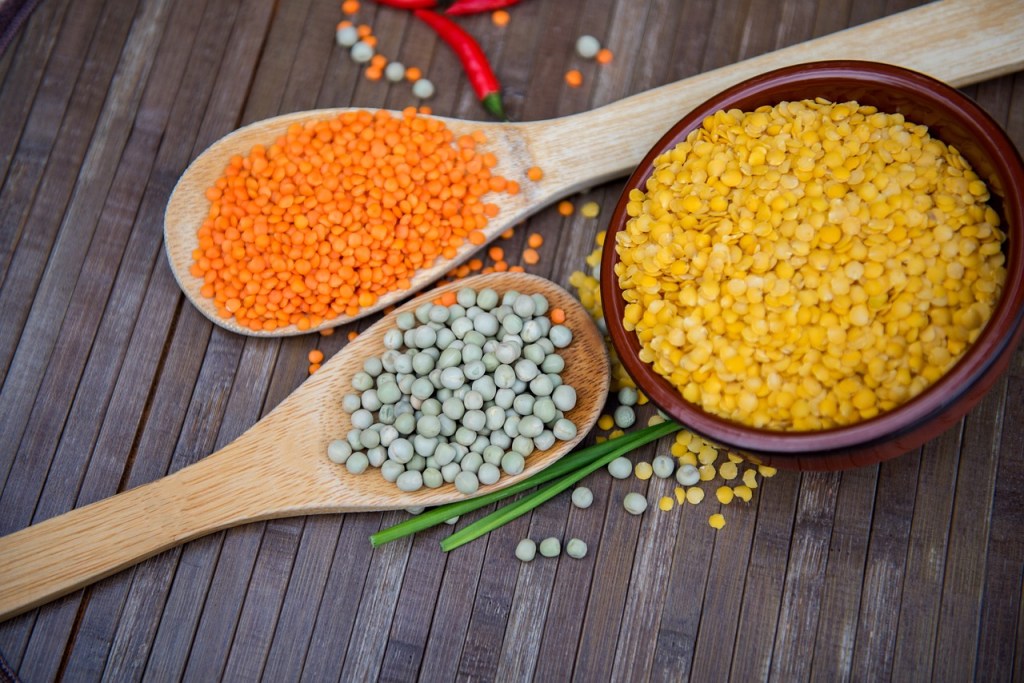
Although you will probably just see a couple of varieties in your market, there are numerous types. They vary in color from brown to green to black to reddish-orange. Some are considered large, others small, and even others petite.

Most lentils will be sold in a whole shape. However, some, such as red or yellow, are sold as “split.” This means their seed coat is removed, and they are cut in half.

Brown Lentils

  • These are the ones most commonly found in supermarkets.
  • Size/shape – large, flat
  • Color—light brown. Because the brown color can have a greenish tint, they are sometimes called green lentils. Do not confuse these with French green lentils.
  • Taste – Mild, earthy flavor
  • Uses
    • They are intermediate in their ability to maintain their shape. They break down easier than French green lentils or Beluga lentils, but not as much as red and yellow. To keep them as firm as possible, do not overcook them.
    • Use in soups, stews, curries, salads, pilafs or meat replacement dishes.
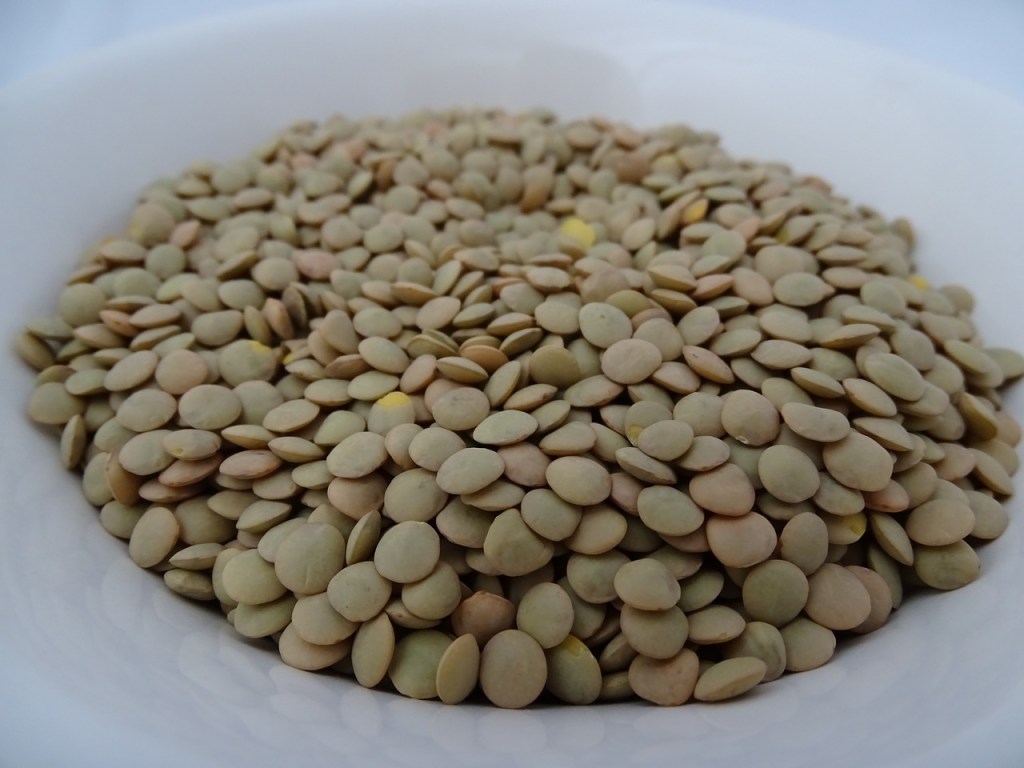
Green Lentils

  • Some sources consider these a type of brown lentil, while others describe them as a separate variety. They are not the same as Puy lentils, though.
  • Size/shape – similar in size/shape to brown lentils
  • Color – a dusky green color
  • Taste – earthy but slight peppery quality
  • Uses are similar to brown but may maintain their shape better when cooked.

Lentilles du Puy (du Puy lentils)

  • These are only grown in the Puy region of France and are known as French green lentils. Not all French green lentils are grown in this particular region of France. If they do not say “Puy,” they are probably the same variety but grown elsewhere.
  • Size/shape – smaller and rounder than other lentils. They have a thicker skin than other green lentils, which gives them a firmer texture.
  • Color – greenish with dark specks.
  • Taste – If true “Puy” lentils, they will have mineral and peppery notes due to the volcanic soil in which they are grown. This may not be so if you have green lentils grown in other areas of France.
  • Uses
    • They take longer to cook.
    • As they hold their shape, they work well in salads and soups, although they may require pureeing in the latter.

Red Lentils

  • Size/shape—These are often sold as “split,” meaning their coat has been removed, and the inner part has been split in half.
  • Color – reddish-orange
  • Taste – Earthy and nutty with floral notes.
  • Uses
    • These cook more quickly than other lentils.
    • They break down completely so they can be made into a puree.
    • Good in soups and curries.
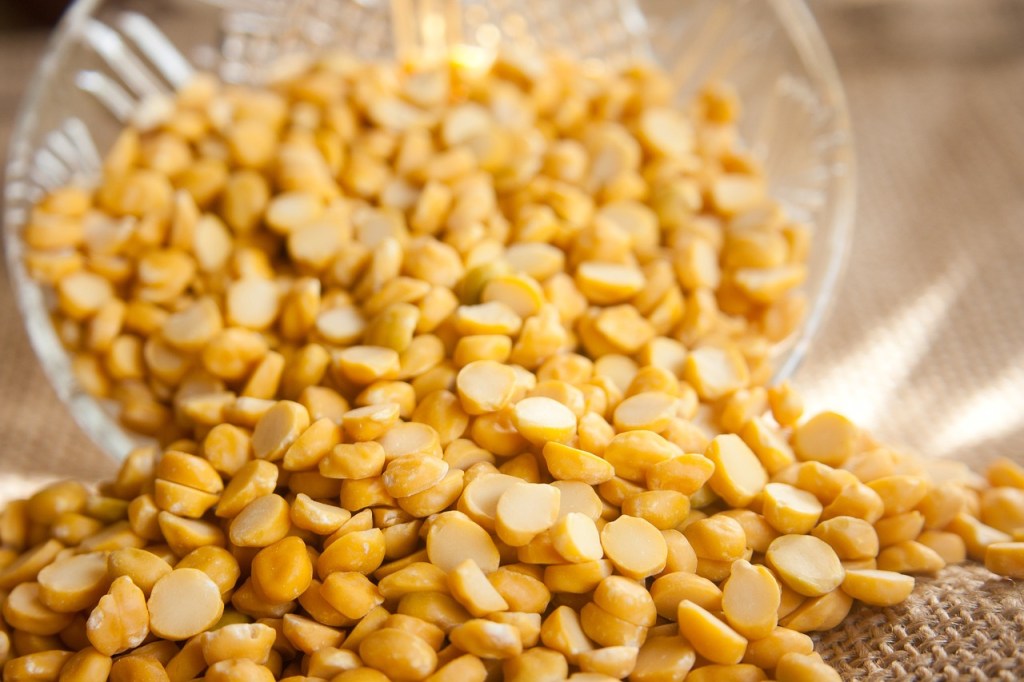
Yellow Lentils

  • These are very common in Indian cooking.
  • Color – yellow
  • Flavor – slightly sweet
  • Uses
    • They become soft when cooked and can act as a thickener.
    • Common in Indian dals, hummus, and as a thickener in soups and stews.

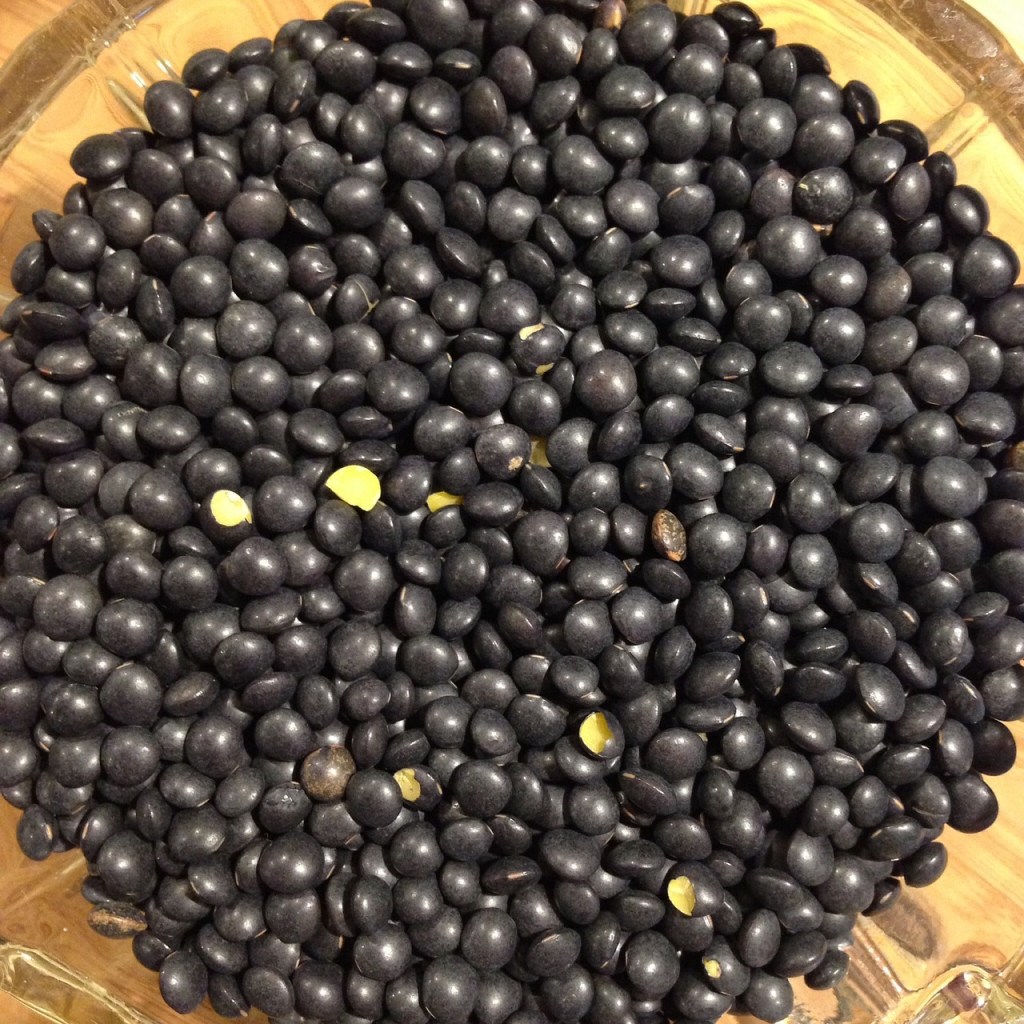
Beluga (black) Lentils

  • They get their name due to their resemblance to caviar.
  • Size/shape – very small and sphere-shaped
  • Color – dark brown to black
  • Taste – meaty and earthy
  • Uses
    • They have thicker skin, meaning they will retain their shape but take longer to cook.
    • Use in salads and soups.

Cooking Lentils

  • Purchase lentils that are as fresh as possible, as older lentils take longer to cook. If they are very old, they may not soften at all, despite how long you cook them. Some recommend buying from bulk bins as they tend to be fresher due to the more considerable turnover.
  • Lentils should be rinsed before cooking to remove dust or debris.
  • You should also sort through them to pick out any pebbles or grit that might be present.
  • They do not need to be soaked before cooking as they have a relatively short cooking time.
  • Cook lentils in plenty of water as they will swell in size as they cook.
  • Bring the water (or broth) to a boil, then reduce to a low simmer to prevent the skins from splitting.
  • Do not add salt until the lentils are cooked, as it can cause the lentils to stay crunchy rather than soft and tender. Some caution against adding acidic ingredients, such as tomatoes, for the same reason. However, others like to add them earlier to aid in flavor absorption.
  • To add more flavor, add aromatics (onion, leeks, celery, carrots, garlic), spices, herbs, or even meat. Cook aromatics gently first before adding lentils.
  • Be aware that brown and green lentils will be firmer and hold their shape better, while red and split green lentils will quickly break down.
  • Cooking Times
    • Brown lentils – 20-30 minutes
    • French green lentils – 25-35 minutes
    • Red and yellow lentils – 15-20 minutes
    • Black Beluga lentils – 20-25 minute
  • America’s Test Kitchen likes to make crispy lentils to top soups and salads. After a short brine (see below), they strain and pat them dry. After heating oil in a pan until very hot, the lentils can be fried until crispy and golden. After removing from the pan, they can be tossed in seasonings of your choice.

Brining

  • As with other legumes, the skin of the lentils can easily rupture during cooking. To prevent this, America’s Test Kitchen recommends soaking them in a salt brine before cooking. They recommend a teaspoon of salt in a quart of water and soaking for an hour.
  • Do not brine split lentils since their coat has been removed.
  • Skip brining if you want a softer, more mushy texture.

Storage

  • Dried lentils have a very long shelf life. Store in an airtight container away from light, heat and moisture.
  • Cooked lentils may be stored in an airtight container in the refrigerator for up to a week or in the freezer for up to a month.

Are you a regular consumer of lentils? I must admit that I am not although my husband likes them in soup. I challenge all of us who are not lentil-eaters to set a goal of trying the different varieties. That is one healthy challenge!

Cooking Tips · Ingredients · Techniques

Japanese Milk Bread – Is it worth the effort?

People often ask me if I like to bake or to cook. I always find this question hard to answer as I love to do both. If I was forced to pick one, I just couldn’t do it. Many people, though, find themselves gravitating towards one or the other. If you consider yourself an avid baker, you probably have heard of Japanese Milk Bread. If you shy away from baking, you may not have heard of it. It is a delicious creation, and what it is and why you might want to try it are the subjects of this Cooking Tip.

If you love artisan bread with its thick, chewy crust and interior full of holes, milk bread is not for you. If you only want to eat bread made with whole grains, milk bread is not for you. If, however, you love the guilty pleasure of soft, creamy, slightly sweet white bread, read on.

Image by Sornram Srithong from Pixabay

According to Bon Appetit, Japanese milk bread may have been invented by a British baker who opened a bakery in Japan in 1862. If you have never tasted milk bread, the closest thing you may recognize is white supermarket sandwich bread, although that is not as flavorful or as fluffy as milk bread.

Japanese milk bread is an enriched bread, meaning it contains more than just flour, water and yeast. Enriched breads also contain fat, dairy, eggs and/or sugar.

Other names you may see are Hokkaido milk bread or Shokupan. The latter Japanese term means “food bread.” It is a general term for a loaf that you slice and toast into sandwiches. It has a soft interior with a mild flavor and minimal crust. As it has evolved, today’s shokupan contains more fat than the original.

The key to making this bread is something called Tangzhong, which is a Chinese technique. It is a warmed roux usually made with milk and flour, although some recipes use water and flour, and others use all three. This tangzhong is said to do a couple of things. According to MasterClass, it allows the flour to absorb more liquid, yielding a moister result. The warm liquid also starts activating the gluten in the flour, aiding in trapping the liquid and achieving the final soft texture. It also helps to give milk bread a slightly longer shelf life than other breads.

As a sideline, not all bakers agree that tangzhong is the key to milk bread. Read this post from Epicurious for more information. Since the large majority of recipes use the tangzhong method, I will discuss that.

Besides the tangzhong, the other ingredients are flour, yeast, milk, sugar, butter, eggs and salt. Some recipes will add nonfat dry milk powder, saying it improves the bread’s tenderness and flavor.

  • Tangzhong – This is made by mixing the flour, milk, and/or water together over low heat until it thickens to a pudding-like consistency and reaches 150°F. It is then set aside and allowed to cool slightly before continuing with the recipe.
  • Flour – Most recipes use bread flour, although some have developed recipes using all-purpose flour.
  • Sugar – This gives the bread a sweeter flavor than other breads. Most recipes call for about ¼ cup.
  • Butter – As with all baking, use unsalted unless salted is specifically called for. Some recipes just have you soften it, while others will melt and cool it before adding it to the mixture.
  • Egg – Another enriching ingredient that increases the fat content.
  • Folding/Shaping – After the dough is mixed sufficiently and allowed to rise, most recipes require you to follow a folding technique for shaping followed by a second rise. The folding technique will vary depending on the recipe, so consult the one you are using for their recommendations. The classic baking method is in a Pullman pan, but you can also use a loaf pan or even shape the dough into rolls.

Although most recipes are similar, they can vary somewhat. As with all baking, it is best to follow your specific recipe carefully and use weights rather than volume measurements, if possible. Here are three recipes to try—all from reputable sources. The first two give measurements in weight and volume, while the third is volume only.

Have you made milk bread before? Did you like it? If you haven’t made it, I encourage you to try it. Although it is not the healthiest bread, it is delightful on the palate!

Cooking Tips · Ingredients

Tap Water – Hot, Cold or Neither?

Image by Karolina Grabowska from Pixabay

Imagine you are making pasta for dinner, and you are running behind. Your sauce is ready, but you still need to cook your pasta. For that, you need boiling water. You fill your pot with hot water from the tap to save time. Or, you want to make a beverage that requires hot water. Why heat cold water? Why not use the already hot water from your tap? Have you ever been in those situations? What you should and shouldn’t do is the subject of this Cooking Tip.

The simple answer is don’t do it! Don’t use that hot tap water for your cooking or drinking. Why not?

Lead

  • Lead is commonly found in our plumbing systems, especially in older homes. Even newly-manufactured pipes have a permissible amount of lead in them.
  • Lead dissolves more easily in hot water than cold and, therefore, is more likely to contain higher amounts of lead. We all want to limit our exposure, but especially those of our children, to lead.

Contaminants

  • Hot water systems like tanks and boilers contain metallic parts that corrode as time goes by. These can contaminate your water. Hot water dissolves these contaminants faster than cold water.

Bacteria

  • Hot water tanks can act as biological incubators and grow bacteria.
  • The CDC says boiling water for one minute (or three minutes at elevations higher than 6,500 feet) will kill bacteria. However, boiling water does not remove lead.

Minerals

  • Hot water contains more dissolved minerals from your pipes, which, although not a health hazard, can negatively affect the taste of your food and beverages.

Ben Montross, Vermont’s Drinking Water Program Manager, has the following advice to consume tap water with the lowest possible risk.

  • Only consume cold tap water.
  • Flush the taps until the water runs truly cold before consuming it.
  • Regularly clean and sanitize appliances that use water.

I have always used cold tap water, but others in my household do not always heed this advice. What about in yours?

Cooking Tips · Ingredients · Techniques

Beurre Monté – just another butter sauce?

Sauces are one of my favorite things to make. They are easy, and they elevate food from ordinary to delicious. I have written three prior Cooking Tips – Sauces Demystified, Mother Sauces I and Mother Sauces II on different types of sauces. One sauce I have not discussed is Beurre Monté. That is the subject of this Cooking Tip.

Image by Peter Toporowski from Pixabay

As you might suspect, beurre monté is a French invention. It is translated in various ways: “worked up butter,” “prepared butter,” “mounted butter,” or “whipped butter.” It is also a very simple and delicious sauce, as long as you don’t mind that it is made almost entirely of butter.

We all know that fat and water do not mix. We must force them to do so by the process called emulsification. This is done by slowly adding one ingredient to the other while vigorously mixing. This suspends tiny droplets of the one into the other. Vinaigrettes are one type of emulsion. The water element is typically vinegar, citrus juice, fruit juice or a combination. The fat usually is olive oil. If you pour them together, they will naturally separate. It is only by whisking the water-like ingredient while you slowly pour in the oil that you will get them to combine into an emulsion. They will often separate when setting, but you can again re-emulsify the mixture by shaking or mixing.

If you have read my Sauce Cooking Tips, you will have read that most pan sauces are finished by whisking a small amount of cold butter into the sauce. This thickens the sauce and gives it a glossiness and richness. That process is called “monter au beurre.”

Although it sounds similar, beurre monté is different. It is an emulsion, one that is made by whisking cold butter into simmering water. As one source puts it, it is the “lifeblood of many professional French kitchens.” That sounds like it would also be a good sauce for us home cooks to know.

There are only two ingredients – butter and water. Cooks Illustrated will tell you that the ratio of butter to water is crucial. You want only enough water for the fat droplets to disperse themselves without the result being too thin and watery. However, not everyone is such a stickler for that ratio.

Cooks Illustrated recommends three tablespoons of water to eight tablespoons of butter. Thomas Keller of The French Laundry uses four tablespoons of water to one pound (32 tablespoons) of butter. Masterclass agrees with Keller.

Despite your water-to-butter ratio, all agree on the method. Bring your water to a boil and reduce to a very low simmer. Start whisking the cold butter in piece by piece. You want the butter to melt and break into droplets that you emulsify in the water bit by bit. Continue this process until you have emulsified all the butter. Season to taste and you are done.

Feel free to try some variations on this basic recipe.

  • Stock – substitute stock for water, but be cautious of the sodium content.
  • Herbs – whisk in minced fresh herbs. Hardy ones (rosemary) can be added at the start, but more delicate ones (tarragon) should be added at the last minute.
  • Preserves, liqueurs, juice – After adding the butter to the water, whisk in 1½ Tablespoons jam or jelly and 1½ teaspoons of liqueurs or juice. Cooks Illustrated recommends raspberry jam plus Chambord, apple jelly plus brandy, or plum preserves plus amaretto.

Some might ask how this is different than just melting butter by itself. The result is quite different. Melted butter will be thin and just run off the food. By contrast, beurre monté coats and clings to the food and provides a more luxurious experience.

How would you use beurre monté?

  • As a sauce on its own for meat, fish, pasta or veggies.
  • As a base for another sauce. Make the beurre monté and add other flavorings such as herbs, spices, lemon juice, shallots, jams, liqueurs and more.
  • As a poaching liquid for veggies, delicate meat or seafood. Because of fat’s low heat conductivity as compared to water, it will allow you to cook meat and fish more gradually, giving you a tender and not overcooked result. It also infuses the meat and fish with the flavor of butter.

You may make smaller amounts to meet your immediate needs. You can also make it ahead and hold it for up to 4 hours. To do that, put a lid on the pot and keep it warm but only at a sub-simmer, 135-160°F.

The leftover sauce may be refrigerated but will not have the same texture upon reheating. Instead, upon reheating, use it as you would regular melted butter. You could also heat it to turn it into clarified butter by removing the milk solids.

I do not know about you, but I have some salmon in my freezer that is just calling out to me for it to be dressed in a beurre monté. What about you?

Cooking Tips · Ingredients

Herbs in a Tube – Are they any good?

Have you seen those tubes of herbs in your market? Have you ever tried them? Should you try them? Read on as this Cooking Tip breaks down this subject. For more information on fresh herbs, see this prior Cooking Tip.

The leading brand of these herb pastes you will see in the stores is Gourmet Garden. They have several varieties, including basil, garlic, ginger, cilantro, Italian herbs, jalapeno, lemongrass, parsley, Thai seasoning and lemon. The company says they are “the perfect substitute for fresh herbs or spices.” The only information about how these pastes are made is

“The herbs and spices are harvested at a time that maximizes their flavors. This crop is then washed, chopped and cold blended for you to discover the fresh chopped taste when you open the tube in your home.”

When you buy (or grow your own) fresh basil, the only ingredient is basil. In contrast, the ingredient list on a tube of Gourmet Garden Basil is:

“The herbs and spices are harvested at a time that maximizes their flavors. This crop is then washed, chopped and cold blended for you to discover the fresh chopped taste when you open the tube in your home.”

When asked about these other ingredients, the company says the following.

“Gourmet Garden products do not contain artificial colors, flavors or preservatives. There are a few simple food ingredients included in the product, though their role is about creating an environment where harmful bacteria cannot grow. These ingredients are kept to a minimum and it’s about having a product which is fresh and safe for people to consume and still deliver the fresh taste of herbs and spices to you in a convenient pack.”

If this is a concern for you, the herbs are grown and processed in Australia and then shipped to both Australia and North America.

Another company that sells herb/spice pastes is Amore. This company is based in Italy and is most known in the US for its tomato paste, but they also sell Pesto, Anchovy, Garlic, Herb, Chili pepper and Sundried Tomato. Unlike Gourmet Garden products, which are displayed in a chilled display in the produce section, Amore products are displayed on the shelf, often in a specialty food section. They do require refrigeration after opening.

There may be other companies producing herb pastes, but Gourmet Gardens and Amore are the two you are most likely to find.

What do these products taste like, and should you consider using them? I was surprised that there were not that many reviews of these products. Those that I did find were mostly positive in terms of taste. There were some cautions, though.

Fresh vs. cooked

  • They are better in cooked dishes such as soups, sauces, pasta and meat dishes.
  • Where you want the fresh basil flavor to shine through, as in pesto and other uncooked dishes, stick with fresh basil.

Shelf life

  • Although the shelf life of these tubes is longer than fresh herbs, it is still only about three weeks (for Gourmet Garden) in the refrigerator after opening.
  • They also caution you against leaving the tubes out of the refrigerator for more than a half hour.

Other ingredients

  • All of these products contain other ingredients to aid in packaging and shelf life. They generally include some type of sugar, oil and salt. Be sure to look at the nutritional labels, as they vary from brand to brand. Let’s first remind ourselves of dietary advice.
  • Sugar – The American Heart Association recommends limiting added sugar to 25 grams for women and 35 grams for men.
  • Salt – The current dietary recommendation is to limit our salt consumption to 2300 mg or less daily.
  • Oil – Dietary guidelines instruct us that our saturated fat intake should be limited to less than 10 percent of daily calories. We should, instead, use unsaturated fats, particularly polyunsaturated fats. For more on fats/oils, see this Cooking Tip.

Let us compare these added ingredients for these two brands.

Gourmet Garden’s Italian Herbs

  • Ingredients – basil, dextrose, oregano, canola oil, sodium lactate, whey (milk), parsley, glycerin, sea salt, ascorbic acid (to protect color and flavor), rosemary, xanthan gum, acetic acid, citric acid.
  • Sugar – You will see that the second ingredient is dextrose, a type of sugar. A serving size of 1 teaspoon contains 1 gram of sugar, about ¼ teaspoon.
  • Salt – One teaspoon contains 125 mg of sodium.
  • Fat – Total fat in one teaspoon is 0.5 grams. From the ingredient list, it is all in the form of canola oil.

Amore’s Herb Paste

  • Ingredients – basil, sunflower oil, Italian parsley, oregano, extra virgin olive oil, salt, citrus fiber, citric acid.
  • Sugar – 0 grams
  • Sodium – 55 mg
  • Fat – 1.5 grams and is a mixture of sunflower and extra virgin olive oil.

I have used several Gourmet Garden’s products although only in cooked applications. I find them quite suitable for that purpose. The only Amore product I have tried is their Tomato Paste, which is very nice. In a test of tomato pastes done by America’s Test Kitchen, they recommended this product alongside others in a tube, such as Cento and Mutti.

As I was researching this Cooking Tip, I found the difference in ingredient lists illuminating, and it may also help you to choose as you are in the store.

If you have fresh herbs that you won’t use up, you can make your own herb pastes. Just combine your herb(s) of choice in a food processor with a bit of olive oil until you get a paste consistency. Freeze in an ice cube tray, remove to a bag and stow in your freezer.

Have you tried Herb Pastes, and what do you think?

Cooking Tips · Ingredients

Mirin, Rice Vinegar, Sake – Is there a culinary difference?

If you like to cook Asian-inspired dishes, especially Japanese, you have undoubtedly seen some ingredients you may not have in your pantry. These might include mirin, rice vinegar and sake. What these ingredients are, how they differ, and how best to use them is the subject of this Cooking Tip.

Mirin

  • This is also known as sweet rice wine. It is made with steamed glutinous rice, koji, and a distilled rice liquor with a low alcohol content.
  • Koji is steamed rice inoculated with koji mold, a fungus used for various culinary purposes, which is then allowed to ferment. It starts the fermentation process when added to ingredients like soybeans, rice, or wheat grains. This fermentation process can last anywhere from two months to many years
  • The liquor is known as ‘shochu’. It is most commonly made with sweet potato, barley, rice, buckwheat and sugar cane.
  • The sweet flavor comes from the starch in the rice being converted into glucose.
  • Mirin has an alcohol content of around 14% and contains 10 to 45% sugar.
  • Mirin is somewhat comparable to the flavor of dry sherry.
  • It is similar to sake but has a lower alcohol content and more sweetness.

Types of mirin

  • Hon-mirin
    • This type is termed “true mirin” or “genuine mirin.” It is the most traditional kind of mirin and has about a 15% alcohol content with no added sugar. Other types of mirin tend to use sake rather than shochu. Testing has shown it is worth seeking this out if mirin is a main ingredient due to its superior and more complex flavor.
    • All sources agree that hon mirin is the authentic type. How the other types are categorized varies by source.
    • True hon mirin will be challenging to find in stores, but you can seek it out in specialty stores or online.
  • Mirin-fu chomiyro (shin mirin)
    • This means “mirin-style seasoning”. It has no or very little alcohol and abundant added sweeteners. Another name you will commonly see is “Aji-mirin.” This translates to “flavor of mirin” and is less expensive due to the processing. It has added sugar and only about 8% alcohol. This type has a lower alcohol content and a sweeter flavor. It is made with water, rice, salt, alcohol, and corn syrup.
  • Shio-mirin (salt mirin)
    • This one is the saltiest due to salt added during fermentation, but it still has the typical sweetness.

Uses

  • When you want to add a bit of sweetness to the dish. Use restraint, though, so you do not overpower your dish with sweetness.
  • To add umami and more depth of flavor.
  • To add shine to your dish. The sugar in mirin can give your food a mild shininess, such as when used with a teriyaki or other sauces.
  • To eliminate certain smells. As the mirin is heated and the alcohol starts to evaporate, it can take the odor of fish or meat with it.
  • Helps to tenderize meat.

Recommended brands

  • Kikkoman manjo premium hon mirin sweet rice wine seasoning
  • Fukuraiyun traditionally brewed hon mirin sweet rice wine
  • Takar hon mirin sweet rice wine (Note that some from this brand use sake rather than shochu.)

Substitutes

  • Rice vinegar – this can be used in a pinch, but it may be too acidic and bitter because it is vinegar.
  • Sherry in equal amounts.
  • Marsala wine.
  • Add one teaspoon of sugar to one tablespoon of white wine or sake for every tablespoon of mirin.

Rice Vinegar (or rice wine vinegar)

  • This is a type of vinegar that is made by fermenting rice. It is usually milder than the typical vinegar we have in our pantries.
  • Japanese and Chinese rice vinegars are different. Japanese is white in color and mild in flavor. Chinese can be red, black, or white depending on the rice variety used, and it has a more robust, sharper flavor.

Types of rice vinegar

  • White rice vinegar
    • This is the most common type.
    • It is clear to yellow in color.
  • Brown rice vinegar
    • It is light to dark brown in color.
    • It is made from unpolished brown rice.
    • It can be used interchangeably with white.
  • Black rice vinegar – often used as an umami dipping sauce
    • It is deeper in color and flavor.
    • It is made from black glutinous rice and other grains.
    • The flavor is somewhat smoky.
    • It is often used in Chinese stir-fries, dipping sauces, and as a condiment.
  • Red rice vinegar
    • It is made from red yeast rice (a fermented rice) and sometimes barley and sorghum,
    • The flavor is sweet, tart, and salty.
    • It is often used in Chinese seafood dishes and dipping sauces.
  • Seasoned rice vinegar
    • This is white rice vinegar with added sugar and salt.
    • It is used to season rice for sushi and is also good in salad dressings.

Differences between mirin and rice vinegar

  • Alcohol content
    • Mirin is a cooking wine with an alcohol content between 8% and 15%.
    • Rice vinegar contains no alcohol.
  • Aging
    • Rice vinegar is aged more than mirin, giving it more umami.
  • Uses
    • Use mirin when you want a bit of sweetness.
    • Use wine vinegar for more umami.

Substitutes

  • Other vinegars, such as apple cider or white wine vinegar. Use equal amounts, but add ¼ teaspoon of sugar.

Uses

  • Seasoned rice vinegar is classic with sushi rice.
  • Noodle dishes
  • Fried rice
  • Dressings
  • Pickled dishes
  • Marinades and chili sauce.

Sake

Image by Erwin from Pixabay
  • This is a Japanese alcoholic beverage made from four ingredients – rice, water, yeast and koji (a mold.)
  • It uses a particular type of rice called Sakamai.
  • It is made through a brewing process similar to beer. The rice starch is converted to sugars, which ferment into alcohol by yeast.
  • Use in your cooking as you would wine.

Substitutes

  • Dry Sherry
  • Chinese rice wine
  • White wine
  • Dry vermouth

Sushi vinegar

Image by Harry axalant from Pixabay
  • Also known as awase-zu, which means combined vinegar.
  • Sushi vinegar is not a different vinegar but is rice vinegar to which sugar and salt has been added.
  • It can be bought ready-made, or you can make your own.

Those are some of the most common Japanese condiments that you will use not only in Japanese cooking but in many Asian dishes. Now that you know the differences and how to use them, I hope you experiment with making some wonderful dishes!

Cooking Tips · Ingredients · Techniques

Sour Cream – for more than baked potatoes!

Take a look in your refrigerator right now. Is there a container of sour cream there? Did you buy it for one recipe, and then it just sits there until it goes moldy, and you throw it away? What is sour cream anyway? All those questions and more are the subject of this Cooking Tip.

Sour cream is a dairy ingredient that adds a creamy and tangy flavor to your dishes. It can be used in both sweet and savory applications. It is made by adding lactic acid and bacteria to a combination of cream and/or milk and letting it thicken and sour.

Regular sour cream contains about 20% milk fat. Light sour cream is made from a mixture of milk and cream, resulting in a lower fat content.  Non-fat sour cream has no fat, but it needs to be thickened. This is achieved by adding stabilizers and thickeners such as corn starch, gelatin, carrageenan, and guar gum.

Brand Differences

There are differences in the ingredient lists between brands. Just check the labels.

  • The Daisy Brand list of ingredients is only “cultured cream.” This is the top choice of America’s Test Kitchen.
  • Knudsen’s brand shows “cultured pasteurized Grade A cream (from milk), enzymes.”
  • My store brand has this much longer list – “cultured cream and skim milk, whey, modified corn starch, cultured dextrose, gelatin, sodium phosphate, guar gum, carrageenan, sodium citrate, calcium sulfate and locust bean gum.” I know which one I would rather buy for the minimal difference in price!
  • The “Natural” store brand is better, showing “cultured cream and skim milk, enzymes.”

Uses for Sour Cream

  • In cold dishes, it:
    • Adds creaminess, mild acidity and a bit of tang.
    • Acts as a binding agent to hold ingredients together, as in a chicken salad.
    • Can be a replacement for mayonnaise with a lower fat content but it won’t be as acidic.
    • Examples
      • Use in deviled eggs in place of mayonnaise.
      • In pasta/potato salads, swap sour cream for all or part of the mayonnaise.
      • Try as a sandwich spread.
      • It makes for creamy dressings and dips.
      • Add to whipped cream to add another flavor dimension. Add ¼ cup to 1 cup of heavy cream along with your sweetener of choice. Whip together with an electric mixer.
  • In hot dishes, it:
    • Balances heat with its tanginess.
    • Adds richness to baked goods.
    • Can be a wonderful finishing touch with a hint of acidity.
    • It can act as a thickening agent for sauces and soups.
      • For sauces, gradually whisk it into the warm sauce to prevent curdling and separation.
      • For soups, add towards the end of the cooking process.
    • Examples
      • Add to soup or chilis as a topping/garnish.
      • Top your tacos, burritos, and baked potatoes.
      • Add to a pasta sauce to increase creaminess.
      • In cakes/muffins, it can give you a moist and tender crumb. The acidity also helps balance the sweetness. Substitute a portion of the liquid in your recipe with sour cream.

Make your own

Image by Олег from Pixabay

Some people like to make their own as they control the ingredients that go into it, and they only have to make the amount they want. Here are some ways to do that.

Buttermilk technique

  • Combine 1 cup heavy cream and ¼ cup buttermilk in a sterilized jar and seal. Shake vigorously to combine.
  • The bacteria in the buttermilk will ferment the cream, which leads to souring and thickening.
  • Allow to sit at room temperature for 24 hours.
  • Store in refrigerator for up to 2 weeks.
  • Replace some of the cream with whole milk, half-and-half, or light cream if you’d prefer a lower-fat version. Just keep in mind that your sour cream will not turn out quite as thick if you decrease the fat. To thicken, you can pour through cheesecloth.

Vinegar/lemon juice technique

  • This is similar to the buttermilk technique but uses a different acid – either lemon juice or white vinegar.
  • Combine ¼ cup room temperature milk and either 1 tablespoon of lemon juice or 2 tablespoons of white vinegar. Thoroughly combine.
  • Add 1 cup room temperature of heavy cream. Combine.
  • Let sit in a warm place for at least 12 hours to a maximum of 24 hours.

Powdered sour cream

Many of us use powdered buttermilk. There is also powdered sour cream that you can reconstitute just like powdered milk. The former is easy to find in our markets, whereas the latter will probably have to be purchased online.

Substitutions

If you do not have any on hand for a particular recipe, you can try the following substitutions.

Yogurt

  • America’s Test Kitchen tried substituting Greek yogurt for sour cream in three recipes.
    • In biscuits and a sour cream sauce, the yogurt did fine.
    • In beef stroganoff, the yogurt with its lower fat content broke due to the heat.
  • Use plain yogurt, preferably Greek, in equal parts.
  • If you are not using Greek yogurt, consider draining it through a cheese-cloth-lined sieve over a bowl for at least 30 minutes.
  • Since yogurt is only 10-12% fat, it will not give you the same richness but can certainly be used.
  • For baking, for one cup of sour cream, use one cup of yogurt plus one teaspoon of baking soda.
  • For a dip, combine 1 cup sour cream with ¼ cup yogurt and 1 cup cottage cheese.
  • For a sauce, mix 1 cup of sour cream, 1 cup of yogurt, 1 tablespoon of flour, and 2 teaspoons of water.

Buttermilk

  • Try plain buttermilk. Since this is thinner than sour cream, many like to add softened butter to improve the texture.
  • Also, use less than the amount of sour cream called for, or it might be too liquid.
  • For baking, try ¾ cup buttermilk + ⅓ cup softened, unsalted butter.

Cottage cheese or Cream cheese

  • The texture of both of these items is different than sour cream. So, you should blend them with some liquid to get a consistency similar to sour cream.
  • For dips, combine 1 cup cottage cheese and ¼ cup yogurt/buttermilk in a blender.
  • For cream cheese, blend together 6 ounces of cream cheese and three tablespoons of milk.

Storage

  • To help it last as long as possible, store it in the refrigerator sealed tightly. It should keep for about three weeks.
  • Signs of it going bad are visible mold, the aroma of mold, or other off-smell (even if you do not see mold), or if it is taking on an off-white color.
  • If you see mold, just as with soft cheeses, you should not just scrape off the moldy part as the mold can extend into the product even if it doesn’t appear so.
  • Not a problem if it has separated. This is normal, and you can either drain it off or mix it back in.
  • When spooning it out of the container, always use a clean spoon to prevent introducing pathogens into the sour cream.
  • If you can’t use it up, try freezing it. Because the texture will suffer, reserve your frozen sour cream for use in cooked dishes, not fresh. Allow it to thaw in the refrigerator. If you add it to soup or similar, toss it in frozen.

Sour cream is such a simple ingredient, but it can add so much to your dishes. I am sure you already use it, but if not, pick some up when you are in the store or try making your own!

Cooking Tips · Ingredients

Is It Garlic or Is It Not?

Garlic is an ingredient that I am sure we all use in our kitchens. I have written a prior Cooking Tip on Garlic. However, there are less common garlic varieties and that is the subject of this Cooking Tip.

The garlic that we are all familiar with belongs to the genus allium and the species sativum. As I will show below, other types may be of the same genus but different species. There are two main types, or subspecies, of garlic. These are hard-necked garlic (Allium sativum var. ophioscorodon) and soft-necked garlic (Allium sativum var. sativum). There are a number of different varieties within these two subspecies, which will vary in size, color, aroma and flavor.

The soft-necked is what we normally find in our supermarkets.

Elephant Garlic

Image by Maison Boutarin from Pixabay
  • The first thing to know is that this is not really garlic. It is really a member of the leek family. Elephant garlic belongs to species ampeloprasum, the same as leeks.
  • It is two to three times larger than regular garlic but has fewer cloves. Regular garlic can have up to 20 cloves in a head where as elephant usually has no more than six.
  • It has a milder flavor than regular garlic. It produces the same flavor compounds when crushed as regular garlic but less. So, it doesn’t taste as potent.
  • Cooks Illustrated did a testing of both.
    • They first tried it in its raw form in aïoli. They found it had a “mild, garlicky and onion-like” flavor. That is not surprising given that it is related to leeks.
    • They also used it in soup, where it was simmered for a longer time. Here, they found the flavor was so mild that it disappeared.
    • Their conclusion was that it is not a substitute for regular garlic if you enjoy the flavor of garlic.
  • Good uses for elephant garlic.
    • Raw dishes such as dips or vinaigrettes.
    • Roasted and served with bread or in a pesto or mashed potatoes.
    • Roasted and served with seafood, poultry or meat dishes.

Wild Garlic

Image by Hans from Pixabay
  • This plant is a different species than regular garlic although it is considered a wild cousin to regular garlic. It is part of the amaryllis family.
    • According to the Agricultural Research Service (part of the Department of Agriculture), true garlic in its wild form is grown “only in Central Asia today. Earlier in history garlic grew wild over a much larger region and, in fact, wild garlic may have occurred in an area from China to India to Egypt to the Ukraine.”
    • Outside of this “center of origin,” plants referred to as “wild garlic” will be of the allium genus but not the species sativum. Here in North America, what we call wild garlic is probably Allium vineale“.
  • It is a favorite among foragers. It can be found mid-February to April and it grows in damp woodland and by shaded streams.
  • It has dark green, wide, pointed leaves with a single flowering stem with a star-shaped white flower. Be careful if you are foraging as some look-alikes are poisonous.
  • The aroma is of mild garlic and similar to chives.
  • The entire plant is edible.
    • The bulbs can be use like an onion.
    • The early shoots are used as you would salad leaves or herbs.
    • The bigger leaves are chopped and eaten raw or cooked like spinach.
    • The stems are used like chives.
    • The flowers are sprinkled as a garnish.

Garlic Scapes

Image by WikimediaImages from Pixabay
  • These are the long, slender flower stems that grow from the top of hardneck garlic, which is the type that grows in colder climates.
  • Farmers harvest these early in the year so the plant can then put its energy into growing the garlic bulb.
  • They are hard to find outside of farmers’ markets or specialty food stores in late spring or early summer.
  • The appearance is like a very long and curly green bean with a tapering tip.
  • The taste is a muted garlic flavor. It can be grassy and similar to scallions.
  • How to use garlic scapes.
    • Use them as you would green onions or chives.
    • It is recommended that the tips and bulb be cut off as they get mealy when cooked.
    • They can be a substitute for green beans in stir fries.
    • Tossed into omelets and frittatas.
    • Blended into a mild garlic butter.
    • They can add a very mild garlic flavor to pesto or dressings.

Green Garlic

Image by Larisa from Pixabay
  • Other names are “spring garlic” or “baby garlic”.
  • As the name implies, this is garlic that is harvested before maturity. It is available late winter to early summer with the peak being early spring. It is normally of the soft-neck variety.
  • It started just as a result of farmers thinning their garlic crop. It subsequently became very popular and is now a considered its own crop.
  • It looks similar to a green onion.
  • It has a mild garlic flavor with onion notes.
  • The aroma is of garlic but less pungent.
  • To use, trim off the root ends and any tough leaves. You can then chop the white and light green leaves and the first few tender inches of the dark green leaves.
  • You can substitute green garlic in recipes that call for onions, scallions or leeks.

Black Garlic

Image by Capucine from Pixabay
  • This is regular garlic that has gone through an aging process. It has been made in Korea for a long time but only has been sold in the US since 2007.
  • Traditionally, it was cooked at a low temperature for a period of months. Today’s process happens over days or weeks.
  • The appearance can be a bit startling as the cloves are a deep, black color.
  • The flavor is sweet and tangy, similar to molasses, tamarind or balsamic vinegar. The enzymes that result in the normal pungent garlic flavor/aroma are destroyed during the cooking process. This means that black garlic doesn’t taste like garlic.
  • The texture is sticky but spreadable.
  • Uses – The flavor is too subtle for normal garlic uses. Use it sauces, dressings, stews or as a condiment. Just do not expect a garlic-like flavor.

Have you ever tried any of these garlic varieties? What do you think? Let me know!

Cooking Tips · Ingredients

Air-Chilled Chicken- Worth It or Just Hype?

I was recently teaching a class on how to make a delicious Valentine’s dinner. During that class, a question was asked about the pros and cons of air-chilled chicken. Since this was a topic of interest, I thought I would dedicate this Cooking Tip to that topic.

When poultry is processed commercially, part of the process involves chilling the meat. For food safety reasons, the USDA requires that the chicken be cooled to 40°F or lower within four hours of slaughter.

There are two ways to accomplish this – cold water chilling and air chilling. The former is how most chickens are handled in the US, although air chilling has been widely used in Europe since the 1960s. According to D’Artagnan, air chilling has only been used in the US since 1998.

Here are some differences between these two methods and some of the claims made about them.

Water chilling

  • With this method, the chickens are submerged in chlorinated ice-cold water.
  • The temperature is quickly reduced to the proper temperature.
  • Because of being submerged in the water, the chicken absorbs excess water. Studies have shown that the chickens can absorb anywhere between 2 and 12% of the weight in water, which you pay for at the checkout.
  • Many chickens are cooled in the same vat of water. Some feel this increases the risk of cross-contamination of pathogens from one chicken to the others. Consumer Reports periodically analyzes chicken for pathogens. A 2010 report found that 62% of the chickens were contaminated with campylobacter, and 14% contained salmonella. Testing done a few years later (2018) found 9% of the samples testing positive for salmonella. It is important to note that both of these pathogens are killed by proper cooking.

Air Chilling

  • The process involves putting the chicken into temperature-controlled chambers, where they are chilled for about three hours.
  • Because the chicken is not put into water, no excess water is absorbed. Proponents claim the following benefits.
    • More tender chicken
    • Better texture
    • Better tasting chicken
    • The chicken cooks faster as it does not contain excess moisture.
    • As the skin does not get water-logged, you are able to get very crispy skin when the chicken is roasted.
    • This process saves water but incurs higher electrical costs.
    • Reduced chance of cross-contamination of pathogens. Testing has shown that air-chilled chickens are cleaner. However, one study showed that about 40% were still contaminated with salmonella and/or campylobacter.
  • Because this process takes much longer, is more labor intensive and takes special chambers, it is more expensive. Some of this cost is offset by the fact that you are only paying for the weight of the chicken, not excess water.

According to Bell and Evans, a poultry business that started in 1894, most US producers may claim air chilling, but, in reality, they use a hybrid method that combines chlorinated water chill and air chill. They built the first 100% air-chilled facility in 2005, although they are not the only such facility today.

If you wish to try air-chilled chicken, ensure it states so on the package. It is most likely water-chilled if it doesn’t say it is air-chilled.

Unless you order online from some farms that have invested in air-chilling facilities or have a local farm that uses this technique, air-chilled chickens may be hard to find. Sources say that Whole Foods and Costco sell air-chilled chickens. My local supermarket does not carry them, but some Safeway stores do.

I must admit that I have not tried air-chilled chicken. Have you? What do you think of it? Let me know.

Cooking Tips · Ingredients

Goat Cheese – Should you take another look at it?

If you have been to a cheese-monger or a good cheese department in a supermarket, you can see just how complicated the world of cheese can be. I have written prior Cooking Tips on cheese in general – Part 1, Part 2 and Part 3. In this Cooking Tip, I want to concentrate on one type of cheese that can be somewhat polarizing – Goat Cheese. The world of goat cheese is not monolithic. Different varieties vary not only in flavor but also in texture.

People who do not like goat cheese say it tastes funky and even like a barnyard. However, this is not always true, depending on the type of goat cheese and its producer. I recall tasting goat cheese in a dish when visiting southern France. It was mild, creamy and delightful. I decided right then and there that I did like goat cheese – and it wasn’t like a barnyard at all!

France used to be the primary producer of goat cheese, and that is where one of its names – chèvre – comes from. It means goat in French. Its introduction into the US is relatively recent.

Laura Chenel of Sonoma, California, started the Laura Chenel Creamery. After working and studying around the world, she returned to California and bought her first goats. As the herd grew, so did the milk production, which she began to turn into cheese. She traveled to France in 1979 to learn more about the process of cheese making. The business grew and accumulated awards for their cheese production. America’s Test Kitchen places it at the top of their favorite goat cheeses.

One of Laura’s first customers was Alice Waters, an iconic name among American chefs. She introduced goat cheese into the dining scene when she topped a green salad with a round of breaded and baked goat cheese at her Berkeley restaurant, Chez Panisse. Since then, domestic production of goat cheese has surged.

Most goat cheese is described as tangy and grassy and, at times, gamy. One of the significant factors in the flavor is the goats’ diet. They have very strong stomachs and tend to eat many plants that have a pungent character. Cheesemakers that want to temper this will feed their goats a restricted diet to achieve their desired flavor profile.

The freshness of the goat milk is also an important determinant of the cheese flavor. The older the milk, the “goatier” the cheese will taste. According to the cheese makers, keeping male and female goats separate during the breeding season is also important. The male goats produce strong-smelling hormones that can affect the cheese’s flavor.

How much salt the cheese maker uses can make a difference in flavor and texture. The salt content of the cheese can vary greatly depending on the cheese maker. Those who keep it to a minimum do so as they feel salt interferes with the clean, fresh taste. Others think that salt can enhance the cheese’s flavor. Salt also has an effect on texture when the goat cheese is baked. Lower-salt goat cheeses became mealy or crumbly when baked, whereas those with a higher salt concentration tend to be smoother and creamier.

Cheese from both goats and sheep have a slightly lower lactose content than cows’ milk but are not lactose-free. The goat milk also has a different protein composition from cow milk, which makes it more digestible.

Goat milk can be made into many styles of cheese, such as brie, blue cheese, camembert, cheddar, feta, and gouda. One major categorization of goat cheese is fresh versus aged.

  • Fresh goat cheese is often called chèvre. As noted above, this term means goat in French. However, in common usage, it tends to indicate the traditional French, fresh goat cheese, which is typically un-aged and is soft and fluffy in texture. This is usually what you get when you buy a log of goat cheese, but the sealing process can lead to compression of the cheese. It may or may not be flavored with peppercorns, garlic, fruits or honey. It may also be coated in herbs and spices
  • Aged goat cheese – The texture of aged goat cheese can range from soft to firm and crumbly. As with many other types of aged cheeses, the flavor may be more pronounced. There are two aging periods.
    • Semi-soft – This is aged 8 to 15 days. It is still soft but does have a pronounced goaty flavor.
    • Hard and firm – This type is aged 3-4 weeks. It has a more full-bodied flavor with a drier texture.

How do you use goat cheese? Here are some ideas.

Image by Csaba Nagy from Pixabay

How about you? Are you a lover or hater of goat cheese? Do you have any favorite ways of enjoying it? If you think you do not like goat cheese, try to seek one that is milder in flavor, such as this one from Vermont Creamery or this one from Murray’s Cheese. Both can be found in my local supermarket and perhaps in yours, too.