Cooking Tips · Ingredients · Techniques

Paella — Spain in a pan

This is the second Tip in this series on Spanish cooking and is about Paella, one of the national dishes of Spain. It is a very popular dish and I just became aware that it even has its own emoji. 🄘 It would be good to review my prior Tip on Spanish ingredients before diving into how to make Paella.

Paella was originally called arroz a la valenciana, roughly translated ā€œValencian riceā€. The name of paella was given to this dish towards the end of the 19th century, being named after the distinctive pan in which it is cooked. As the original name implies, the dish originated in Valencia, Spain and paella cooks from that area have had their own version since the 1800s, paella valenciana. It originally contained rice, beans and spices along with chicken and snails. Later people began to use rabbit, pork and duck. Some will say that anything other than paella valenciana is simply un arroz en una paella – a rice in a paella pan.

As with so many dishes, there is not just one recipe for paella but there are some common threads. First and foremost, paella is a rice dish. It does usually contain meat and/or seafood although there are also vegetarian versions. However, it is really all about the rice.

If you read much about paella from experts, they will mention certain ā€œrulesā€ for making this dish. However, if you look at recipes or watch videos, you will see there are just as many versions that break all or most of those rules. If you choose to try paella, I want you to have as much success as possible. We will, therefore, start with some of the traditional recommended elements.

Paella pan

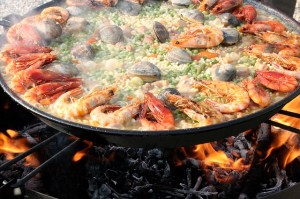
As I mentioned before, the name paella refers not only to the dish but to the pan in which it is made. It is a wide, shallow pan with sloping sides and two handles. It is typically made of thin, conductive metal. There are different sizes depending on how many servings there will be. The rice should be in a thin, even layer of about ½ to ¾ inch thick. Advantages of a paella pan are that the rice is in contact with all the wonderful flavors at the bottom of the pan, the rice is able to cook evenly and have quick evaporation resulting in a dry texture with separate grains of rice. Finally, the pan heats and cools quickly so that when the pan is removed from the heat, the rice in the bottom stops cooking immediately.

Most of us home cooks will probably not have a paella pan and will use another pan we already have. However, purists will say that a dish made of similar ingredients but cooked in a different pan is un arroz (a rice) and not a paella.

You may use one or two large skillets, preferably made of stainless steel or aluminum. Avoid cast iron or other heavy skillets that retain heat too much. Because of the limitations of the size of our cooktop burners, don’t use a pan larger than about 12 inches. You can, though, use two skillets. The method of cooking is described below but, if using two skillets, cook the meats and sofrito in one and then divide this between the two skillets, add half the liquid and carry on with the recipe.

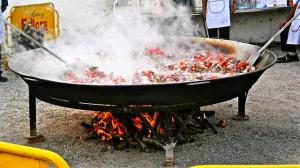
A paella pan does need a wide, powerful and uniformly distributed heat source. Traditionally, it is cooked over a wood fire, often with a special frame to hold the pan. Just as most of us will not have a paella pan, we will want to use our cooktops rather than a wood fire. Just realize that the burners will not be an exact fit and you may need to move and rotate the pan to get even cooking.

Rice

You do not want to use just any rice. Rather, you want a short- or medium-grained rice. This type of rice is able to absorb abundant liquid, up to three times its weight, which is more than your typical long grain rice.

Spanish short-grain rice is almost round, its length is only slightly longer than its width. Medium-grain will be a bit longer as compared to its width. Both have a high degree of pearling, which is the concentration of starch in the middle of the grain and gives it its very white color. It also allows for the great absorption and ultimate creaminess of the dish.

Spanish rice is sometimes named for the region where it is grown and sometimes for the rice variety. Some of the regions are Calasparra, Valencia and Delta del Ebro. The short-grain Bomba rice is a particular variety that is grown in all three regions and is the one most often recommended for making paella. It is said to be a little more forgiving in the cooking process and therefore, especially recommended for beginners.

None of these rices will most likely be present in your average supermarket. You will have to look for them in international markets or online. Some non-Spanish options that produce decent results are CalRiso, Calrose, California Blue Rose, Japanese short-grain rice and Italian short-grain rices such as Carnaroli and Arborio.

A standard serving of rice is ½ cup (100 gms) of uncooked rice per person. The amount of rice you use will determine the size of the pan that is needed. When everything is in the pan and the rice is in a thin layer, the liquid should ideally reach the pan’s handles. Here are recommended pan sizes for varying serving amounts.

  • 2-3 people – 12 inches
  • 2-4 people – 14 inches
  • 4-5 people – 16 inches
  • 4-6 people – 18 inches
  • 6-8 people – 20 inches
  • 10 people – 22 inches
  • 12 people – 24 inches
  • 15 people – 26 inches

Do not stretch the pan more than a serving or two beyond the recommended number or the purpose of the pan is defeated. But if you have a large group and only a moderate-sized pan, reduce the amount of rice per person from ½ to ā…“ cup and serve other appetizers and salads.

In your everyday cooking, you may use a 2:1 liquid to rice ratio but with this Spanish short-grain rice, it will be different. The exact rice-to-liquid ratio will vary depending on the size of the pan, the heat source and how dry you want the rice to be. For a dry paella, use 1 cup rice to 2 to 2½ cups liquid. Recall that the Bomba rice can absorb up to three times its weight in liquid.

If you wish to scale the recipe up or down, be sure to keep the rice-to-liquid ratio constant while the size of the pan changes for the number of servings you are cooking.

Olive oil

A mild Extra-Virgin Olive Oil (Spanish, if available) is recommended.

The Sofrito base

El Sofrito is the foundation of nearly every Spanish rice dish (see this Cooking Tip for more info). It is a slow sautƩ of veggies that includes one or more of onions, green or red bell peppers, garlic and tomatoes. It is gently and slowly cooked into a very soft, almost jam-like base.

Onions are not generally used in paellas as they produce a lot of liquid and can make the rice mushy. That being said, I looked at 15 different paella recipes from different sources and all but two called for onions. If you use onions, be sure to cook them thoroughly until all the moisture is gone.

Tomatoes should be peeled, seeded and finely chopped (known as concassƩ) before being added to the pan. Alternatively, they can be grated on a box grater. To do this, cut them in half, remove the seeds and grate, discarding the skins. You can also use canned whole tomatoes. (See this Cooking Tip for why you might not want to use canned diced tomatoes.) Strain them, reserving the liquid to add later to the cooking sofrito, and finely chop. The tomatoes must cook until the moisture has evaporated and the texture is very soft.

Saffron

Saffron is what gives paella its yellow color and should not be skipped or substituted. See this Cooking Tip for a discussion of saffron. Some people will just crumble the saffron and add directly to the pan once the liquid is added. Others will ā€œbloomā€ it in warm stock or wine before adding it.

Paprika

Known as pimentón, there are three kinds of Spanish paprika.

  • Dulce – sweet. This is the one you want to use for paella.
  • Agridulce—bittersweet or semisweet
  • Picante – hot

Socarrat

This not an ingredient but a desired outcome from the cooking method. It is a slightly caramelized crust that forms on the bottom of the pan if cooked properly. It is the favorite part of paella for many people.

Meat and/or Seafood

As mentioned above, the original paella was made with chicken and snails and later with rabbit, pork and duck. In the northwest of Spain and in Portugal, chorizo sausage is added. It adds a depth of flavor and will take on whatever spiciness level is in the sausage you buy.

Outside of Valencia, the most common is what is called ā€œmixedā€ or ā€œmixtaā€ paella and is normally made with chicken and various types of seafood. As you travel away for the coast of Spain, the paella will contain more meat, especially rabbit, and less fish.

In Murcia, Spain, they make a paella hortelanaā€, meaning paella of the vegetable garden. It is a vegetarian version made with veggies of your choice and often has a pesto-like sauce made with almonds, garlic and parsley added to it.

Stock

The stock in which you cook the rice is very important for imparting flavor. Therefore, you want to use a great stock, whether it is homemade or store-bought. If the latter, use one with no or low amounts of sodium. The better the stock, the better the rice will be.

Cooking Method

There are certain ā€œrulesā€ for cooking paella if you talk to a paella expert. However, you will see plenty of videos and recipes that break some, if not all, of these rules. I will give you recommendations that are as close to authentic as I can.

Most people begin by browning the meat in olive oil. This not only gives more flavor to the meat but also produces fond on the bottom of the pan, another flavor contributor. Don’t worry about cooking the meat all the way at this point. It will finish cooking later.

Then, as mentioned above, the veggies should be slowly cooked down into a sofrito. Most do this in the same pan, but to speed up the process, you could be doing this in on pan as you are browning the meat in another.

Paprika is then added along with the stock and saffron. (Note above note about blooming the saffron.)

Some recommend bringing the liquid to a boil and adding the rice. Others add the rice to the sofrito, let it fry for a moment and then add the boiling liquid.

Whichever you do, the rice should be cooked, uncovered, at first at a high heat for about 10 minutes and then turned down until the riced is al punto, ā€œat the pointā€, meaning the rice has just a bit of bite left to it and the bright white nucleus of the kernel has almost disappeared. It will finish cooking during the resting stage.

The liquid needs to be completely evaporated at this point, which is the challenge in cooking a great paella. As the liquid evaporates, there develops the thin, crispy layer of toasted rice on the bottom on the pan, the ā€œsocarratā€.

Paella experts will tell you that after the rice is added and you ensure it is totally submerged in the stock, it should not be stirred although you can shake the pan. Stirring interferes with the formation of the socarrat and also releases the starch from the rice kernels. This is what you want with a creamy risotto but not with a paella. You want a dry rice here. Again, I have watched videos where this advice is ignored but I would recommend that you keep your stirring to an absolute minimum.

Finally, it is removed from the heat and covered to rest before being served. It is traditionally eaten right from the pan, not with plates.

If you want to make the paella ahead of time, just make it to the point where you would add the rice. Let it cool, cover and refrigerate if holding it for more than a few hours. Cover with foil to prevent evaporation. When ready to finish, remove foil, bring liquid to boil and finish.

If you want to read more about making paella by someone who learned from his Spanish mother-in-law, I highly recommend the book La Paella by Jeff Koehler.

I must admit that paella is not one of my favorite dishes. Perhaps that is because I have never eaten a truly great one. Have you?

Cooking Tips · Ingredients

Ingredients for Spanish Cooking

I will be teaching a private cooking class on Paella and Tapas. One thing I will be teaching is the importance of understanding the ingredients that make these dishes authentic. I thought all of my readers might also be interested in this topic. To do this, I will be writing a series of three Cooking Tips on Spanish ingredients, Paella and Tapas. In this one, I want to just concentrate on traditional and typical ingredients that you will find in Spanish kitchens.

Olive oil

Although olive oils are made from olives grown in various countries, Spanish olive oil is what is used in Spanish cuisine, especially extra-virgin. The flavor can vary from mild to robust as there are more than 200 varieties of olives grown in Spain.

Rice

Spanish rice is either short- or medium-grain. Short-grain rice is almost round, its length is only slightly longer than its width. Medium-grain will be a bit longer as compared to its width. Both have a high degree of pearling, which is the concentration of starch in the middle of the grain and gives it its very white color. It also allows for the great absorption and ultimate creaminess of the dish.

Spanish rice is sometimes named for the region where it is grown and sometimes for the rice variety. Some of the regions are Calasparra, Valencia and Delta del Ebro. The short-grain Bomba rice is a particular variety that is grown in all three regions and is the one most often recommended for making paella.

Meat

  • Spanish Chorizo – this is a dried and cured sausage that is made from pork and seasoned with paprika, giving it a red color. It can be either sweet or spicy and might or might not be smoked. It can be eaten as is or cooked. This is to be distinguished from Mexican chorizo, which is a spicy ground meat sausage, usually sold raw and requires cooking before eating.
  • Jamón Serrano – this ham comes from the hind leg of Spanish white pigs and is dry-cured for an average of 12 months although the highest quality is cured for about 18 months. At least 90% of Spain’s ham production is of this type. It is considered an everyday type of ham.
  • Jamón IbĆ©rico – this is a dry-cured ham from black Iberian pigs. Depending on the grade of jamón, the pigs may feast upon mostly acorns and grasses or the diet may also include herbs, roots and cereals. The meat is cured from 12-36 months. Because of the pig’s diet, the ham has a strong nutty aroma and flavor. It is higher in fat than serrano and is not as chewy as other cured meats. It is considered a delicacy and its price tag reflects that.
  • Because both of these hams are very difficult to find outside of specialty markets or online sources, you may want to seek out a substitute. There really is no substitute for Jamón ibĆ©rico. As for serrano, some will recommend substituting prosciutto. The latter is an Italian ham that comes from the same breed of pig and looks similar to serrano. However, its flavor is milder and somewhat sweeter as well as having a softer texture due to a difference in diet and the curing process.

Olives

As mentioned above, Spain grows over 200 varieties of olives, including manzanilla (what most people think of as a Spanish olive), gordal, hojiblanca, campo, cacereña, malaguena and aragón. They vary in color, shape, size and flavor.

Marcona almonds

This is a large, wide and flat almond from Catalonia, Spain. They have a higher fat content than California almonds, giving them a creamy taste. In Spain, they are often blanched and then fried in oil and tossed in sea salt.

Sherry vinegar

Made from the best sherry wines and then, depending on the category, it will be aged from 6 months to 10 years. It has a more complex flavor than other vinegars.

Herbs – flat-leaf parsley, rosemary, thyme and oregano

Piquillo Peppers

These red peppers are traditionally grown in Navarre, Spain. They are very mild with a Scoville rating of only 500-100 units. The name is said to derive from a Spanish word meaning ā€œlittle beakā€, which is reflected in their small, narrow and pointed shape.

Garlic

The garlic you will find in most Spanish kitchens will be locally-grown and will have a purple hue to it.

Other produce – tomatoes (fresh, canned, tomato paste), potatoes, onions, oranges and lemons.

Saffron

Saffron is a very expensive but very important ingredient in Spanish cooking. See this Cooking Tip for a more thorough discussion of saffron.

Paprika

Known as pimentón, there are three kinds of Spanish paprika and can be smoked or not.

  • Dulce – sweet.
  • Agrodolce—bittersweet or semisweet
  • Picante – hot

Cheese

Spain produces many regional cheeses that vary from soft and fresh to hard and aged. Some are produced from cow’s milk but others from goat’s and sheep’s milk. There are too many Spanish cheeses to mention but here are four of the most popular.

  • Manchego – produced in Castilla in the La Mancha region, it is made from sheep’s milk. It can be fresco (aged only 2 weeks), semi-curado (aged up to 3 months), curado (aged up to 6 months) and Viejo (aged up to a year). As the aging continues, the cheese gets drier and spicier.
  • Cabrales – a type of blue cheese from the Asturias region. It is a soft cheese made from a mixture of cow, goat and sheep milk. It has a very strong aroma and flavor.
  • Mahon – from the island of Menorca. It is a dense cheese with a buttery and salty taste that often has paprika and olive oil rubbing into the rind.
  • Tetilla – made from cow’s milk, it has a yellow rind and a conical shape. The flavor is creamy and slightly salty.

Stock your pantry and refrigerator with these Spanish ingredients and stay tuned for how to turn them into a yummy paella and wonderful tapas!

Cooking Tips

Wheat Germ — a nutty ingredient?

I was asked to demonstrate some healthy snacks at a recent Healthy Living Expo. One of them was a Walnut & Dried Cherry Bar, a delicious and healthy alternative to store-bought bars. One of the ingredients in this recipe was wheat germ. I wondered how many of you use wheat germ or know much about it. That is why I decided to dedicate this Cooking Tip to the subject of Wheat Germ.

If you read my series on Healthy Cooking earlier this year, you may recall one of the Tips in that series was on Healthy Breads. In that Tip, l discussed the three different parts of the wheat kernel. There is the bran, the germ and the endosperm. When the wheat is refined, the bran and the germ are removed. By doing this, they are removing most of the fiber and a significant portion of the nutrients. Wheat germ is a product that is entirely just that – the germ portion of the wheat kernel – although some brands may enrich it with some additional vitamins.

According to the Mayo Clinic, wheat germ is ā€œan excellent source of thiamin and a good source of folate, magnesium, phosphorus and zinc. The germ also contains protein, fiber and some fat.ā€

Although the stores will mostly carry toasted wheat germ, there is also a untoasted version. Toasting is done to prolong shelf life.

The toasted version has a taste that is nutty and a bit toasty. It can be added to many recipes in order to add the nutrients and fiber that the germ contains. Try adding it to breads, muffins, casseroles, meatloaf, granola bars, yogurt, smoothies and so much more.

Because of the oil content, it should be stored in the refrigerator to prolong its shelf life and preserve freshness.

There is a train of thought that we should avoid wheat germ for various reasons. First is that fact that wheat germ is not a ā€œwholeā€ product. To be considered whole wheat, the product must contain all three parts – bran, germ and endosperm. The germ is just one part. They recommend using whole wheat flour rather than just the germ. However, many recipes add wheat germ in addition to whole wheat flour due to the nutty and toasty flavor.

Another concern raised is the fatty acid profile of the wheat germ. It is about approximately 60% polyunsaturated, most of which is of the omega-6 type. Recall my Tip on Fats for more information.

It is also felt that wheat germ is difficult to digest due to the way it is prepared. Thus, the argument is that even though it is full of nutrients, it does you no good if you can’t digest and absorb those nutrients.ā€ Experts say that the toasted version is more easily digested.

Wheat germ is also high in oxalate, a compound that can cause kidney stones in some people if they eat too much. Some people also develop diarrhea from the consumption of wheat germ.

If you want to give wheat germ a try, you should be able to find it in your larger supermarket or, of course, online. Although not the only brands, the two most common are Bob’s Red Mill and Kretschmer. Do you use wheat germ? Do you like it? If you like nutty and toasty flavors, you will probably enjoy wheat germ.

Cooking Tips · Ingredients

Parsley — Garnish or Ingredient?

Have you ever seen that for recipes that call for parsley, some specify ā€œflat-leafā€ or ā€œItalianā€ while others do not specify what kind? What are these types and does it really matter which you use? That is the subject of this Cooking Tip.

Although your local grocery store will probably only carry one or two kinds of parsley, there are four main varieties.

Curly

  • This is the most common variety and is sometimes known as ā€œcommon parsleyā€. It is easily recognizable by its curly leaves.
  • It has a milder flavor than flat-leaf and it is somewhat on the grassy side. Older plants will yield leaves that are more bitter.
  • Although it can be used in cooking, it is more often used as a garnish.

Flat-leaf

  • This is also known as ā€œItalian parsleyā€ and has leaves that are flat and serrated.
  • Although curly is known as ā€œcommon parsleyā€, the flat-leaf variety is what is normally called for in recipes as it has a bolder and more aromatic flavor than the curly kind.

Japanese

  • This perennial variety is native to Asia and has leaves that are more pointed than other kinds.
  • The entire plant is edible. The leaves are normally used as a seasoning, the roots are eaten like a vegetable and the sprouts are often put on salads.
  • It does have a more bitter flavor than other varieties.

Hamburg

  • Other names for this variety include ā€œroot parsleyā€ and ā€œDutch rooted parsleyā€.
  • It looks similar to flat-leaf parsley but the leaves are not eaten due to the strong flavor.
  • It has long, thick roots that look like a parsnip and is said to taste like a combination of celery and carrot. It is normally not eaten raw but used in soups and stews.

Uses for parsley

  • Recipes will often call for using parsley as a pretty garnish but it is also added to dishes for flavor.
  • It can be added to salads of mixed greens and/or herbs.
  • It is usually a component of a bouquet garni, which is a bundle of herbs used to flavor soups/stews. A typical mixture contains parsley, thyme, peppercorns and bay leaf. It is tied together before adding to the dish so you can easily remove it at the end.
  • Some dishes have parsley as one of the main ingredients.
    • Chimichurri – an Argentinian sauce served with grilled steak and composed of fresh herbs (including parsley) along with garlic, vinegar, olive oil and seasonings.
    • Tabbouleh – a Lebanese salad made with bulgur, parsley, tomatoes and a dressing.
    • Gremolata – a condiment of parsley, lemon zest, and garlic. In Italy, it is traditionally served with Osso Bucco.
    • Parsley Pesto – rather than making a classic pesto with basil and pine nuts, you can mix it up with other herbs, including parsley.

Parsley is a very versatile herb that is great to have on hand. If you have a green thumb, it is also easy to grow. We probably mostly use it as a garnish or secondary ingredient, but don’t forget it can also star in many dishes.

Cooking Tips · Ingredients

Basil — the taste of summer!

If you had to name one herb that spoke to you of the hope of summer, which would it be? I suspect many of you would agree with me that herb would be basil. Because basil is not just one herb, this Cooking Tip will enlighten you on some of the many types and uses for basil. There are over 100 varieties of basil although you will most likely only be able to find one or two in your supermarket. The other ones will need to be sought out in a good garden center.

Basil is native to tropical Asia and Africa and cultivated in many Asian and Mediterranean countries as well as the US. I am just going to discuss a few of the many, many varieties.

The most common variety is what is known as Sweet Basil. Its smooth leaves are oval in shape with a medium green color. It has a sweet but slightly spicy flavor. It is abundantly used in Italian dishes such as pesto sauce, salads, pasta and pizza. If your recipe does not specify a particular type of basil, this is your best choice. An interesting tidbit is that it also naturally repels mosquitos.

Genovese basil is the 2nd most common basil. It is very similar to Sweet Basil and, in fact, some growers will use these terms interchangeably. Some call it a variety of sweet basil. It does though, have larger and darker green leaves. Just as with Sweet Basil, it is a staple in Italian cooking although it does have a stronger flavor. When using this variety, start with just a small amount and then add more to your desired flavor.

Lemon basil – this variety is a mix of basil and lemon with a delightful citrusy scent and light green leaves. Because of the lemon component, it compliments poultry, fish dishes and grilled veggies.

Lime basil – The bright green, narrow leaves of this plant yield a rich citrusy scent like limes.

Greek basil – this variety is smaller than other basils and has delicate light green leaves. The flavor has a spicy quality to it and thus, is often paired with meat dishes or used in soups. It is also frequently used as a garnish due to its unique appearance. Many people like it for container gardening due to its compact size.

Cinnamon basil – with its small green leaves and purple stems/flowers, this is an especially attractive basil. It can also be referred to as Mexican Basil. It has a mild flavor with cinnamon undertones. It is often used in Asian cooking as well as in beverages. Due to the warm cinnamon notes, it pairs well with meat dishes.

Thai basil – this variety has light green leaves and purple flowers. It is very aromatic with a licorice flavor. As noted in its name, it is primarily used in Thai cuisine. It is one basil that retains its flavor when cooked at high temperatures.

Holy basil – also known as Tulsi basil, it has small leaves with a spicy fragrance and is often used in Indian dishes. It should be cooked as it can be bitter in the raw state.

Purple basil – there are different varieties that are sometimes called ā€œpurple basilā€. Two of the most common are Purple Ruffles and Dark Opal. Purple Ruffles is actually a cross between Green Ruffles and Dark Opal. They both have purple leaves but the Ruffles variety has ruffled leaves. Neither are as sweet as other basil varieties and carry more of a spicy note.

Here are a few tips for using basil in the kitchen

  • Pick the type of basil that is best for your dish. Use sweet basil for European dishes, especially those from the Mediterranean. For Thai dishes, use Thai basil. If you are cooking up an Indian dish, consider Holy Basil.
  • Add the basil at the right time. The aroma can dissipate quickly as the herb is cooked and it does not stand up to long cooking times. So, add it towards the end of the cooking process. Note the exception above about Thai Basil.
  • Store basil in an upright container with its ends submerged in water after trimming the stems. Leave it on the counter uncovered and do not refrigerate. Replace the water daily.

What are your favorite uses for basil? Pesto is probably high on everyone’s list. Another classic and one of the simplest is a Caprese Salad. One of my favorites is a NYT recipe for Heirloom Tomato Tart. How about making a basil simple syrup and then using it to make a Strawberry Basil Soda? Whip up a batch of Basil-Lemon Scones (courtesy of Tea Time Magazine) for a great afternoon treat. Try making them with Lemon Basil.

Whatever you make, as we move into summer, enjoy the wonderful herb known as Basil!

Cooking Tips

Minty Freshness

My husband and I were walking through our local garden center and I wanted to look at all the fresh herbs on display. They had an excellent selection of different types of herbs and even within an herb category, there were numerous varieties. One of those that I so enjoyed was mint. They probably had 6 or 7 different varieties of mint. That fact is what led to this Cooking Tip where I will delve into some of these mint varieties, what they are and how to use them.

According to gardening experts, there are over 600 known varieties of mint. If you buy your mint in a plastic container in your supermarket, you will probably not have a choice. The container will be labeled ā€œmintā€ and that will be it. It will be most likely spearmint although the label does not usually specify this. If you want to try any of these other wonderful types of mint, you will have to search them out in a good garden center.

Spearmint

One of the most common varieties, it is also the earliest cultivated and used mint. Therefore, many older books just refer to it as ā€œmintā€. It has less menthol (the chemical that gives you the minty and cooling flavor) than its relatives and thus has a sweeter and mellower flavor. It is also more herbaceous making it the choice for when you are making a savory dish that calls for mint.

Peppermint

Another very common variety, peppermint is a hybrid of watermint and spearmint. It contains significantly more menthol than spearmint. In fact, it is so high that it is often felt to be spicy, similar to pepper. Because of these qualities, it is better suited to sweet dishes or beverages. My husband grows a type of peppermint called ā€œCandy Mintā€, which has an even more intense flavor. I love using that to make Chocolate Mint truffles.

Apple Mint (aka applemint, wooly mint)

This mint looks unique in that its leaves are rounder and have a furry appearance. It may be that the name comes more from the leaf shape rather than its flavor, which is mild due to its low menthol content. Any apple comes in with the aroma more than the flavor. It is often used in making mint jelly but is also nice in fruit salads and beverages.

Chocolate Mint

The leaves of this mint are darker than other varieties and the stems are purplish. Both the origins and flavor of this mint are controversial. As to the origins, some say it is a hybrid of orange mint while others say it is more closely related to watermint. Others call it a cultivar of peppermint.

In respect to flavor, there are those who will detect definite chocolate notes. Others say they can detect chocolate in the aroma but not the flavor. Some liken the aroma and flavor to an after-dinner mint such as an After Eight or Peppermint Patty. Still others feel that any chocolate notes are imaginary. When a chemical analysis was made, there was nothing that would account for the chocolate aspect. For those that feel there is a mild chocolate flavor, they like to us it in desserts and beverages.

Ginger mint (aka Scotch mint, Vietnamese mint)

This is a low-growing mint that is a hybrid between spearmint and corn mint that does not grow in the wild. The mint flavor is strong and a bit spicy with hints of ginger. Great uses are soups, vinaigrettes, seafood dishes and baked goods. It is also used in making candy and in flavoring chewing gum.

Mojito Mint (aka Cuban mint)

This mint is a variety of spearmint but has an herbier flavor. It is the one most traditionally used in making the drink known as a mojito.

Orange Mint (bergamot mint)

A relative of peppermint, its parent plants are spearmint and watermint. The leaves are tinged with red. The flavor is citrusy and it is more aromatic than many mints, reminding many of Earl Grey tea. It can be used in drinks, fruit salads as well as fish/poultry dishes.

Pineapple Mint

With its pretty variegated leaves, some grow this as an ornamental plant. It is a type of apple mint. Its fruity scent flavor lends itself to use in beverages, jellies and fruit salads.

Watermint

This is an intensely minty variety with very pronounced menthol notes. Because of this, it needs to be used sparingly so as to not overpower the dish. It is more commonly infused into hot water and used as a medicine.

To store fresh mint, trim off the stems a bit and place them in a jar/glass with about an inch of water. Cover with a plastic bag secured with a rubber band and store in the refrigerator. You can extend the life by changing the water every few days. Other options include hanging the sprigs to air dry or drying using a food dehydrator.

You can also freeze mint. One method is to place whole or chopped mint leaves into the wells of an ice cube tray and cover with water. Once frozen, you can move them to a freezer bag. To use later, just add one of the cubes to your dish or beverage. Another option is to lay the leaves flat on a baking sheet and put that into the freezer. After about an hour, carefully move them to a bag for longer storage. Although the flavor is maintained in the freezer, the texture will be limp. Due to this, it may not be suitable as a garnish.

According to my husband, mint is easy to grow. His exact words were ā€œit’s hard not to grow it.ā€ Since the only way to try some of these different varieties is to grow them yourself, I hope you give some of them a try!

Cooking Tips · Ingredients

Tarragon — a wonderful culinary herb

I feel like Tarragon is similar to Cilantro in that people either love it or hate it. However, tarragon is much less common and I would suspect many people have never tried it. I was a bit concerned about this herb as I heard it had a licorice flavor and there are few things I dislike more than licorice. This was an unfair judgement, though, and now I know it is a wonderful herb to have in your kitchen. Perhaps some of you feel the same as I did and this Cooking Tip is for you.

Tarragon is a perennial and is part of the sunflower family. Just as with many culinary herbs, there are different varieties of tarragon. The main three are French, Russian and Mexican.

French –this is the one with the best flavor and the one preferred by most chefs. The leaves are much more aromatic than the Russian variety.

Russian – as it is easier and cheaper to grow, much of the tarragon you will see is of this variety. Its flavor is much milder than the French tarragon. Since the tarragon you buy in the supermarket may not be labeled, the only way to tell which variety you have is to crush the leaves and smell it. If you do not have that classic licorice aroma, it is probably Russian.

Mexican – known as Mexican Marigold Mint

As can be seen by its name, this is not a true tarragon. However, this plant grows better in hotter climates and has a similar anise/licorice aroma and flavor.

Tarragon’s primary flavor is light licorice. It also has notes of citrus, grass, vanilla, mint and a bit of spiciness. Because its flavor is fairly prominent, don’t overdo it by adding too much.

There is also a dried version and, unlike many herbs, dried tarragon does retain much of its licorice flavor but the other flavor notes disappear. Therefore, dried tarragon has a strong but less complex flavor.

You can use it like other fresh herbs but it is great with dishes containing chicken, fish, shellfish, eggs, butter and cream. Lemon also complements it well because of the citrusy notes in the herb.

As with most herbs, fresh tarragon should normally be added towards the end of cooking to retain its flavor. The dried should be added earlier in the cooking process. If you do use dried in a recipe that calls for fresh, remember the 3-to-1 rule. Whatever amount of fresh is specified, only use ā…“ of the amount of dried.

There is no real substitute for tarragon because of its unique flavor. Some feel chervil and fennel (bulb, fronds, seeds) do a decent job but true tarragon is still preferred.

Tarragon can be stored similarly to basil – in a glass of water on the counter. Or, roll the leaves in a damp paper towel, put in a plastic bag and in the crisper drawer of your refrigerator.

As tarragon is beloved in French cuisine, you will often see it in French recipes. For example, BĆ©arnaise sauce is a classic French sauce containing tarragon which is considered a derivative of hollandaise sauce. It is one of the ingredients in the dried herb mixture of Herbes de Provence. It is also an important component of the fresh herb mixture known as Fines Herbes. This is also known as PCCT – a mixture of parsley, chives, chervil and tarragon and it is the seasoning in a classic French omelet.

Although our supermarkets carry many more flavored vinegars than they used to, tarragon vinegar is one I have difficulty finding. However, you can make it yourself with white wine vinegar and fresh tarragon. This can then be used in vinaigrettes, on salads or on roasted veggies

One of my favorite uses for fresh tarragon is in a recipe by Australian chef, Bill Granger, for Chicken, Leek and Tarragon Pie. It also makes a nice addition to egg salad.

A classic French recipe SuprĆŖmes de Poulet Ć  l’Estragon (Supremes of Chicken with Tarragon) from the book Classic French Recipes for Special Occasions by Carole Clements and Elizabeth Wolf-Cohen demonstrates a company-worthy dish featuring both fresh and dried tarragon.

Those are just a few ideas for using this wonderful culinary herb. If you have never tried it, I hope some of these will inspire you to get on the tarragon wagon!

Cooking Tips · Ingredients · Techniques

Asparagus – A Sign of Spring

My husband just harvested the first asparagus spears of the season. Since it is not a long season, I like to make the best of it and serve it in many different ways. With that first harvest I made a wonderful Skillet Asparagus Salad with Goat Cheese from Cooking Light. To encourage you to experiment, I thought I would devote this Cooking Tip to just that subject – Asparagus.

If you are not growing your own asparagus, you need to purchase it at the store. Choose spears with firm stalks and tightly closed tips. Try to buy a bunch with similarly sized stalks for even cooking. When you bring it home, trim a small amount off the bottom of the stalks and place in a jar or glass with a bit of water in the bottom. Cover loosely with a plastic bag. Store in the refrigerator. Change the water daily. It is best, though, to eat it as soon as possible

There are different varieties of asparagus – green, purple and white. Purple asparagus gets its color from anthocyanins, the same pigments that give us other purple food such as grapes. White is just green asparagus this is grown in darkness under the dirt. Because photosynthesis is limited, chlorophyll doesn’t develop and the resulting spears are white.

You will also notice that asparagus spears come in different widths from very thin (pencil) to thick. The thin spears are best for sautƩing, steaming or grilling whereas the thick spears are better if you wish to roast or braise them although they can also be steamed or boiled.

When you are ready to eat it, it should be thoroughly washed and then the woody part of the stem removed. Most people teach the ā€œsnapā€ method. Pick up a spear and gently bend it. They are said to naturally snap where the tender part ends and the woody part begins. Cooks Illustrated feels this method is too imprecise and wasteful. They just trim the bottom one inch, which is the woodiest part. Then, they peel the bottom half to expose the white flesh.

Realize that it only takes a short time to properly cook asparagus. Thin asparagus will only take a couple of minutes. Thicker spears will take a few minutes longer.

There are various methods of cooking asparagus.

Steaming

Place asparagus in a steamer basket and cook gently over simmering water just until tender. This method is great for preserving the green color.

Boiling

You can boil asparagus but it will not take very long. If you are not serving it right away, you may want to plunge it into ice water once it is tender to avoid overcooking and loss of color. This is essentially blanching, a method where you cook it in simmering water just until it is tender and then you put it in an ice bath.

Microwave

Place in a microwave-safe dish with 2 tablespoons of water. Cover and microwave on high for about 3 minutes. Stir and continue to cook just until tender, another 2 or 3 minutes.

Pan searing

Cooking in a hot skillet with butter/oil is a great and quick method. This is what I did for the above mentioned Asparagus Salad.

Grilling

Lay directly across the grill grates or use a grill basket. You can also grill inside by using a grill pan.

Braising

This method goes against the standard wisdom of cooking asparagus only until it is crisp tender and still bright green. However, Keith Dresser of Cooks Illustrated highly recommends it. To do this, choose the larger spears that are at least ¾ inch thick. Peel the skin until the white skin is exposed, which helps the braising liquid to get into the interior of the stalk. Bring a large skillet of water/chicken broth/olive oil/salt to a simmer and add the asparagus in a single layer. Cook covered until the spears are tender. Remove the lid, continue to cook while shaking the skillet until the pan is almost dry. This creates a light glaze that coats the asparagus. Add flavorings such as lemon/chives or orange/tarragon.

Pan steamed

This method combines the methods of sauteing and steaming. To start with, you put the asparagus into a skillet with water and seasonings, cover and steam it for about 2 minutes. Then, you uncover and cook until almost dry and asparagus is crisp tender.

Roasting

Roasting is a bit tricky because the spears can easily overcook and lose their nice green color by the time they brown. To use this method, choose thicker spears. As with many roasted veggies, putting your baking sheet in the oven while it is preheating is very helpful to getting the right result. This means the spears will start to sear as soon as they hit the hot pan. Cooks Illustrated tested different roasting methods and recommends a very hot oven (500°F) with the baking sheet placed at the lowest position. They caution against shaking or stirring the asparagus while it is cooking. This resulted in asparagus that was crisp-tender, deeply browned on one side and green on the other.

One of my favorite recipes that uses roasted asparagus is from My Recipes, Roasted Asparagus & Arugula Salad with Poached Egg. It is not only extremely tasty but can make an impressive starter or first course for a dinner party.

How you decide to cook your asparagus is your choice. I just encourage you take advantage of this wonderful vegetable during its peak season. Your taste buds will thank you!

Cooking Tips · Techniques

The beautiful Mediterranean way!

I recently wrote a series of Cooking Tips on Healthy Eating and Cooking. Although I did not use the term ā€œMediterraneanā€, much of what I wrote about is very consistent with eating a Mediterranean diet. Since this is a very healthy way to cook and eat, I thought I would write this Cooking Tip on that very subject.

The term ā€œMediterranean cuisineā€ is not synonymous with the term ā€œMediterranean dietā€. The cuisine of the Mediterranean is of a great variety as there are twenty-one countries bordering the Mediterranean. When the Mediterranean diet is referenced, most are referring to how they eat in Italy, Spain, southern France, Greece, the isle of Crete and the Middle East. All of these have a focus on the following type of diet.

  • Minimally processed, seasonally fresh, locally grown foods
  • Abundant plant foods – vegetables, fruit, cereals, legumes, nuts, seeds
  • Primary source of fat is olive oil
  • Moderately high intake of fresh fish and low intake of poultry and meat
  • Moderate amounts of dairy products, mostly cheese that is not high in fat as well as yogurt
  • Garlic, nuts, herbs, spices all add flavor & interest
  • Potatoes & rice are eaten in restraint
  • Pasta is a side or first course, not a main course
  • Dessert is usually fresh fruit or, in some cases, honey-based sweets
  • Moderate alcohol consumption, preferably from wine and usually with meals

If you wish to start cooking and eating this way, start with stocking your pantry and refrigerator the Mediterranean way. Following is a list of common ingredients although it is far from complete.

  • Olive oil, usually extra-virgin (For a more in-depth discussion of olive oil, see this Tip.)
  • Herbs – common Mediterranean herbs are parsley, dill, rosemary, thyme, sage, mint, fennel, bay, tarragon, lemon verbena and oregano. As much as possible, try to use fresh herbs. Oregano might be one exception.
  • Spices – cinnamon, cloves, allspice, nutmeg, anise, saffron, sumac, za’atar and Aleppo pepper.
  • Dairy – cheese made from sheep’s and goat’s milk as well as yogurt.
  • Beans and lentils
  • Rice and grains, especially ones such as bulgur, farro, barley, wheat berries and quinoa. For more info, see this Tip.
  • Olives
  • Vinegars – balsamic, red wine and white wine
  • Pomegranate molasses – this is reduced pomegranate juice used especially in Middle Eastern and Persian cooking.
  • Preserved lemons – lemons pickled in salt and their own juices. Common in North African dishes.
  • Rose water – water that has been infused with the essence of rose and is often used in Middle Eastern, Indian and Persian cuisines.
  • Harissa – a spicy, fruity chili paste.
  • Tahini – ground sesame seed paste.

Once you have guidelines on ingredients and what to eat, cooking Mediterranean dishes is no different than any other cooking. Having decent knife skills, understanding the different types of cooking (sautƩing, steaming, poaching, baking, roasting, etc.), knowing how to use herbs/spices and understanding what NOT to do in the kitchen are all skills that transcend cuisines. Check out my other Tips on these subjects. If you are in the Colorado area, consider booking a class to help you with any or all of these skills. For great ideas on how to cook Mediterranean, consider attending one of these upcoming classes.

Springtime is the perfect time to upgrade your eating and cooking habits to the wonderful Mediterranean way. I hope you give it a try!

Cooking Tips · Techniques

Gnocchi — a different Italian dish

When you think of Italian food, what do you think of? Is it pizza, spaghetti or lasagna? There is so much more to Italian food than that. One of those ā€œotherā€ dishes would be Gnocchi. What gnocchi is, how to make it and how to serve it are the subjects of this Cooking Tip.

The word ā€œgnocchiā€ actually means ā€œlumpsā€, although the word is said to derive from the old Lombard phrase knohha, meaning ā€œknotā€ or from nocca, which means knuckles. We often call theseā€ Potato Dumplingsā€ but they were not always made with potato. This dish dates as far back as the 1300s when it was made from flour or breadcrumbs. A cookbook from 1570 contains a recipe made from flour/breadcrumbs/water and pushed through the holes of a cheese grater. The potato version probably began in the 16th or 17th century.

Since potato gnocchi are the main variety found outside Italy, let’s discuss how to make them. The goal is to make light and airy gnocchi although it is easy to end up with dense and heavy ones if you aren’t careful.

The type of potato is important. Almost all experts recommend using a dry, floury variety like Russets. Some feel that a white all-purpose or a Yukon gold are acceptable but if you have never made them before, stick with the Russet. They have a lower water content and a higher starch content. Because of this, you can add less flour, which means less gluten and an end product that is more tender.

How you cook the potatoes is a bit of a debate. There are those that only recommend baking them in their skins as this will remove moisture. Others feel the potatoes can be boiled but do advise to boil them in the skins to reduce moisture.

Whichever method you use to cook the potatoes, you then want to mash them while they are hot. The absolute best method for this (as well as making mashed potatoes) is to use a ricer. These are inexpensive tools that are worth the money.

After ricing (or mashing), the hot potatoes should be spread out on your cutting board or baking sheet so they cool and to maximize moisture evaporation.

Eggs are not a traditional ingredient although many recipes will add one as it makes an easier to handle gnocchi due to its capacity to help bind the dough together. This prevents the gnocchi from disintegrating in the boiling water. Eggs also add richness to the finished product. The downside is that the egg white can contribute to a denser and chewier gnocchi. Using only the yolk is a great alternative.

Once cool, it is time to make the dough. Mound up the cooled potatoes and start to add a bit of flour and egg, if using. As excess flour is the enemy to light and tender gnocchi, you only want to add as much flour as necessary to get a cohesive dough. Harold McGee says you should need less than 1 cup per pound of potatoes. Cook’s Illustrated recommends weighing your ingredients and using 4 ounces of flour to 16 ounces of riced potatoes. Whatever recipe you follow, do not add all the flour at once. Add it in stages to get the proper result.

The ingredients should be gently kneaded into a dough. Using something like a bench scraper and just scraping and folding can help in preventing over-kneading. Your goal is a moist but not sticky dough.

After you obtain a nice dough, it is portioned and rolled out into a thin rope. It is cut into pieces, generally about ¾ of an inch in size. Shaping into the traditional ridged C-shape is next. This can be done by using a gnocchi board or a fork. A wonderful friend who had lived in Italy gave me a gnocchi board and I love it. It is very easy to use.

For cooking, they are normally gently placed into boiling, salted water and cooked only until they rise to the surface. They are plated and dressed with a sauce. Some find that they can be cooked directly in the sauce without the boiling stage.

Sauces are varied but include marinara, pesto and a butter sauce with sage, herbs and/or garlic. One of my favorites is a sun-dried tomato pesto.

What are the problems that arise in making gnocchi?

  • Dense and chewy gnocchi – this is normally due to adding too much flour and/or kneading too aggressively.
  • Lumpy mashed potatoes – using a ricer will give you a smooth and airy result.
  • Bland flavor – cooking them in salted water and then serving with a flavorful sauce is the answer to this problem.

Every area of Italy has its distinct gnocchi style and sauce.

  • As mentioned above, gnocchi can be made with just flour and water although they will be heavier and denser than potato gnocchi.
  • Gnudi di Ricotta – ricotta dumplings
    • These are more common in Tuscany and use no potatoes. Rather, strained ricotta, egg, breadcrumbs and cheese are combined and rolled into balls before being dusted in semolina. After cooking, they are fried in butter until golden brown.
  • Gnocchi alla Romana – semolina gnocchi
    • This dish originated in Rome and is made with semolina flour. Traditionally, the dough is chilled, cut and baked with butter and Parmigiano Reggiano cheese.
  • Gnocchi Parisienne
    • This is a French version of gnocchi. The base is a choux pastry (the dough used to make profiteroles.) The dough is dropped into water via a piping bag to cook followed by putting them into a pan of butter to crisp up. Finally, it is dressed with lemon juice and herbs.
  • Malloreddus
    • Eaten on the Italian island of Sardinia, this variety is made with only semolina flour and water, sometimes colored with saffron. This results in a denser and chewier gnocchi.
    • The traditional sauce is Campidanese, a sausage, tomato and fennel ragu.
  • Malfatti
    • These are very colorful as they are made from ricotta, spinach and Parmesan bound together by semolina and egg. They tend to be larger than other gnocchi, about the size of a golf ball.

Fresh gnocchi can be frozen uncooked for up to 2 months. Boil them frozen although it will take a bit longer. Store cooked gnocchi in airtight container in refrigerator for up to 4 days.

Have you made gnocchi? Although they do take a bit of practice and patience, they can be a delightfully different Italian meal.