Cooking Tips · Techniques

Sabayon or Zagablione – A Creamy Delight by any Name

Are you looking for a relatively quick dessert using ingredients that you probably already have? Here’s a great idea—try making a Sabayon. This Cooking Tip explains what it is and how to make it.

Image by Monika Schröder from Pixabay

Sabayon is a rich and creamy French sauce. In Italy, it is known as Zabaglione, and this version probably predates the French one. Although it is basically the same dessert, the French version is typically made with white wine or champagne, while the Italian version usually uses Marsala wine.

This dish is easily customizable and can be made in sweet and savory versions. In the culinary world, it is considered a technique rather than an actual recipe.

Ingredients

  • Egg yolks thicken the sauce. The fresher the eggs, the better the result.
  • Sugar adds sweetness but also helps trap air when combined with the yolks. According to some, it also slows the formation of protein bonds, which allows the eggs to reach a safe temperature without scrambling.
  • Wine adds flavor. Because wine is a prominent flavor in this dessert, use one you like. For a non-alcoholic version, substitute an equal amount of orange juice (or other citrus juice), sparkling apple cider, or coffee for the wine.
  • Savory versions will eliminate the sugar and add a pinch of salt. You can consider other ingredients such as stock, pureed red pepper, finely chopped herbs, spices, or olive oil. Use your imagination.
  • Ratio – The standard ratio is equal parts, by weight, of these ingredients. The amount of liquid can vary depending on how thick you want the sabayon to be.

Procedure

Image by Estudio Gourmet from Pixabay
  • This dish needs to be made over gentle heat. The best way to do this is to whisk the mixture over a bain marie (water bath). You can either use a double boiler or place a heat-proof bowl over a pot of simmering water. The bottom of the bowl should not touch the water. This should be prepared and ready to go before starting the cooking process.
  • Whisk the egg yolks and sugar in a large bowl. Since the mixture will expand as it is whisked, use a bowl large enough to accommodate this increase in volume. Whisk in the wine. Whisk until the mixture lightens in color, looks foamy and increases a bit in volume.
  • Most chefs recommend whisking in a figure 8 pattern to increase aeration. America’s Test Kitchen tested different whisking methods of stirring, beating and side-to-side motions. Although they did not specifically test these in making a sabayon, they found that the side-to-side motion was the most efficient in almost all applications.
  • Place the bowl over simmering water. Whisk continuously until the mixture becomes thick and frothy and the sugar dissolves completely.
  • Keep whisking until the temperature reaches 150° – 165°F and makes ribbons. To see this, elevate the whisk above the surface of the mixture. As the mixture drops back into the bowl, it will look like a ribbon that stays on top for about 15 seconds. By this time, it should have at least doubled in volume.

Serving
Sabayon is best used immediately after you make it. You can refrigerate it for a couple of days, although it will deflate. Whisk well before serving. Reheating is tricky as it can separate. If you want to reheat, use very gentle heat. A bain marie is recommended.

Sweet sabayon

  • Serve over fresh fruit.
  • Serve over bread pudding.
  • Serve over a slice of cake.
  • Make a trifle by layering the sabayon with pieces of sponge cake, fruit, chocolate, nuts, or crunchy cookies.
  • Put fresh berries in an oven-safe dish and spoon sabayon over the top. Put under the broiler (watch carefully) or use a kitchen torch to brown the top.

Savory sabayon

  • Serve over asparagus or other vegetable.
  • Serve over scallops or other seafood.

Variations

  • Dissolve ¼ teaspoon gelatin into the wine. Finish the recipe as normal and then chill until cold and set.
  • Fold in whipped cream or whipped egg whites (beware that these will be raw) at the end.

Possible pitfalls

  • You allow the egg yolks to get too hot, resulting in scrambled eggs. To prevent this, watch that the water in the bain marie is only simmering and whisk continuously. If you think it is getting too hot, take the bowl off the heat and continue to whisk. Lower the heat before putting the bowl back over the water.
  • The mixture breaks. Add a small amount of ice water and whisk to re-emulsify.
  • Lumps in the mixture can be caused by too much heat and insufficient whisking.

Have you ever made a sabayon or zabaglione? Although it is not difficult and only requires a few commonly available ingredients, you will need a bit of arm power, as the whisking can take more than 10 minutes. Grab a readily available friend or family member and share the whisking. Sharing in the result will be their reward!

Cooking Tips · Techniques

Plating like a chef!

When you go out to a restaurant, and they present you with an artfully plated dish, your expectations that it will taste good go up. Those who know me know that making things look pretty is not a skill I possess. If I want a nice garnish or some other touch on the plates I am serving to guests, I call my husband, who is much better with things that require a bit of manual dexterity. This Cooking Tip on how to plate food is for those who want that wow factor when you serve your guests. I don’t think it will help people like me, but you never know!

Dishes

Most chefs will tell you successful plating starts with the plate/dish. There is a reason most restaurants serve food on white dishes. It is a plain background on which you can do your artistry. However, you do not have to feel constrained by this if your dish’s colors/patterns complement and do not distract from the food.

Other considerations besides the color are the size and shape of the dish. There is no one correct size; it should be large enough to hold the food without looking like there is too much empty space but not so small that it covers the entire plate. Successful plating involves a certain amount of negative space.

Some like to match the shape of the dish to the food, such as using a square plate with slices of lasagna. Others like to contrast shapes. Use what is most pleasing to the eye for your food.

Food placement

The classic style puts the main ingredient in the center of the dish, with the side dishes arranged around it. Others like to put that main ingredient just off-center.

Traditional plating involves placing the main part of the meal (typically the protein) at about 6:00, the traditional starch at about 11:00, and the side dish at 2:00. This works best when the sizes of these different items are balanced.

Others like to arrange the food in linear patterns, either vertically or horizontally. The food is placed in parallel or intersecting lines, and garnishes are added to break up the lines. Still another pattern is placing the food on the plate in arcs rather than straight lines.

Odd numbers of items, such as shrimp, scallops, or small bites are considered more attractive than even numbers.

You will undoubtedly have seen the practice of stacking food on the plate to add height. An example would be putting the starch on the bottom, the protein in the middle, and the veggies to top it off. The bottom layer could be your starch in a pureed form, mayo or a sauce. The middle layer could be your protein or a neat dollop of rice or noodles. If the protein is not in the middle layer, it will be in the top layer. Longer items, such as asparagus spears, also look great on top.

Another tip is to slice your chicken, steak or other protein before plating and then arrange it on the plate back into its whole shape but fanned out.

This all takes creativity and practice. Some chefs start by making a drawing of how they want the plate to look. This helps them visualize and then achieve just what they want.

Color

Try to avoid a monotone dish. If you are serving a lighter-colored protein, such as fish, surround it with darker-colored sides and vice versa.

Garnish

Sprinkling on herbs or cheese or even a lemon slice can add a pop of color and increase the visual appeal. When it comes to cheese, rather than grating, why not try making shavings and topping the food with those? Just a drizzle of olive oil or an interesting infused oil can be striking. You could even incorporate edible flowers.

Sauces

Sauces are not always necessary but are an excellent addition. I was taught in culinary school that the proper way to use a sauce is to put it on the plate first with the other items on top. Get creative with how you apply the sauce to the plate. This video has some interesting techniques for the application of sauces. If you are going to use a sauce, do not plate it until just before serving.

Texture

Just as you do not necessarily want all the food to be the same color, you also do not want all the textures to be similar. Adding chopped nuts, sesame seeds, or seaweed flakes adds a certain amount of interest to the mouthfeel.

Wipe the edges

This is just common sense. If some of the items are all over the edges of the plate, it will look messy. Take those few seconds to wipe it clean before putting the plate in front of your guest.

Helpful tools

If you are serious about raising your plating skills, consider investing in some helpful tools. Inexpensive squeeze bottles improve your control over where your sauce goes. Long tweezers allow you to place smaller items exactly where you want them without disturbing the other ingredients. Some chefs like to use food-grade paintbrushes. Ring molds help you achieve that neat, circular placement of the food. Small prep bowls can be used to mold your rice into a neat shape before placing it on the plate. A good set of kitchen tongs will aid you in shaping an attractive nest of pasta on the plate.

Even with my lack of creativity and poor manual dexterity, these tips could help me make my dishes not only taste great but look attractive and appealing. I am sure it would be the same for you. Experiment, have fun and don’t be too hard on yourself!

Cooking Tips · Techniques

Meringue – A Fluffy Delight!

When you hear the word Meringue, what do you think of? Do you think of that soft and fluffy topping on your lemon pie? Or, do you think of the swirly, crisp cookies that melt in your mouth? What meringue is and how to make it is the subject of this Cooking Tip.

Image by Charlotte Markham from Pixabay

By definition, meringue is a mixture of beaten egg whites and sugar. It can be as soft as what you find on that pie or a Baked Alaska. It can also be baked into what is termed a hard meringue. Examples of these are little meringue cookies or a Pavlova. The latter is a dessert with a hard meringue base topped with fruit and whipped cream.

Since egg whites are the main ingredient, one must know how to separate the egg whites from the yolks. Eggs are easiest to separate when they are cold. However, they whip up faster and with more volume when at room temperature. Therefore, one of your first steps is to take your eggs out of the refrigerator and separate them. Put them in a bowl and allow to set at room temperature while you finish your prep for the particular recipe.

Image by Julia Filirovska from Pixabay

Have you ever had a time when you just couldn’t get the egg whites to whip up properly? If that happens, the main culprit is fat. The presence of fat in the egg whites prevents them from whipping up in volume and texture.

Here are tips to help you have success in whipping egg whites.

  1. Fat may be present if you allow some of the egg yolks to get into the whites. To prevent this, consider using the three-bowl technique for separating your eggs.
  • Separate one egg putting the white into Bowl #1 and the yolk into Bowl #2.
  • Separate the remaining eggs one at a time, allowing the white to drip into Bowl #3.
  • After each one, put the yolk with the other ones in Bowl #2.
  • If the egg white you have put into Bowl #3 looks clean of yolk, add it to Bowl #1. This way, if you accidentally get yolk into a white, you can set it aside so it doesn’t contaminate all the whites in Bowl #1.
  • Always use a clean glass or metal bowl. Try not to use a plastic bowl as they will often have a coating of fat on them, inhibiting whipping.
  • Ensure your beating implements (mixer blades, whisks) are clean of any fat.
  • Cream of tartar – adding a small amount of this ingredient helps to stabilize the egg whites. Use ⅛ teaspoon for every egg white.

There are three basic methods of making meringue.

  • French meringue is made by beating egg whites to the foamy stage (45-60 seconds), slowly adding sugar, and continuing to beat into a soft, airy, light mixture. This method can be a bit fussy as adding the sugar too early or too late can lead to disappointing results.
  • Cooks Illustrated tested the timing of adding sugar to the egg whites.
    • They made three batches each of meringue cookies, angel food cake and chiffon cake. They varied when they added the sugar – before whipping, after a minute of whipping and at the end.
    • The best result for all the tests was adding the sugar after a minute of whipping. Adding at the beginning gave dry cakes. Adding at the end resulted in dense and crumbly cakes.
  • For meringues, adding at the start gave dull cookies with a very fine crumb. Adding late resulted in an overly airy and grainy texture. They compared the taste to Styrofoam.
  • It is also helpful to add the sugar a couple of tablespoons at a time until it has all been incorporated. Adding the sugar slowly ensures all the sugar is dissolved. This type of meringue is the least stable. Therefore, it is usually used when it is going to be baked – either in a cake batter, meringue cookies or a meringue shell.
  • Cooks Illustrated also tested the speed of whipping the egg whites.
    • They tested this with meringue cookies, meringue frosting, chocolate mousse and chiffon cakes. They tried two methods of whipping – slowly until foamy and then finishing on high and beating on high the entire time.
    • The slow start produced a meringue about 10% more in volume. This gave cookies and frosting that were lighter and airier.
    • With the cakes, they were indistinguishable.
  • Swiss meringue is prepared by putting the egg whites and sugar into a bowl that sits above boiling water – a type of bain marie. When the mixture reaches a temperature of about 120° to 140°F, the mixture is removed from the heat and then beaten to stiff peaks. This method results in a less fluffy meringue than French and less stable than Italian. The recipe testers at Serious Eats claim to have found a technique that will make your Swiss meringue as light as a French meringue but as stable as Italian. They do this by cooking it to a higher temperature – up to 175°F. They also whip it vigorously at high speed for about 5 minutes until it is glossy, thick & stiff. This type of meringue is often used as the base for buttercream frosting. Cooks Illustrated agrees with a higher temperature. They recommend heating the whites to 160°F and increasing the amount of sugar to make pavlovas, saying it produces the result of a crisp shell with a marshmallow-like interior
  • Italian meringue starts by putting the egg whites into your mixer bowl and beating to soft peaks. Then, a sugar syrup that has been heated to 240°F is slowly drizzled in while you continue to whip until the meringue is very voluminous and reaches the desired peak. Because this sugar syrup is very hot, one must be very careful when using this method to prevent burns. It is the most stable of the meringues but is also heavy and thick. It is used to make nougat and is also the best for topping meringue pies.

What are the culinary uses for meringues?

Image by Didier from Pixabay
  • Meringue-topped pies or Baked Alaska
    • A French meringue is recommended for these recipes.
    • Because the meringue is made with raw egg whites, be sure to bake it so that the internal temperature reaches 160°F.
    • Because of this concern, some recommend using meringue powder as the egg whites have been pasteurized. It is made with dried, powdered egg whites and also contains sugar, silicon dioxide, corn starch, citric acid and cream of tartar. Cooks Illustrated tested this product to see if it would work in making pavlova, uncooked royal icing, and seven-minute frosting. In all the tests, they found the meringues were dense and grainy, and the frostings were extremely sweet and thin. For these reasons, they do not recommend this product.
  • Meringue cookies are small, light cookies with a crunch throughout.
    • A French meringue is typical.
  • Pavlova is like a large meringue cookie, but whereas it has a crispy shell, the interior is more marshmallow-like with a chewy texture.
    • It is generally made with a French meringue to which cornstarch and an acid (usually white vinegar) are added along with flavorings. It is then spread out on a parchment-lined baking sheet and baked in a low oven until the outside is crisp. The oven is then turned off, and the meringue is left inside the oven to finish drying out.
    • Cooks illustrated tried making a pavlova with an Italian meringue. Although the usual temperature the meringue is cooked to is 140°F, the resulting meringues were coarse and had a pitted exterior. They increased the temperature that they cooked the egg whites to 160°F. This gave a smoother texture, but the exterior was too soft. They found that increasing the amount of sugar gave them the crispy shell they wanted. They recommend 1 ½ cups of sugar to ¾ cup of egg whites. Because the ratio is important, they recommend measuring or weighing these ingredients. For large eggs, this will probably be six egg whites.
    • Typical pavlova recipes call for adding cornstarch and vinegar to the egg whites after whipping. They also tested this and found it solid advice. They recommend adding 1½ teaspoons of each.

A final interesting point is for those of you who would like a plant-based alternative, and that is aquafaba. Aquafaba is the liquid from a can of chickpeas. Cooks Illustrated tested this using four ounces of aquafaba and four egg whites. They heated the aquafaba and dissolved the sugar in it. After allowing the mixture to cool, they added cornstarch and whipped it with salt, vanilla and cream of tartar. They were pleasantly surprised that the result was a whipped-up mixture that was sticky and “taffy-like.” So, if you want an egg-free alternative, give it a try!

As baking season progresses, I hope you consider making meringues. A browned meringue-topped pie is beautiful on your table. A pavlova with its crisp white base and the topping of fresh fruit and cream is a showstopper. Little meringue cookies are not only wonderful to eat, but they also make very nice gifts, especially when flavored and colored.

Happy Baking!

Cooking Tips · Techniques

How to make Cake Rolls – Tips for Success!

One of my favorite types of cake to make is a Cake Roll. What it is and how to successfully make it is the subject of this Cooking Tip.

If you wish to delve into more detail about making cakes in general, I suggest looking at these other Cooking Tips.

For this Cooking Tip, let’s narrow our focus to Cake Rolls, also known as Roll Cakes. You might have heard other names, such as Swiss Roll or Roulade. No matter its name, in its simplest form, a Cake Roll is a light cake that has been rolled and filled with jam or other filling and often dusted with powdered sugar.

The type of cake is a sponge cake. They have a light and airy texture that is achieved by folding whipped egg whites into a batter made of beaten yolks and sugar. This lightness helps you to be able to roll it without it breaking.

You do not have to be limited to the rolled shape. That same cake batter and baking method will leave you with a blank canvas to turn into other shapes and delightful creations. More on that below.

Let’s start with some general Cake Making Tips that will help you no matter what kind of cake you are making.

  • Baking cakes, especially if you live at a high altitude, is not a time to fly by the seat of your pants. It is, rather, a time to follow the recipe exactly. The only variations would be those you make at high altitudes.
  • Buy a food scale and weigh the ingredients. It is more accurate than cup measures and will yield better results.
  • Pay attention to temperatures called for in the recipe. If it specifies room-temperature ingredients, you will only get the desired result if you heed that advice.
  • Butter should be unsalted unless otherwise specified. If all you have is salted butter, reduce the salt in the recipe by ¼ tsp for each 4 ounces of butter. If you do much baking, try to always have unsalted butter on hand. It keeps wonderfully in the freezer, and you will not have to make adjustments.
  • Use the appropriate pan sizes. Some adjustments can be made, but using the size called for is best.
  • Try not to use dark-colored pans as they will not give you the desired result of a golden, moist, tender cake.
  • Most recipes will call for greasing the cake pans. Even better is to grease the pan, line it with parchment, and grease again. For bundt-style cakes, grease the pan thoroughly and sprinkle lightly with flour or use a flour-based pan spray. See this Cooking Tip for more information about these sprays.
  • Allow enough time to preheat your oven thoroughly. Using an oven thermometer to check its accuracy is also a good idea.
Image by sayadul al araf from Pixabay

Now, let’s focus on Cake Rolls in particular.

Ingredients

  • Most cake rolls only contain eggs, sugar and flour.
  • Most cake roll recipes will have you beat the yolks and whites separately.
  • Eggs separate more easily when cold but whip up better at room temperature. So, take eggs out of the refrigerator, separate but then allow them to come to room temperature before proceeding with the recipe.

Baking the Cake

  • Follow the recipe carefully in terms of the order of adding ingredients.
  • The type of pan you will be using is a baking sheet. Some companies will label them as a Jelly Roll pan.
  • Prepare your pan carefully by lining it with parchment paper, then spraying it with a non-stick spray. Careful attention to this will help keep your beautiful cake from sticking to the pan.
  • Spread cake batter evenly in the pan. Using an off-set spatula will help you get it level.
  • Do not overbake. Press lightly on the top of the cake. If it springs back, it is done.
  • Do not bake until the cake is brown, as this will cause it to dry out and become brittle.

Rolling the cake – three methods

One important tip that applies to all these methods is to roll the cake while still warm to minimize cracking.

  • Rolling Method 1
    • Place a non-lint tea towel on a cooling rack and sprinkle generously with powdered sugar to prevent sticking.
    • Remove cake from oven. Gently run a knife around the cake to loosen the edges.
    • Turn the cake onto the prepared towel and rack.
    • Remove pan and parchment.
    • Sprinkle the surface with powdered sugar.
    • Place another tea towel on top of powdered sugar.
    • Place another rack on top of the towel.
    • Grab the entire stack (from rack to rack) and turn it over.
    • Roll the cake while still warm, rolling the towel inside the cake.
    • Cool on rack for at least 30 minutes.
    • Unroll and fill as desired.
    • Reroll cake around filling.
  • Rolling Method 2
    • Remove cake from oven and loosen edges.
    • Sprinkle the surface with sugar.
    • Place parchment on top of the cake, followed by a towel that has been slightly dampened with a spray bottle of water.
    • Cover the stack with another baking sheet. Flip over.
    • Allow to rest for 3-5 minutes.
    • Remove baking sheet.
    • Slightly moisten parchment with a spray bottle of water and wait about 1 minute before removing it from the cake.
    • Your cake should be warm but not hot for the rolling step.
    • Roll with the damp towel and parchment inside.
    • Allow to cool.
    • Unroll and fill as desired.
    • Reroll cake around filling.
  • Rolling Method 3
    • Lay a tea towel on the counter and sprinkle generously with powdered sugar.
    • Remove cake from oven and invert onto towel.
    • Remove parchment.
    • Roll the cake up with towel inside.
    • Allow to cool.
    • Unroll and fill as desired.
    • Reroll cake around filling.

Filling the cake

  • Choose a filling that is spreadable and not runny.
    • Leave a quarter inch around the edge without filling.
    • Do not add too much filling, as it will make rolling difficult and squeeze out the edges.

Non-Rolled cakes

You may branch out and assemble in a non-rolled form using this same wonderful type of cake. Let’s look at two ideas.

Stacked cake

  • After removing the cake from the oven onto a cooling rack, run the tip of a small knife around the edges to loosen it.
  • Allow to cool for about 15 minutes.
  • Sift powdered sugar over the surface and cover with a tea towel, followed by a second rack.
  • Flip the racks, remove the pan and parchment.
  • Allow to cool completely.
  • Cut your cooled cake into four rectangles. You may wish to carefully trim away about ¼ inch of the edges for a clean look.
  • Stack the rectangles on top of each other with your preferred filling between the layers.
  • You may top the cake with powdered sugar or even apply a chocolate glaze.

Wrapped cake

  • After removing the cake from the oven onto a cooling rack, run the tip of a small knife around the edges to loosen it.
  • Sift powdered sugar over the cake.
  • Cut the cake into five equal rectangles.
  • Cover one rectangle with a tea towel or paper towel separately.
  • Cover the other four rectangles with a different towel.
  • Place another cooling rack on top and flip.
  • Remove pan and parchment.
  • Take the one rectangle that is covered separately and roll it up.
  • Place on a rack and allow to cool.
  • Allow other rectangles to cool in their flat state.
  • Unroll the cooled rectangle and remove the towel.
  • Cut the non-curled edge at an angle to create a beveled edge.
  • Do the same on both ends of the flat rectangles.
  • Spread filling on rectangles.
  • Re-roll the one curled rectangle and set it on your plate upright with the cut side up.
  • Take a second strip and wrap around this first layer, using the beveled edges to nestle within each other. Place this second strip so that one edge aligns with the edge of the first strip. Continue with other rectangles, gently pressing the layers together as you proceed.
  • Spread more filling on the outside of the cake to give the appearance of a frosted cake.
  • This type of cake needs a few hours to set up before cutting so the layers stay together.

I hope you give Cake Rolls a try. They may look difficult but are not if you follow the above tips.

Happy Baking!

Cooking Tips · Techniques

Make-ahead pies – help to destress the holidays.

As we are speeding towards the holidays, last week’s Cooking Tip was about freezing food in general. In this Cooking Tip, I want to concentrate on an item that will be on almost all our holiday tables – Holiday Pies.

As I mentioned in the last Cooking Tip, you may not have freezer space for whole pies. If you do, the questions are: what sorts of pie freeze well, are there any that you shouldn’t freeze and should you bake before freezing?

America’s Test Kitchen tested several different pies in different states. Although the following are their findings, most pie experts agree with them. When there are other options, I will discuss them.

Image by Elias Astudillo from Pixabay

Fruit pies

  • Freeze unbaked. They found that if baked before freezing, the pie crusts tended to be soggy when thawed. The filling did not taste as vibrant as it would have if baked and never frozen. On the other hand, pies that had been frozen unbaked were found to be indistinguishable from freshly baked pies.
  • They recommend freezing the pie until solid before wrapping it in plastic wrap as it leads to less damage to the crust.
  • Their technique:
    • Assemble the pie.
    • Do not apply an egg wash or sugar.
    • Freeze, uncovered, until firm.
    • Wrap in a double layer of plastic wrap and then in foil. Return to freezer.
    • Write the recipe’s original instructions on a label and affix it to the outside.
    • Freeze no longer than two months.
  • To bake a frozen fruit pie:
    • Do not thaw.
    • Brush crust with egg wash and sugar sprinkles, if desired.
    • Bake at the specified temperature, but increase the time by 10-15 minutes.
    • If the crust starts to brown too much, cover it with a pie shield.

Pumpkin pie

  • Although some chefs say you can successfully freeze pumpkin pies, most sources (including America’s Test Kitchen) caution against freezing these pies. The custard filling turns out grainy and wet and it very likely will have a soggy crust.
  • They found the same results whether frozen baked or unbaked.
  • The science of this has to do with the egg proteins unraveling and forming a gel that holds water. Since there is a lot of water in the dairy and pumpkin, this leads to ice crystals and unpleasant results. They recommend finding a recipe that does not use eggs if you want to freeze your pumpkin (or other custard or cream) pies.

Image by Juliane Lutz from Pixabay

Pecan pie

  • America’s Test Kitchen found that pecan pies froze well, either baked or unbaked. Even though there are eggs, there is very little water, as in pumpkin pies, minimizing the problems one finds when freezing pumpkin pies.
  • Their technique:
    • Unbaked
      • Pour filling into a pre-baked shell, cool and wrap as above.
      • To bake, do not thaw, but increase baking time by about 30 minutes.
    • Baked
      • Cool and wrap as above.
      • To serve, unwrap and thaw on the counter, which could take up to 3 hours. You may also allow it to thaw in the refrigerator overnight.
  • Freeze for up to 2 months.

Freezing pie filling

  • Another option for fruit pies is to make and freeze your filling. Later, thaw it overnight in the refrigerator and continue with making your pie.
  • Michigan State University Extension recommends the following technique.
    • Add ½ tablespoon of cornstarch or 1-2 tablespoons of flour to the filling.
    • Line your pie pan with foil, pour in the filling and freeze in the pan.
    • Once firm, remove from pan, wrap and return to the freezer.
  • They also recommend adding the same amount of cornstarch or flour to fruit pies that you are going to freeze unbaked.
  • An additional dusting of cornstarch on the pastry before adding the filling helps decrease sogginess.

Freezing pie crusts

A third option is to make and freeze the crust. There are three ways.

  • Make and portion your pie pastry.
    • Form into disks and wrap securely.
    • When it is time to make a pie, allow the crust to thaw, roll out and continue with making your pie.
  • Roll out your pie crust and freeze either baked or unbaked.
    • Unbaked crusts will last in the freezer for about 2-3 months.
    • Baked crusts last about 4-6 months.
  • For unbaked crusts, do not thaw. Bake them directly out of the freezer.
  • Thaw a baked crust by allowing it to stand at room temperature or heat in a 350°F oven for about 5 minutes.

Baking frozen pies

  • As mentioned above, do not thaw your frozen pies before baking.
  • You will need extra baking time. Most sources recommend adding anywhere between 15 and 30 minutes. However, it may take more or less. Watch your pie and bake until the filling is bubbling.

With these make-ahead tips for your holiday pies, you can minimize the stress of getting that holiday dinner on the table.

Cooking Tips · Ingredients

All cocoa powders are not the same.

Image by congerdesign from Pixabay

Cocoa powder is a mainstay in our pantries if we do much baking of chocolate-flavored items. If you go to the store to buy some cocoa powder, you will be faced with not only different brands but also different types. Knowing which one(s) to pick and when to use them is the subject of this Cooking Tip.

Cocoa powder is made by grinding cocoa solids that have been separated from the cacao beans. This makes it a very concentrated form of chocolate flavor. There are two main types of cocoa powder – natural and Dutched (or Dutch process). Not every container of cocoa powder will tell you which kind it is. One hint is that if it is an American brand, it will most likely be natural whereas most European brands are Dutched.

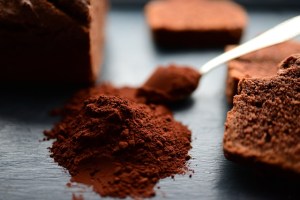
Natural cocoa powder may also be labeled unsweetened cocoa powder or even pure cocoa powder. Cocoa beans are acidic (pH of 5-6) and because there is no further processing after grinding, cocoa powder is also acidic. It is light brown in color with a reddish tint and tastes sharp, fruity and bitter.

Dutch-process cocoa powder has been alkalized. The cacao beans are soaked in an alkaline solution. This leads to a cocoa powder where the acidity has been neutralized. The color is darker brown and the flavor is mellower and more earthy. Because manufacturers use different alkalinizing agents as well as different ways of processing, one brand can vary greatly from another. There are different subtypes of Dutched cocoa, which I will discuss later in this Tip.

These two types of cocoa powder are not always interchangeable. It depends on what you are making, the other ingredients in your recipe and your desired result. This is due to chemistry, specifically acid-base chemistry. Review this Tip on leaveners for more info.

If you are making a baked recipe that calls for natural cocoa powder, it often also calls for baking soda. The latter is an alkaline leavener that is activated by acids. (E.g., yogurt or buttermilk.) Without the interaction of the acidic ingredient and the alkaline baking soda, the leavening won’t occur. Therefore, if you swap out the natural cocoa for Dutched, this reaction will be muted leading to less rise of your baked goods. Some people like this, though, as the results are very moist and fudgy as compared to lighter and drier baked goods when using natural cocoa.

Recipes that call for Dutched cocoa typically call for baking powder. Baking powder is mixture of baking soda and an acid (often cream of tartar). Therefore, it does not require another acid to activate it and start the rising process. In this instance, the cocoa is not part of the leavening process but it is there mostly for flavor and color.

Many pastry chefs recommend Dutch-processed cocoa for unbaked chocolate items and natural cocoa for recipes that require baking. If, however, the batter needs to remain moist, a Dutch-processed cocoa should be used even if it is a baked item.

King Arthur Baking has a nice guide to how to substitute one type of cocoa for another. It is always best to use whatever type that the recipe specifies. They state that if a recipe doesn’t specify which type of cocoa to use, it should have been developed to work with either type. I must say I do not have the same faith in recipe writers as discussed in this Recipe Caution tip. King Arthur does say that an exception is if you are using older American recipes as Dutch-processed cocoa wasn’t widely available throughout most of the 20th century. In this case, you would be better to choose a natural cocoa.

They recommend Dutch-process if the recipe calls for baking powder and natural cocoa for those recipes that are leavened with baking soda alone or if baking soda is the predominant leavener. On the other hand, if baking powder is the main leavener, the cocoa will often be Dutched. If the recipe does not include acidic ingredients, feel free to use natural cocoa.

If neither baking soda or powder is in the list of ingredients, use either cocoa. Examples would be puddings, sauces, souffles, etc.

Here are some tips from King Arthur’s substitution guide.

If you use natural cocoa in place of Dutched, expect the following.

  • Color – baked goods will be lighter in color.
  • Rise – as a recipe that calls for Dutched cocoa will probably call for baking powder, you shouldn’t notice a difference in rise.
  • Flavor – the flavor may be a bit tangy and slightly bitter.
  • Recommendations
    • If the recipe calls for 3 tablespoons or less of cocoa powder, use the same amount.
    • If it specifies more than 3 tablespoons, replace the baking powder with half the amount of baking soda.
    • If the recipe calls for not only baking powder but also baking soda, no changes are needed.

If you use Dutched cocoa in place of natural, expect the following.

  • Color – baked goods will be darker in color.
  • Rise – baked items will not rise as much.
  • Flavor – you may taste a soapy element as the baking soda hasn’t been totally neutralized.
  • Recommendations
    • Replace the baking soda with twice the amount of baking powder unless the recipe calls for both ingredients and, in that case, no change is needed.
    • Same if the recipe calls for an acidic element such as vinegar or yogurt.

As I noted above, there are actually some subtypes of Dutch-process cocoa.

  • Black Cocoa – Thisis considered ultra-Dutch processed. It is very dark in color and is said to be how Oreo cookies get their dark color. It will give your cakes, cookies or chocolate sauce a rich dark brown, almost black, color. It will also have a smoother, less bitter taste than either natural or regular Dutched cocoa. On the down side, many feel it has less of a chocolate flavor.
  • Rouge Cocoa – This is also known as red cocoa powder. In terms of alkalinity, it is between regular Dutch cocoa and black cocoa. It has a burgundy color. According to Guittard, one of the makers of this type of cocoa, it has a “fudgy, bittersweet flavor right at home in pastries and baked goods”.
  • Double Dutch – This is a blend of regular Dutch cocoa powder and black cocoa powder. This allows the dark color to shine while still having a great chocolate flavor.

Another interesting product offered by King Arthur is what is known as a Triple Cocoa Blend. According to the company, triple cocoa powder is made by mixing Dutch cocoa powder, natural cocoa powder, and black cocoa powder. They market it as an all-purpose cocoa powder that can be used in any recipe. Its color is darker than natural or regular Dutched cocoa but not as dark as black cocoa. The flavor is characterized as having “earthier, mellower notes of a Dutched cocoa powder with some of the acidity and more rounded fruity chocolate notes of natural cocoa powder.”

Everyone will have their favorite cocoa even among these different types. Cooks Illustrated did a testing of 8 different cocoa powders, 4 Dutched and 4 natural. They used them in two different sheet cake recipes. One called for natural cocoa powder and the one specified Dutched. They also made a cookie recipe that didn’t specify the type of cocoa.

Their results were as follows.

  • The natural cocoas produced cakes and cookies that were taller, more airy but more crumbly.
  • The Dutched powders led to less rise and a fudgier texture.

They also found that not all brands reacted the same and they attributed this to fat content. When analyzed, three of their cocoas had a 10-12% fat content while the others had a 20-22% fat content. The latter cocoas are what ended scoring the highest in taste tests. Those items made with a higher fat cocoa tended to be more chewy and fudgy than those made with the lower fat ones. The lower fat products gave a drier and crumblier baked item.

A final factor they mentioned was starch content. The lower the fat content of the cocoa was, the higher the starch content. As starch is very good at absorbing liquid, the cakes and cookies made with these cocoas were drier.

Their recommendation was that to obtain moist and tender baked goods, choose a Dutch-process cocoa that is high in fat and therefore, lower in starch. They suggested choosing a product with at least 1 gram of fat per 5-gram serving. Their favorites were all higher fat Dutched products.

  • Droste
  • Guittard
  • Valrhona

Bon Appetit’s recommended products are:

  • Guittard Cocoa Rouge (a Dutch processed cocoa)
  • Droste
  • For a natural cocoa, they recommended either Hershey’s or Scharffen Berger.

Chef’s Pencil (an international food magazine) rated the following as the best chef-recommended cocoa powders.

  • Valrhona Pure Cocoa Powder, a French, Dutched cocoa
  • Callebaut Cocoa Powder, a Dutched cocoa from Belgium
  • Ghirardelli Majestic Premium Cocoa Powder, an American product
  • Cacao Barry Cocoa Powder 100% Cocoa Extra Brute, a French, Dutched cocoa

Serious Eats recommended the following Dutched cocoas with most of them being higher in fat content.

  • Nu Naturals
  • Cacao Barry Extra Brute
  • Callebaut CP777
  • King Arthur Bensdorp Royal Dutch
  • Droste
  • Valrhona

If in the past, you have just grabbed whatever carton of cocoa powder you saw on the shelf, I hope this Tip will give you the information you need to make a more informed decision.

Cooking Tips · Ingredients

Tea – A British Tradition

Even if you do not like to drink tea, I would bet that many of you enjoy sitting down to a beautiful and tasty Afternoon Tea or even just a simple Cream Tea. Just what these events are and some of the arguments around them is the subject of this Cooking Tip.

Image by Ji-yeon Yun from Pixabay

The first piece of disagreement about Afternoon Tea is the name. Here in the US, most people use the term High Tea rather than Afternoon Tea but this is a misnomer. The concept of Afternoon Tea started in England in the 1840s when The Duchess of Bedford wanted a small bite between lunch and dinner. It started out as just tea and a small snack, but the popularity grew once she started inviting her friends over and it became a social gathering for the wealthy social class. It developed into a light meal composed of three courses – tea sandwiches and savories, scones with clotted cream and jam, and sweet pastries. Everything was bite-sized and eaten with fingers. Afternoon tea time was around 4:00 pm. It was not meant to replace dinner but instead to tide someone over until dinner, which was usually served at 8:00 pm for the upper class. Afternoon tea is also called Low Tea since it was enjoyed on low tables with comfortable chairs and sofas in the drawing room.

High Tea, on the other hand, was a working class family evening meal or supper. High Tea time was between 5:00 pm & 7:00 pm after the working class came home from work. The menu consisted of much heartier dishes meant to nourish after a long day at work. High Tea was served at a high dining table where supper was eaten and thus, the name.

Image by Stefan Schweihofer from Pixabay

Cream Tea is a simple delight consisting only of scones (with clotted cream and jam) and tea.

Another interesting argument has to do with the scone course and it is one that continues to divide people in Britain. The debate is about how you put the jam and clotted cream onto the scones. Do you put the jam on first or do you put the clotted cream on first? The two counties from which clotted cream originated are Devon and Cornwall and they vehemently disagree on this topic. In Devon, the cream is spread on the scone first followed by the jam. In Cornwall, they say the jam must go on first. Here is a summary of their respective arguments.

Cornwall – jam first

  • It is easier to spread the jam on first and then add cream.
  • The jam does not slide off the cream.
  • You can taste the cream better.
  • You usually put cream on the top of other desserts, e.g., pie, fruit, cake.

Devon – cream first

  • The cream is like butter for the scone.
  • The jam will lie flatter on the cream, making it a bit easier to eat.
  • You are at less of a risk of getting cream on your face.
  • It originates from when jam was expensive so you would just put a small amount on top.

A final topic is just what clotted cream is. Authentic clotted cream is made in either Devon or Cornwall, England. It is made by heating unpasteurized cow’s milk for many hours, which causes the cream to rise to the surface and “clot.” The historians say that clotted cream was originally made by farmers to reduce spoilage. As they did not have refrigeration, heating the milk was a way of separating the cream from the watery whey, which is where the bacteria were found. This also produced a thick and rich cream that became very popular.

Just as champagne cannot be called that unless it is from the Champagne region of France, products can only be labeled as “Cornish clotted cream” if they are made with milk from Cornwall cows and are a minimum of 55% butterfat. The farmers tell us that it is the grass eaten by Cornish cows that gives the clotted cream its yellow color.

Clotted cream should be distinguished from other dairy products. If the cream is allowed to separate naturally – without the application of heat – you get different products. If you allow the milk to separate just once, it produces “single cream”. If there is a second separation, it produces “double cream.” These products contain less fat and, therefore, are thinner and have a lighter taste.

You may wonder how these dairy items compare to American products. In the US, our heavy cream is 36-40% fat, whipping cream is 30-36%, and light (table) cream is 18-30%. Half-and-half is a mixture of cream and whole milk. It contains 10-12% fat. The British double cream is 48% fat, whipping cream is 35% fat, and single cream is 18%. As we noted above, clotted cream is at least 55% fat but some is up to 65%.

What is your preference? Do you prefer a traditional Afternoon Tea or a simple Cream Tea. I know when my husband and I lived in England and were visiting different villages, we loved to find a tea house and sit down for a relaxing Cream Tea. It was a wonderful delight!

Cooking Tips · Ingredients · Techniques

Cookies – make them the best they can be!

Image by Jill Wellington from Pixabay

Although making cookies is something we do all year-round, it certainly ramps up during the holiday season. Many of you probably have wonderful memories of making cookies with your mother or grandmother and want to create similar memories with your own children. Others of you just love to make – and eat – cookies. You do want your cookies to turn out well and I have written a prior Tip with some great advice on how to get the type of cookies you want. I encourage you to read that Tip. In this Cooking Tip, I want to share with you some ideas from cookie chefs out there who are always seeking that perfect cookie.

Baking pans

  • In my prior Tip, I mentioned that light-colored baking sheets are better than dark-colored ones.  That is still an excellent recommendation.
  • A number of sources advise against greasing your baking sheets. They feel it can cause your cookies to spread too much and lead to a greasy cookie. If your cookies stick, the pan may be the culprit due to the residue that accumulates over years of baking. In fact, spraying your pans with a nonstick spray is one of the items that leads to the residue build-up. To avoid sticking, the other choices are to get a new pan or use parchment or silicone mats.
  • Cookie experts do have some words of caution as to parchment and silicone.
    • Cookies baked on silicone mats tend to spread more than those baked on parchment.
    • Cookies baked on silicone also tend towards greasiness.
    • There is a bit of disagreement on the browning aspect of the cookies. Some feel that the cookies brown more with parchment and others think that is true for the silicone mats.
    • If using a silicone mat, try to remove the baked cookies to a rack as soon as you can. As silicone doesn’t breathe, cookies left on a mat to cool may sweat, affecting the texture.
  • Don’t rotate the pans. You may have heard that if you have more than one baking sheet in the oven that you should rotate them half-way through the baking time. This is said to help with even baking and the problems of hot spots in your oven.  Cookies, though, bake for a relatively short amount of time. When you open the oven, you immediately lose heat and this can lead to cookies that do not properly brown or rise as you would expect. So, you may want to skip the rotation advice with cookies.
Image by Silvia from Pixabay

Shaping cookies

  • If making a drop cookie, use a cookie or ice cream scoop. This not only helps with better shape but also ensures the cookies balls are equal in size and, therefore, bake more evenly.
  • It also helps to gently roll the balls between your hands to get as perfect of a round shape as you can before baking.
  • If making “slice & bake” cookies where the dough is rolled into a log and put in the refrigerator to chill, it can flatten as it sits. Put your dough in a slit open cylinder from a roll of paper towels before placing in the refrigerator. This will help the log keep its round shape.

Rolling out dough

  • As you have seen from cookie recipes, most advise chilling the cookie dough before rolling it out. However, it can crack if it is too cold. An alternative is to roll it out before you chill it. It will make it easier if you divide the dough in half before rolling. Just-made dough will be sticky and so, you will want to roll it between wax or parchment paper. You probably will not need to dust the surface with flour to prevent sticking. The paper also makes it easy to flip over during the rolling process to get an evenly rolled dough. It will need to be chilled after rolling before you cut out the shapes. This helps the dough to firm up but having it rolled out first means it will chill much faster than a whole block of dough.
  • Some cookie experts recommend rolling out your cookie dough on a surface sprinkled with powdered sugar rather than flour. This prevents sticking to the counter without adding extra flour to the cookies.

Doubling a recipe

  • If you wish to make a double batch of cookies, pay attention to these tidbits of cookie wisdom.
  • Make sure your mixer will hold a double batch. If you have too full of a bowl, not only can it get messy but it can lead to over-mixing as you try to get all the ingredients incorporated.
  • Know which ingredients can be scaled straight-up.
    • The main ingredients (flour, sugar, milk, etc.) can be doubled without a problem.
    • With spices, be careful you are not adding too much as some spices are very powerful.
    • Baking powder or soda can be a problem. Adding too much can lead to premature rising and subsequent collapsing when they come out of the oven. So, one expert recommends you use the following formula for these leavening ingredients. For every one cup of flour, use 1 to 1¼ teaspoon of baking powder and ¼ teaspoon of baking soda. If your recipe has both in the ingredient list, look at the ratio of one to the other and try to maintain that ratio.
  • I have written about this before but it is worth repeating. Write down the doubled measurements directly on your recipe so you don’t get partway through and then forget to double an ingredient; something that is so easy to do if you are just doubling things in your head.
  • If you are rolling out the cookie dough, divide it in half for rolling. Keep the other half in the refrigerator while rolling out the first half.

Ingredients

Butter

  • As mentioned in my prior Tip, your choice of fat affects both the flavor and texture of the cookies. Butter gives you superior flavor and a more tender cookie but leads to more cookie spread. Shortening melts slower and, therefore, you get less spread. Some recommend a 50/50 blend to try to get the butter flavor without excessive spread.
  • J. Kenji López-Alt, author of The Food Lab likes 1 part flour to 1 part sugar to 0.8 parts butter. He claims this leads to cookies with moderate spread and no “cakiness”.
  • The form of the butter can also make a difference.
    • Creamed butter yields lighter/firmer cookies.
    • Melted butter leads to denser/chewier cookies.

Sugar

  • Granulated sugar yields thin, crisp cookies.
  • Brown sugar results in taller and more moist cookies
  • For a good balance, you may want to try a mixture of the two sugars.
  • Corn syrup – this is another sweetener and can yield cookies that are soft, wide and darker in color. If you like a chewy cookie, swap out some of the sugar for corn syrup.

Leavening

  • Baking powder produces cakier cookies that rise higher during baking with smoother tops.
  • Baking soda will give you cookies that are craggier and denser.

Salt

  • Do not forget the salt as it brings out the sweetness and flavor of your cookies.

Mix-ins

  • Chefs who have tested different types of chocolate prefer hand chopped chocolate from bars saying it gives the most intense flavor and a more interesting texture.
  • Press a few of the chunky ingredients (chocolate chips, cranberries, peanut butter chips, etc.), into the tops of the cookie dough balls before baking. It tells people what is in the cookies, it is attractive and helps with the texture.

Freezing cookies and cookie dough

  • Do not freeze cookies with a more liquid batter (tuiles, Florentines, pizzelles).
  • Very cakey cookies such as Madeleines do not freeze well.
  • Baked cookies that freeze well are bar cookies, sugar cookies, drop cookies, biscotti. Place cookies on a baking sheet and freeze solid and then put in an airtight container.
  • To thaw, take out of container and allow to sit at room temp.
  • Can gently reheat cookies in a 275°F oven for a few minutes.
  • Any doughs with a good amount of fat freeze well. Examples are shortbread, gingerbread, drop cookies (oatmeal, chocolate chip, etc.), icebox cookies and sugar cookies.
  • For drop cookies, form dough balls, place on a baking sheet, freeze and then transfer to a plastic bag or storage container.
  • For icebox cookies, wrap logs in plastic wrap, put into freezer bags and then freeze.
  • For roll-out cookies, wrap the dough in plastic wrap and then in a freezer bag. Can also roll the dough out between parchment paper, wrap in plastic wrap and freeze.
  • If your cookie recipe calls for a dip in powdered sugar, freeze the dough balls without the sugar. Roll in the sugar just before baking.
  • Most cookies can be baked straight from the freezer but may need a few extra minutes in the oven.

I hope this Tip along with my prior Tip help you achieve wonderful Cookie Success!

Cooking Tips · Techniques

The Final Step to a Great Pie

(Updated September 2022)

In the last few Cooking Tips, we have been discussing how to put that perfect pie on your dinner table. We looked at ingredients and techniques for making a great pie crust. You are now ready to put it in the oven but there is another subject to discuss – blind baking your pie crust. That is the subject of this Cooking Tip.

Blind baking a pie crust is simply pre-baking your crust (either partially or totally) before adding your filling. So, when do you blind bake your crust? The simple answer you might say is – when the recipe tells you to do so. Yes, that is true, but there are general guidelines to let you know whether you should do this.

Pies that have fillings that are not baked require a fully baked pie crust. An example is a yummy French Silk Pie. Since the pie is not going into the oven after adding the filling, the pie crust needs to be fully baked.

Other times you want to blind bake is with custard pies or pies with delicate fillings. With custard pies (such as pumpkin), the moisture in the filling might make the crust soggy before the crust is fully baked. Partially baking the crust before adding the filling helps to prevent this. There are also some delicate fillings that are only briefly cooked on the stovetop. If you do not blind bake the crust but rather put the filling in an unbaked crust, the filling would be over-cooked before the crust is fully baked. An example is Chocolate Cream pie.

One time you do not want to blind bake is if you are making a double-crust pie. If you blind bake the bottom crust, your top crust won’t adhere to the bottom crust. If your filling is such that you would prefer a blind-baked crust to prevent sogginess, you can place decorative pieces of crust over the top to give you a type of open double crust such as in this Gooseberry Pie recipe.

Blind baking is not as simple as putting your unfilled pie crust in the oven. If you do that without adding some weight, your pie crust will puff up – not ideal if you want to put a delicious filling into it. It also makes it much more likely that the sides of your crust will droop before it sets.

Now we know why we need to blind bake a crust, how do we do it? There are three recommended ways depending on what you are looking for in your finished pie.

If you want a pie with a pretty crimped edge or you have a tall crust, line the unbaked crust with foil or parchment making sure it fully covers the crust and the edges of the pie crust. Foil is often preferred over parchment as you can get it into the corners better as well as folding it over the crust to prevent overbrowning. Fill the crust at least 2/3 full with something to weight the crust down as it bakes. I love ceramic pie weights. They conduct heat well and fill up the entire crust. Just make sure you have enough to fully cover the crust. I tend to use two boxes of these for one pie crust.

You have probably heard that you can use dry beans or rice. Those are poor heat conductors resulting in a longer baking time to get to the proper stage.  Another option is granulated sugar, an excellent heat conductor.

Stacey Ballis with My Recipes did an experiment testing different types of weights. Her favorite method was granulated sugar, which conducts heat as well as the ceramic weights but gets into the corners of the pie crust better. She uses the sugar a couple of times and then uses it in her baking. Since it has slightly caramelized by being in the oven, she recommends using it for meringues. Serious Eats agrees with this choice. If you don’t want to use sugar, the ceramic weights are a close second.

As I discussed in last week’s Tip, you should have chilled your pie crust. If you haven’t done that by this step, you may chill it with the weights in place. After chilling, place it in a 375° oven for 20 minutes. Remove from oven and carefully remove the very hot pie weights. Prick the bottom with a fork and return crust to the oven. If you will be baking the pie filling, bake the crust for another 5-8 minutes. If you are not baking the filling, bake the crust for another 12-20 minutes until fully baked. This method should work for most pie crusts but some recipes may have slightly different baking temperatures and times.

A second method is called the “Low & Slow” method. With this method, the pie crust is baked at 350° with pie weights in place for an hour. Baking at a more moderate heat is said to reduce shrinkage & puffing.

A third method is to sandwich the crust between two pans and bake upside down. This method is good for pies with a flat edge that do not need the extra height or when you are not looking for a decorative edge. To use this method, place the crust in the pan and flatten its edge. Spray the outside of another pie pan and nestle into the crust. You may also line the crust with parchment before putting pans together. At this point, chill for 30 minutes to solidify fats and prevent shrinkage.

Now, place the pans upside down on a baking sheet so that the empty pan is on the bottom. Bake for 20 minutes in 375° oven. As the proponents of this method say, “Gravity ensures that as your crust slips ‘down’ the side of the pan, it’s actually moving up!” When baked, remove from the oven and use a spatula to carefully turn over and prick with fork. Return the crust to the oven right side up without second pan and bake for 15-20 minutes until golden brown. You may now fill the crust. When would you want to do this method? It is ideal for pies where the edge of the pie is not as important as its top, such as Lemon Meringue.

What about your pie plate? That is the subject of next week’s Cooking Tip. See you then!

Cooking Tips · Techniques

Techniques for a great pie crust

(Updated September 2022)

After discussing the ingredients you need to make a pie crust, I now want to turn to bringing that crust into reality. That is the subject of this week’s Cooking Tip – how to make a great pie crust. As you read this Tip, you will notice that I often give you different recommendations. Everyone has their preferred method and I want to give you alternatives so you can find what works best for you.

The first point I want to make is COLD is your friend when making pie crusts. The fat that you cut into the flour needs to stay solid as long as possible so that once it is in the oven, it will melt at the appropriate time creating steam and thus, the flaky layers we all crave in pie crusts.

The fist method is the hand method. Start by putting your flour and salt in a bowl and whisk together. I highly recommend weighing your ingredients but if not, measure carefully. At this point, if your kitchen is warm, you may want to refrigerate the bowl/ingredients/equipment. Your aim (no matter the ambient temperature) is a final dough temperature of 65° to 70°. Yes, you can take the temperature of your dough. Just one more reason to have a good digital thermometer in your kitchen armamentarium.

Serious Eats points out that if your room temperature is above 73°, everything that touches the dough will warm it. You may have noticed that your dough seems to need less water on a hot day. That is because the butter is softer making it act more like a liquid. Although you may be tempted to use less water, this may lead to a weaker dough giving you headaches when you try to roll it out.

A solution is to chill everything with an aim to keeping your dough temperature below 70°. Take everything (your bowl with the dry ingredients, your rolling pin and your pie pan) and put them all in the refrigerator. Your fat and your water should already be in there keeping COLD until you need them. If your countertop is warm, fill some plastic bags with ice water and place on the countertop to cool it.

Next, add your COLD fat – butter, shortening or a combination. If you are using a combination, cut up the shortening and add first. Mix it in until the mixture is like sand. Then, add your butter, which should be cut into small cubes, and toss gently in the flour. Working quickly, cut the butter into the flour. I think no tool works as well as your hands to do this step although you can use a pastry cutter. Using a snapping motion between your fingers and thumbs, you will flatten out the butter cubes. Continue this until all the butter is flattened. If your hands are warm, you may want to cool them under the cold tap first. Do not overmix – you want to be left with an uneven mixture with butter pieces that vary in size. Remember, this is what is going to give your crust its flaky layers. So, you do not want your butter to melt or totally disintegrate as you are doing this.

This is the point where you add the ICE water. One train of thought is to never add all the water at once. Add it incrementally so the dough does not get too wet. Start with drizzling in a few tablespoons and gently tossing the mixture. A bowl scraper works great for this. Continue until the dough holds together if you squeeze it in your palm. The reasoning for this is that excess water can lead to more gluten development. However, a too-dry dough can be very difficult to roll out.

Another point of view is that gluten is not necessarily the enemy of soft, flaky crusts. Adding the water listed in the recipe all at once and mixing until it comes together will give you a dough that is easier to roll out without tearing.

After adding the water and mixing, empty the bowl onto a very lightly floured surface or onto a piece of parchment paper. There are two ways you can proceed from here. The easiest is to just gently gather the dough into a ball. If it is still too dry, add more ice water but a small amount at a time. A spritz from a spray bottle may be all you need. If you have added too much water, sprinkle a bit more flour and gently mix it in.

A second way of finishing your pie dough is only slightly more work but gives you even more flaky layers. For this method, you may want to put your dough onto a piece of parchment. Press your dough into a rectangle and then, using the paper to assist you, fold it into thirds – just as you would a business letter — and then fold in half so it is square-shaped. If necessary, using a water bottle, spritz any dry areas with the ice water and then fold. You can also do this folding without parchment by putting your dough onto a floured counter and use a bench scraper to help with the folding.

At this point, shape your dough into the shape of the pan into which you will put it. This will make it easier to roll out to the correct shape. If you have made enough dough for a double crust, cut the dough in half before shaping. Some recommend rolling the shaped dough’s sides along a floured surface to smooth the edges.

J. Kenji Lopez-Alt, formerly of Serious Eats, loves using a food processor to make the dough. He claims his method creates a tender and flaky dough that is very easy to roll out. He puts 2/3 of the flour in the food processor bowl along with salt and any sugar and pulses to incorporate. He then adds the cut-up butter and pulse until all the dry flour is gone followed by spreading the dough around the bowl with a rubber spatula. The rest of the flour is sprinkled over the dough and pulsed until the dough is slightly broken up. At this point, transfer the dough to a bowl, sprinkle with water and use the spatula to fold and press the dough until it comes together into a ball. If you want to read about his reasoning, see this article.

No matter which of the mixing methods you use, you need to next chill the dough. One recommendation is to wrap your dough into plastic and put in the refrigerator for a minimum of 30 minutes. This hardens the fat, which has warmed and softened during the mixing process. It also allows the gluten to relax. You may wish to freeze the dough at this point for use at a future time. If so, wrap in plastic and then in foil before putting in the freezer.

When you are ready to actually assemble your pie, remove the chilled crust from the refrigerator. If it has chilled longer than 30 minutes, you may need to let it warm up just a bit on the counter, leaving it wrapped. It needs to be soft enough to roll but should still be cold to the touch. As you roll it out, you should see large pieces of flattened butter.

Since rolling the dough “wakes” up the gluten and softens the butter, a different recommendation is to roll out your dough and put it in the pan right after you make it. Then, chill it thoroughly in the pie pan – about two hours.

Transferring it to the pan can be done by folding the rolled-out dough into quarters, placing it in the pan and unfolding it. Another method is to gently roll the dough around your rolling pin and then unrolling it over your pan.

You are now ready to finish your pie, right? No, remember the word I mentioned in the beginning – COLD. You want to chill your pie crust before filling it. Once again, this chilling helps to solidify that wonderful fat as well as minimizing shrinkage during baking.

Some just recommend refrigerating the dough after being put in the pie plate. As you have mixed and rolled out the dough, the gluten strands that have developed are stretched and want to snap back. You have probably seen that as you roll your dough; it doesn’t always stay put but tends to shrink. Resting the dough allows the tension in the strands to ease so they remain stretched and don’t shrink back when heated. However, as the pie is baked, the dough is not well set by the time the butter vaporizes. So, the air pockets created by the steam when the butter melts disappear. The soft, not-yet-set dough sinks into those spaces resulting in less flakiness.

Others recommend freezing the dough before baking. As you bake frozen dough, it heats up and sets relatively quickly in comparison to the time it takes the butter to melt. By the time the water in the butter starts to turn to steam, the dough is well into its setting stage. The air spaces occupied by the frozen butter, now that it has largely turned to steam, hold their shape because the dough has started to set. Thus, flakier layers. The downside is that as the water freezes, it holds the stretched gluten in place rather than allowing it to relax. So, when you bake it, the gluten strands snap back and the crust shrinks.

Many recommend a compromise by first refrigerating the dough for approximately 40 minutes to relax the gluten to minimize shrinkage followed by putting it in the freezer for 20 minutes to improve flakiness. Yes, this does require a bit more timing but could lead to a superior result. Now you are ready to choose your favorite filling. However, before putting your filling in the pan, stop and ask yourself if you need to par-bake your crust. Stay tuned for next week’s Tip as we delve into what par-baking is, when you need to do it and how to par-bake. See you then!