Cooking Tips · Ingredients · Techniques

Beets – Pretty, Nutritious & Delicious!

Image by Nick Collins from Pixabay

I am making a lovely tart for tonight’s dinner that contains two ingredients that can be polarizing for some people – beets and goat cheese. I have already written a Cooking Tip on Goat Cheese. In this Cooking Tip, let’s explore the wonderful world of beets, known in Europe as beetroot.

Beets are a root vegetable, but one in which you can eat the entire plant – the bulb, stem and leaves. They are full of healthful nutrients such as antioxidants, vitamins and minerals.

There are different types of beets, but the ones we find in our stores and on our plates are garden beets. Other varieties include the sugar beet (from which we get 55% of our sugar) and mangold beets, which are used in livestock feed. Even among the garden beets, there are different varieties, although you probably won’t know the variety unless you grow them yourself or buy them from a farmer’s market.

Image by Aline Ponce from Pixabay

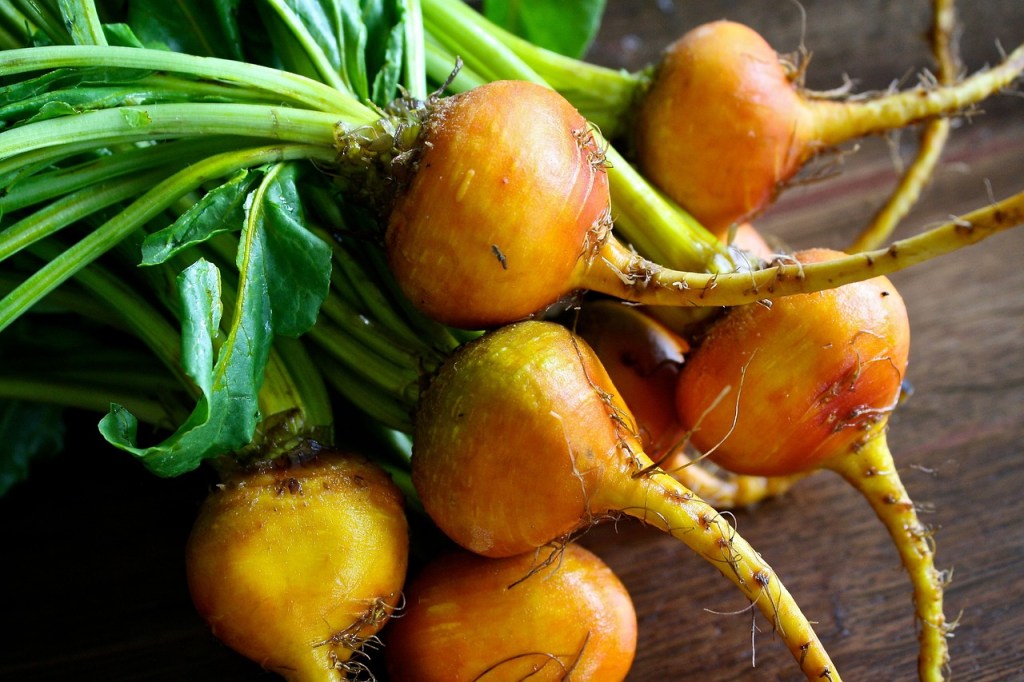
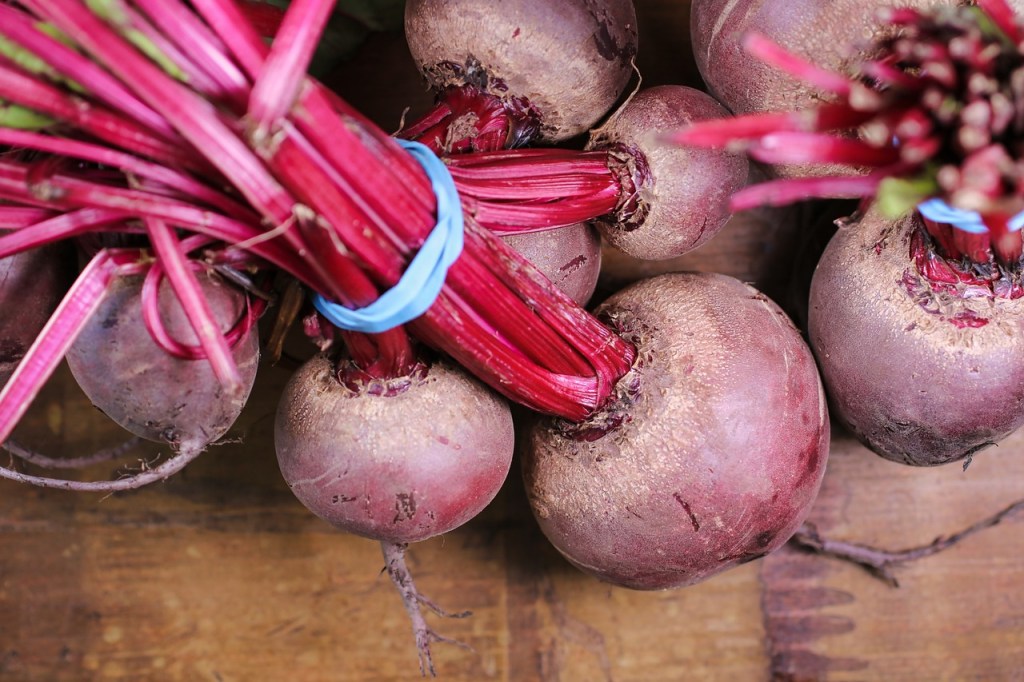
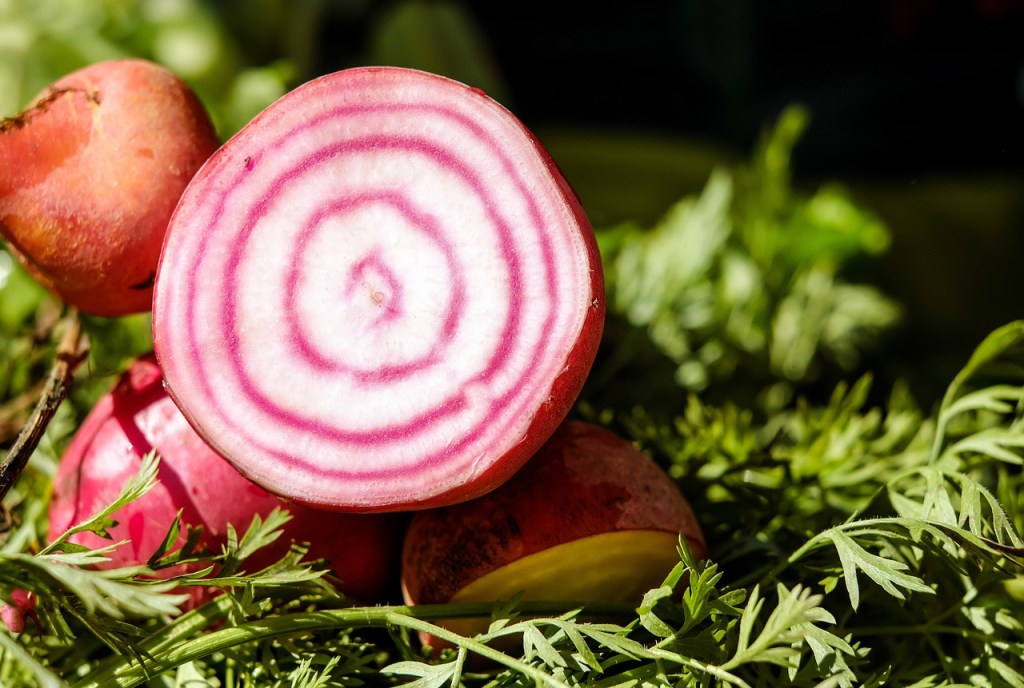
The most common variety in the market is the red beet. Some markets may sell golden beets. A third variety is Chioggia, also known as Candy Cane Beets. They are an heirloom variety from Italy and have pink and white concentric circles on the inside. Although not impossible to find, they are much less commonly sold in the average supermarket.

Most stores also sell vacuum-packed cooked beets. Their flavor is comparable to fresh beets, but canned beets are not as good a substitute for fresh.

The flavor of beets is said to be sweet but earthy. Many ask if the different colored beets taste differently. America’s Test Kitchen tested red beets, golden beets and Chioggia beets. They tasted them raw, roasted and marinated. Their tasters thought that the golden beets were less sweet and more earthy. The Chioggia were rated mild but with a bitter aftertaste.

My husband grows both red and golden beets. I love the look of the different colors, but we also thought the red beets were sweeter in a side-by-side test.

Image by Couleur from Pixabay

When shopping for beets, look for medium-sized ones, about 2-3 inches in diameter. Larger ones may be a bit more tough. Look for ones without blemishes or dents. If you have the choice, buy them with the greens still attached, as they will probably be fresher. Once you get the beets home, cut off the greens and store them separately. Wash the greens, wrap them in paper towels and put them into a plastic bag. Store the beets unwashed in plastic bags in the refrigerator. The greens will last a few days in the refrigerator, but the beets can last up to a month.

Preparing them is not difficult, but it can take some time, depending on your chosen method. They do not need to be peeled, but leaving the skin on can result in a tough texture.

Roasting

This is my preferred method. It takes the longest but is practically hands-off. Wrap the beets in foil and put them on a sheet pan in a 400°F oven for about an hour or until they are tender. Remove them from the oven, allow them to cool and then rub away the skin. Quartering the beets before roasting will speed up the cooking time.

Microwave

Peel the beets, cut them into ½-inch pieces, put them in a microwaveable bowl with a splash of water and cook, covered, for about 15- 25 minutes, depending on their size.

Grill

Heat your grill to medium-low heat. Clean, peel and cut the beets horizontally into ¼-inch slices. Toss the slices in olive oil, place them on the grates, and lightly salt them. Cook for 8-10 minutes, flip and continue cooking until tender.

Steam

Cut the unpeeled beets into ½- to 1-inch cubes. Bring a small amount of water in a pan to a boil. Put a steamer basket in the pot, add the beets, cover and steam until tender, 10-30 minutes. Remove from the basket, cool and peel.

Boiling

Beets cooked in boiling water will be less intense in color and leach some nutrients into the water. However, many like this method. Place whole beets in a saucepan, cover with water, bring to a boil, reduce heat and simmer until tender, 20-45 minutes. Remove the beets from the simmering water, put them into an ice bath to cool and stop the cooking, and peel.

Raw

Beets are perfectly edible in the raw state. However, as they can be tough, they should be sliced very thinly or grated. Another option is to use a spiralizer.

Instant Pot

If you cook your beets this way, there is no need to peel them. The skin is barely noticeable after cooking in an Instant Pot. Leaving the skin on also means extra nutrients.

Beet greens

The beet greens can be eaten raw, but others prefer a quick sauté in butter or oil. Garlic is also a nice addition. It helps to separate the stems and cook them for a few minutes before adding the greens.

Besides the storage advice given above, cooked, peeled beets can be frozen for 8-10 months.

Some people do not like the red beets because they stain hands and cutting boards. However, there are ways to deal with this.

To prevent staining:

  1. Wear gloves.
  2. Coat your hands in oil – just ½ teaspoon rubbed on your hands is enough.
  3. Prevent your cutting board from staining by giving it a light spritz with a cooking spray before cutting the beets.

Removing beet stains:

  1. Wash your hands as quickly as you can in hot, soapy water.
  2. Scrub salt and soap into your hands and then wash.
  3. Rub a bit of whitening toothpaste into the stain and then wash.

What is your favorite way to prepare beets? As mentioned above, I prefer to roast them. You can then eat them just with a bit of butter and lemon juice. Or, add the beets to salad greens and pour over a flavorful vinaigrette along with nuts and goat or feta cheese. Here are a couple of great recipes.

What a pretty and tasty way to get your nutrients!

Cooking Tips · Techniques

Reverse Searing – Advantages & Drawbacks

If you cook a lot of meat, you know the importance of getting a good sear on it. It results in a tasty and crunchy exterior but also leads to the development of fond, the foundation of a great pan sauce. Searing is a fairly easy procedure, and most of us do it exactly the same way. The subject of this Cooking Tip, though, is about turning the searing process on its head in something called Reverse Searing.

Image by tomwieden from Pixabay

Reverse Searing is a technique developed for cooking steak but can be used for other proteins such as burgers, chicken or entire roasts. Regular searing involves heating oil in your pan until it is very hot, putting your meat in it and allowing it to develop a beautiful brown crust on all sides. Depending on the size and cut of the meat, you might finish cooking it on the stovetop or in the oven.

In reverse searing, the meat is first gently and slowly cooked (usually in an oven) to a desired internal temperature. It is then removed from the oven and quickly seared in a hot pan stovetop before serving.

Advantages

  • The meat cooks more evenly and can prevent the gray band of over-cooked meat that often develops just under the surface.
  • The meat is less likely to overcook. Of course, you do need to monitor the internal temperature to ensure over-cooking does not occur.
  • The meat is said to be more tender and softer.
  • The low heat is not equipment-specific. Although the oven is the typical way of cooking the meat, others use a smoker, indirect grill, or even sous vide.
  • The time in the oven dries out the surface, allowing for a good sear. Many feel, though, that the crust is not as good as in a regular sear.

Drawbacks

  • This method is only meant for thick pieces of meat, at least 1.5 inches thick. It will not work well for thinner cuts.
  • The meat takes much longer to cook.
  • Many do not think it produces as good of a crust as with a regular sear.
  • The cooking process involves more pots/pans.

The procedure

  1. Pat the meat dry.
  2. Season with salt and pepper and place on a rack, uncovered, in the refrigerator for 2-24 hours. (See this Cooking Tip for more information on this method of seasoning.)
  3. Preheat oven to 200° – 275°F.
  4. Place meat on a rack over a rimmed baking sheet and place in the oven until it reaches your desired internal temperature. Some recommend cooking until the meat registers 15 degrees below your desired level of doneness.
  5. Remove the pan from the oven.
  6. Heat oil in a heavy pan on the stovetop until very hot.
  7. Place the meat in the pan, adjust the heat and allow it to sear. Then, flip and sear the other side.
  8. If desired, add aromatics such as shallots, thyme, garlic, and basting with butter for a couple of minutes.
  9. Let meat rest and serve.
Image by Raphaël Jeanneret from Pixabay

Is reverse searing worth changing your routine and planning for extra time? Only you can answer that. You will read that it is the perfect way to cook a steak and the only method to get the best steak ever. However, there are as many who have tried it and then gone back to their normal process of searing as there are proponents of the method. What about you? Have you tried it? Do you recommend it or not?

Cooking Tips · Techniques

Plating like a chef!

When you go out to a restaurant, and they present you with an artfully plated dish, your expectations that it will taste good go up. Those who know me know that making things look pretty is not a skill I possess. If I want a nice garnish or some other touch on the plates I am serving to guests, I call my husband, who is much better with things that require a bit of manual dexterity. This Cooking Tip on how to plate food is for those who want that wow factor when you serve your guests. I don’t think it will help people like me, but you never know!

Dishes

Most chefs will tell you successful plating starts with the plate/dish. There is a reason most restaurants serve food on white dishes. It is a plain background on which you can do your artistry. However, you do not have to feel constrained by this if your dish’s colors/patterns complement and do not distract from the food.

Other considerations besides the color are the size and shape of the dish. There is no one correct size; it should be large enough to hold the food without looking like there is too much empty space but not so small that it covers the entire plate. Successful plating involves a certain amount of negative space.

Some like to match the shape of the dish to the food, such as using a square plate with slices of lasagna. Others like to contrast shapes. Use what is most pleasing to the eye for your food.

Food placement

The classic style puts the main ingredient in the center of the dish, with the side dishes arranged around it. Others like to put that main ingredient just off-center.

Traditional plating involves placing the main part of the meal (typically the protein) at about 6:00, the traditional starch at about 11:00, and the side dish at 2:00. This works best when the sizes of these different items are balanced.

Others like to arrange the food in linear patterns, either vertically or horizontally. The food is placed in parallel or intersecting lines, and garnishes are added to break up the lines. Still another pattern is placing the food on the plate in arcs rather than straight lines.

Odd numbers of items, such as shrimp, scallops, or small bites are considered more attractive than even numbers.

You will undoubtedly have seen the practice of stacking food on the plate to add height. An example would be putting the starch on the bottom, the protein in the middle, and the veggies to top it off. The bottom layer could be your starch in a pureed form, mayo or a sauce. The middle layer could be your protein or a neat dollop of rice or noodles. If the protein is not in the middle layer, it will be in the top layer. Longer items, such as asparagus spears, also look great on top.

Another tip is to slice your chicken, steak or other protein before plating and then arrange it on the plate back into its whole shape but fanned out.

This all takes creativity and practice. Some chefs start by making a drawing of how they want the plate to look. This helps them visualize and then achieve just what they want.

Color

Try to avoid a monotone dish. If you are serving a lighter-colored protein, such as fish, surround it with darker-colored sides and vice versa.

Garnish

Sprinkling on herbs or cheese or even a lemon slice can add a pop of color and increase the visual appeal. When it comes to cheese, rather than grating, why not try making shavings and topping the food with those? Just a drizzle of olive oil or an interesting infused oil can be striking. You could even incorporate edible flowers.

Sauces

Sauces are not always necessary but are an excellent addition. I was taught in culinary school that the proper way to use a sauce is to put it on the plate first with the other items on top. Get creative with how you apply the sauce to the plate. This video has some interesting techniques for the application of sauces. If you are going to use a sauce, do not plate it until just before serving.

Texture

Just as you do not necessarily want all the food to be the same color, you also do not want all the textures to be similar. Adding chopped nuts, sesame seeds, or seaweed flakes adds a certain amount of interest to the mouthfeel.

Wipe the edges

This is just common sense. If some of the items are all over the edges of the plate, it will look messy. Take those few seconds to wipe it clean before putting the plate in front of your guest.

Helpful tools

If you are serious about raising your plating skills, consider investing in some helpful tools. Inexpensive squeeze bottles improve your control over where your sauce goes. Long tweezers allow you to place smaller items exactly where you want them without disturbing the other ingredients. Some chefs like to use food-grade paintbrushes. Ring molds help you achieve that neat, circular placement of the food. Small prep bowls can be used to mold your rice into a neat shape before placing it on the plate. A good set of kitchen tongs will aid you in shaping an attractive nest of pasta on the plate.

Even with my lack of creativity and poor manual dexterity, these tips could help me make my dishes not only taste great but look attractive and appealing. I am sure it would be the same for you. Experiment, have fun and don’t be too hard on yourself!

Cooking Tips · Ingredients · Techniques

Roasted Red Peppers – Jarred or Homemade?

Image by Hans from Pixabay

Roasted red peppers are a delicious condiment and a crucial ingredient in many recipes. They are not hard to make, but what do you do if you don’t have any red peppers in your kitchen? Are jarred roasted red peppers a suitable alternative? That is the subject of this Cooking Tip.

Red peppers are a type of sweet pepper. They are wonderful raw or cooked in many different savory dishes. A favorite way of using them is roasting them. There are various ways of doing this in your kitchen.

Oven method

  • Preheat oven to 500°F.
  • Line a baking sheet with foil.
  • Wash the peppers and place them on the baking sheet.
    • Many people will cut them in half, remove the seeds and ribs, and then place them flat on the baking sheet.
    • Many others like to roast them whole as they feel you are less likely to get burned edges. They also find precut roasted peppers more difficult to peel.
  • If whole, rotate the peppers every 10 minutes.
  • Roast until charred on all sides and the skin looks wrinkled, 30-40 minutes.
  • Once charred, remove the baking sheet from the oven and allow the peppers to cool before peeling. Placing them in a covered bowl, plastic or paper bag, or even wrapping them in the cooking foil causes the peppers to steam, resulting in a softer texture. Many say it also makes them easier to peel.
  • Leaving them uncovered to cool will give you a firmer texture.
  • When cool, remove the stem and seeds, peel them, and use them in your dish as directed.

Grill pan or dry cast iron skillet

  • Preheat the pan until very hot.
  • Place the peppers on the pan and cook, turning as they char.
  • Finish as in the oven method.

Directly over a gas flame

  • You may also roast the peppers using the flame of your gas cooktop.
  • Using tongs, hold the pepper directly over the flame, turning until all sides are charred.
  • Finish as in the oven method.

Broiler

  • Cut the peppers to lie flat, removing the stem, seeds and ribs.
  • Heat the broiler with the rack 2½ to 3½ inches from the broiler element.
  • Line a baking sheet with foil and lie the peppers on the sheet pan.
  • Broil until the skin is charred but the flesh is still firm, about 8-10 minutes, rotating the pan halfway through.
  • Finish as in the oven method.

Grill

  • You may also roast them on a grill, which is the method that will result in the most robust smoky flavor.

Jarred peppers are already roasted until they are charred and then peeled. They are shelf-stable until open. Are they a suitable alternative to homemade ones? Most chefs would say yes in certain preparations.

Make them yourself if you want to put them in salads, on a pizza, or on an antipasti plate. However, if you will be pureeing them into a soup or a sauce, the jarred variety will work fine. Just be sure that you like the taste of them and that you check for any ingredients that might have been added to the jarred peppers.

Supermarkets carry various brands in my area. Here are the ingredient lists for these brands. Note that some contain sugar, and one even contains vinegar.

Mt Olive

  • Roasted red bell peppers, water, salt, sugar, citric acid

Mezzetta

  • Peppers, water, sea salt, citric acid

Delallo

  • Red bell peppers, water, salt, brown sugar, citric acid, calcium chloride

Safeway’s Signature Select

  • Roasted red peppers, water, salt, citric acid, calcium chloride

Walmart’s Great Value

  • Roasted red peppers, water, salt, citric acid, calcium chloride

Trader Joe’s Roasted Red Peppers

  • Red peppers, water, sea salt, red wine vinegar

I looked for taste tests on jarred roasted red peppers. There were only a handful and they disagreed on which brand was best. Another problem with taste tests is that they often taste different brands, making it hard to compare results.

America’s Test Kitchen tasted them plain and in roasted red pepper soup. For plain, the tasters preferred firm, smoky and sweet peppers and those that were packed in a brine of only salt and water. Bottles that contained other ingredients such as vinegar, garlic and olive oil were felt to have an interesting flavor, but they also thought that the vinegar masked the red pepper flavor. In soup, the texture was not important, but tasters still preferred sweet and smoky ones. Those packed in vinegar gave a sour note to the soup. Their two preferred brands were Dunbars and Cento. Further down on their rating was Divina. They did not recommend Mt Olive or Mediterranean, among other brands.

Another taste test showed that Divina came out on top. Looking at the brands America’s Test Kitchen also tasted, they did not like Cento. You will note that this was one of the two preferred brands in the testing by America’s Test Kitchen.

Because there are not many taste tests and the above two are inconsistent, I recommend that you just do your own taste test and find one you like.

Whether you make your own roasted red peppers or buy jarred ones, what do you do with them? Here are a few ideas.

  • Red pepper sauce – puree with or without additional seasonings. Use on pasta or meat.
  • Romesco sauce: Pulse in a food processor with olive oil, sherry vinegar, toasted almonds, garlic, salt and pepper. Serve with raw veggies or crackers.
  • Make a soup.
  • Use on an antipasti platter.
  • Add to salads.
  • Use as a pizza topping.
  • Make a delicious twist on hummus.
  • Make a red pepper pesto.
  • Use in a quiche or scrambled eggs.
  • Throw in a summer veggie tart.

There is also a difference in cost between making your own and buying the jarred variety. Currently, in my area, one fresh pepper costs $1.59. The jarred ones vary from $2.15 for a 12 oz jar to $4.49 for a 16 oz jar. The first is $0.18 an ounce and the latter $0.28 an ounce. My fresh red pepper weighed 8 ounces. Not accounting for the weight of the peel, seeds and ribs, that price came to about $0.20 an ounce. Of course, with the fresh ones, there is also the cost of the foil, the power to run the oven as well as your time. Considering all of this, we can say that there is not a huge difference in cost between making your own and buying the jarred ones.

Roasted red peppers will last in the refrigerator for a week or two. For longer, freeze them for up to 3 months. I have a bottle in my refrigerator right now that I want to use up. I will be making a pasta sauce. One choice uses red peppers, parmesan cheese, green chili and cilantro. The other one uses peppers, garlic and feta cheese. Which sounds better? What about you? What will you make with your roasted red peppers?

Cooking Tips · Ingredients · Techniques

Smoothies – Friend or Foe?

Smoothies have never been a part of my daily routine. I suspect, though, that many of you do make smoothies regularly. They are one of those items that do not require a recipe. Instead, some general principles will help you make whatever smoothie you want. That, along with a discussion on the healthfulness of smoothies, are the subjects of this Cooking Tip.

Smoothies are thick, creamy beverages made by pureeing together fruits and vegetables with liquid and, at times, add-ins such as nuts and seeds. All smoothies start with two essential ingredients: a base and a liquid.

Popular ingredients include the following.

  • Fruits such as berries, bananas, apples, peaches, mango, avocado, pear, grapes and pineapple.
  • Vegetables might be kale, spinach, arugula, romaine, bok choy, Swiss chard, collards, wheatgrass, microgreens, cucumber, beetroot, cauliflower, or carrots.
  • Nuts and seeds could be in the form of nut butter, or items such as chia seeds, and flax meal.
  • The liquid can be as simple as water but might also be fruit juice, vegetable juice, milk, non-dairy milk, coconut water/milk, iced tea, or even cold brew coffee.
  • Dairy items such as cottage cheese or yogurt are common.
  • Sweeteners might include maple syrup, raw sugar, honey, pitted dates, simple syrup, fruit juice concentrates, stevia, ice cream, or sorbet.
  • Some people like to add nutritional and herbal supplements such as spirulina, bee pollen, matcha powder, protein powder, and powdered vitamin or mineral supplements.

There are different categories determined by the basic ingredients.

Image by Raul Florinto from Pixabay
  • Fruit smoothies usually consist of one or more types of fruit blended with fruit juice, water, milk, yogurt, or ice cream.
  • Green smoothies usually contain fruit for sweetness, but they also include leafy green vegetables in a larger proportion.
  • Protein smoothies usually consist of one fruit or vegetable, a liquid, and a significant protein source, such as Greek yogurt, cottage cheese, silken tofu, or protein powder.

Smoothies are popular because they are seen as healthy. They can be very healthy, but they also have some drawbacks.

Here are some positives about smoothies.

  • They usually contain a significant amount of healthy nutrients.
  • They help you to eat more fruits and veggies if you do not eat them in the whole form.
  • They are convenient and portable for those on the go.

Here are some of the cautions.

  • Sugar—The major problem with smoothies is that they often contain a significant amount of added sugar. This is especially true of commercially prepared smoothies, as opposed to homemade versions.
  • Calories – depending on the ingredients and the smoothie size, some can contain over 1000 calories, not exactly a low-calorie snack. The suggested serving size of a smoothie is 5 ounces, far less than most people consume.
  • Fiber—Although smoothies can contain a significant amount of fiber if you make them from whole foods, they still will not contain the same amount of fiber as if you were eating the whole foods without blending them.
  • Satiety—Although smoothies may be satisfying in flavor, they may be less so in satiety. It is typical for those drinking smoothies to become hungry again soon afterward, particularly if the smoothie lacks protein or fiber.

To make a healthier, more filling, and pleasant-tasting smoothie, follow this advice.

  • Choose whole fruit, not juice.
  • Add leafy greens. Research has shown that cooking the greens increases their mineral and antioxidant content. Therefore, steam or blanch them, puree them and then freeze them in ice cube trays. Once frozen, store them in a freezer bag.
  • Try to sweeten only with the natural fruit without adding any other sweeteners.
  • Increase the fiber content by adding oats, oat bran, psyllium husks, or chia seeds.
  • Include healthy fats by adding ground flax, chia seeds or flax oil. Alternatively, add nut butter or avocado.
  • Add protein in the form of yogurt or even a protein powder.
  • Blend the ingredients in stages. Most recommend blending the leafy greens and liquid together first, then adding the fruits and blending again.
  • Some will use ice to increase the thickness, but you may also use frozen fruit instead of ice.
  • Some like to make their smoothies using a 60/40 ratio. That is 60% fruits and 40% leafy greens. For example, 2 cups leafy greens, 2 cups liquid, and 3 cups ripe fruit.
  • Homemade smoothies are generally much healthier than ones you purchase in stores or cafes. You can control the amount of sugar in them and amp up the healthy ingredients. The most nutritious smoothies utilize whole foods, contain little or no added sugar, and include a balanced amount of carbohydrates, fiber, protein, and healthy fats.

As the weather is warming up, many people turn to smoothies. Just be aware of what you are drinking and, even if it is a healthful smoothie, it is only one part of a healthy diet that should rely more on whole foods rather than just smoothies.

Cooking Tips · Ingredients · Techniques

Hidden Gluten – Do you know where to find it?

Image by CatsWithGlasses from Pixabay

I do not have a gluten sensitivity. Nor do I cook for anyone who needs to avoid gluten. I was recently teaching a class where one of the recipes we were using called for chili powder. The only one I had contained flour. That might be surprising to those who pay no attention to gluten. Some call these “hidden” sources of gluten. I decided to write this Cooking Tip on those unexpected gluten sources. I hope it is helpful for those of you who may need to cook for others who need a gluten-free diet.

Gluten is a family of proteins naturally found in certain grains, such as wheat, barley, and rye. It gives bread its great chew and elasticity. Too much gluten can make baked goods tough; too little can mean a lack of structure. That is all most of us think about when we consider gluten. However, if you have celiac disease or even a gluten sensitivity, it can seriously impact your health.

We all know not to offer bread, pastries, or pasta to someone who needs to avoid gluten. However, gluten can be hiding in many other places of which we should be aware. This is not an exhausting list by any means. It does highlight some of the more common places where you wouldn’t expect to find gluten, but it can certainly be there.

Seasonings

As I mentioned above, gluten may be hiding in your seasonings. If it is a single spice or herb, it is most likely gluten-free. You have to be cautious when it comes to blends. If you are a regular reader of these Cooking Tips, you know I am a big proponent of making your own spice/herb blends rather than buying pre-made ones. See this Tip for more information. Besides the reasons given in that Tip, add this one – you can avoid putting gluten in these blends.

The main reason that wheat starch is put in some seasoning mixes is that it acts as an anti-caking and anti-clumping agent. Common examples of spice blends are curry powder, chili powder and Italian seasoning, although there are many more.

This is why you should pay attention to ingredient labels, which are required to list any gluten-containing ingredient. My favorite spice source is Savory Spice. They state in their website’s FAQ section that most of their spices/seasonings contain no gluten. They also list those details on the product pages.

One of the largest spice companies, McCormick’s, has this statement on its website, followed by a list of 13 different potential allergens.

We are aware of allergies and sensitivities and will always declare the[se] … ingredients on our label in the ingredient statement – they will never be hidden under the notations of “spices” or “natural flavors.”

If you buy other brands, be sure to check their product information as well as the product labels. Be wary of spices sold in bulk bins, as cross-contamination can easily occur with scoops or other items.

One comforting thought comes from celiac expert Shelley Case, RD. She writes the following on BeyondCeliac.org.

“A single serving of a ground spice is typically quite small (about 0.5 grams). So, if a spice had 160 ppm of gluten and an individual ate 0.5 grams of this spice in a meal, the amount of gluten consumed would be 0.08 milligrams (mg). Studies have found that a threshold level of less than 10 mg of gluten per day is safe for most individuals with celiac disease.”

Soy Sauce

Wheat is used in the traditional method of making soy sauce. This Tip talks more about that process. To avoid gluten but have a product with a similar taste, many people choose Tamari. That is the liquid byproduct formed during miso-making. It is thicker and richer than soy sauce and is made just with fermented soybeans but little or no wheat. Because of that, it is touted as a gluten-free soy sauce. However, not all of the brands are totally free of wheat, so you need to check the label.

Salad Dressings & Vinaigrettes

Some may use malt vinegar (another source of gluten), soy sauce or even flour. As always, check the label or, even better, make your own.

Processed deli meats

Some may contain gluten-containing ingredients, which are used as thickeners. Even if they do not, be wary of cross-contamination by the deli workers.

Oats

Many feel oats are a safe gluten-free food. However, there is some concern about cross-contamination when oats are grown in fields next to wheat fields. To be certain, only buy oats that are certified gluten-free.

Potato Chips/French Fries

Although potatoes do not contain gluten, seasonings often applied to them may contain malt vinegar and wheat starch. There is also the chance of cross-contamination if they are fried in the same oil as gluten-containing foods.

Marinades & Sauces

Many store-bought products in these categories contain malt vinegar, soy sauce or flour. Even sauces (homemade or in the restaurant) served with meat or veggies are thickened with a roux, which is generally made from butter and flour but can be made with gluten-free alternatives.

Sausages

Sometimes, sausages contain a binder made of flour-based ingredients.

Cooking Spray

Most are fine, but some brands can contain flour. Baking sprays are different and are purposely formulated with flour.

You need to become a label-reading expert. However, the words used will not always be flour or wheat. Here are just a few words that could signify gluten unless it states gluten-free.

  • Starch
  • Modified food starch
  • Hydrolyzed vegetable protein
  • Hydrolyzed plant protein
  • Textured vegetable protein
  • Dextrin
  • Maltodextrin
  • Glucose syrup
  • Caramel
  • Malt flavoring
  • Malt extract
  • Malt vinegar
  • Brown rice syrup

There are also apps to help you know if a food is gluten-free. One is Fig. You set it up by indicating what foods you want to avoid. Its search function will tell you which foods will be appropriate for you and in which stores you can find them. You can also scan the barcode to see if the ingredients match your dietary needs. The starter version is free. I have not tried this app, but it has good reviews. Another is Spokin, although it is only for Apple devices.

Many websites can be very helpful for people trying to avoid gluten and those of you who cook for them. Here are just a few.

You may not need this information the majority of the time you take to the kitchen. But, for those times you do, I hope you find this helpful.

Cooking Tips · Ingredients · Techniques

Lentils – Not just for vegetarians!

So many of us are trying to cook and eat in a more healthful manner. I wrote an entire series of Cooking Tips on how to do that. Here is the first one in that series. One way we could all do that is to increase our intake of foods that I suspect we do not eat regularly. One such food is Lentils. What lentils are and what to do with them is the subject of this Cooking Tip.

Some people think lentils are a type of grain. However, they are part of the legume family, similar to beans, peas, and chickpeas. Lentils are a nutritious source of fiber, protein, and other nutrients.

Although you will probably just see a couple of varieties in your market, there are numerous types. They vary in color from brown to green to black to reddish-orange. Some are considered large, others small, and even others petite.

Most lentils will be sold in a whole shape. However, some, such as red or yellow, are sold as “split.” This means their seed coat is removed, and they are cut in half.

Brown Lentils

  • These are the ones most commonly found in supermarkets.
  • Size/shape – large, flat
  • Color—light brown. Because the brown color can have a greenish tint, they are sometimes called green lentils. Do not confuse these with French green lentils.
  • Taste – Mild, earthy flavor
  • Uses
    • They are intermediate in their ability to maintain their shape. They break down easier than French green lentils or Beluga lentils, but not as much as red and yellow. To keep them as firm as possible, do not overcook them.
    • Use in soups, stews, curries, salads, pilafs or meat replacement dishes.

Green Lentils

  • Some sources consider these a type of brown lentil, while others describe them as a separate variety. They are not the same as Puy lentils, though.
  • Size/shape – similar in size/shape to brown lentils
  • Color – a dusky green color
  • Taste – earthy but slight peppery quality
  • Uses are similar to brown but may maintain their shape better when cooked.

Lentilles du Puy (du Puy lentils)

  • These are only grown in the Puy region of France and are known as French green lentils. Not all French green lentils are grown in this particular region of France. If they do not say “Puy,” they are probably the same variety but grown elsewhere.
  • Size/shape – smaller and rounder than other lentils. They have a thicker skin than other green lentils, which gives them a firmer texture.
  • Color – greenish with dark specks.
  • Taste – If true “Puy” lentils, they will have mineral and peppery notes due to the volcanic soil in which they are grown. This may not be so if you have green lentils grown in other areas of France.
  • Uses
    • They take longer to cook.
    • As they hold their shape, they work well in salads and soups, although they may require pureeing in the latter.

Red Lentils

  • Size/shape—These are often sold as “split,” meaning their coat has been removed, and the inner part has been split in half.
  • Color – reddish-orange
  • Taste – Earthy and nutty with floral notes.
  • Uses
    • These cook more quickly than other lentils.
    • They break down completely so they can be made into a puree.
    • Good in soups and curries.

Yellow Lentils

  • These are very common in Indian cooking.
  • Color – yellow
  • Flavor – slightly sweet
  • Uses
    • They become soft when cooked and can act as a thickener.
    • Common in Indian dals, hummus, and as a thickener in soups and stews.

Beluga (black) Lentils

  • They get their name due to their resemblance to caviar.
  • Size/shape – very small and sphere-shaped
  • Color – dark brown to black
  • Taste – meaty and earthy
  • Uses
    • They have thicker skin, meaning they will retain their shape but take longer to cook.
    • Use in salads and soups.

Cooking Lentils

  • Purchase lentils that are as fresh as possible, as older lentils take longer to cook. If they are very old, they may not soften at all, despite how long you cook them. Some recommend buying from bulk bins as they tend to be fresher due to the more considerable turnover.
  • Lentils should be rinsed before cooking to remove dust or debris.
  • You should also sort through them to pick out any pebbles or grit that might be present.
  • They do not need to be soaked before cooking as they have a relatively short cooking time.
  • Cook lentils in plenty of water as they will swell in size as they cook.
  • Bring the water (or broth) to a boil, then reduce to a low simmer to prevent the skins from splitting.
  • Do not add salt until the lentils are cooked, as it can cause the lentils to stay crunchy rather than soft and tender. Some caution against adding acidic ingredients, such as tomatoes, for the same reason. However, others like to add them earlier to aid in flavor absorption.
  • To add more flavor, add aromatics (onion, leeks, celery, carrots, garlic), spices, herbs, or even meat. Cook aromatics gently first before adding lentils.
  • Be aware that brown and green lentils will be firmer and hold their shape better, while red and split green lentils will quickly break down.
  • Cooking Times
    • Brown lentils – 20-30 minutes
    • French green lentils – 25-35 minutes
    • Red and yellow lentils – 15-20 minutes
    • Black Beluga lentils – 20-25 minute
  • America’s Test Kitchen likes to make crispy lentils to top soups and salads. After a short brine (see below), they strain and pat them dry. After heating oil in a pan until very hot, the lentils can be fried until crispy and golden. After removing from the pan, they can be tossed in seasonings of your choice.

Brining

  • As with other legumes, the skin of the lentils can easily rupture during cooking. To prevent this, America’s Test Kitchen recommends soaking them in a salt brine before cooking. They recommend a teaspoon of salt in a quart of water and soaking for an hour.
  • Do not brine split lentils since their coat has been removed.
  • Skip brining if you want a softer, more mushy texture.

Storage

  • Dried lentils have a very long shelf life. Store in an airtight container away from light, heat and moisture.
  • Cooked lentils may be stored in an airtight container in the refrigerator for up to a week or in the freezer for up to a month.

Are you a regular consumer of lentils? I must admit that I am not although my husband likes them in soup. I challenge all of us who are not lentil-eaters to set a goal of trying the different varieties. That is one healthy challenge!

Cooking Tips · Ingredients · Techniques

Japanese Milk Bread – Is it worth the effort?

People often ask me if I like to bake or to cook. I always find this question hard to answer as I love to do both. If I was forced to pick one, I just couldn’t do it. Many people, though, find themselves gravitating towards one or the other. If you consider yourself an avid baker, you probably have heard of Japanese Milk Bread. If you shy away from baking, you may not have heard of it. It is a delicious creation, and what it is and why you might want to try it are the subjects of this Cooking Tip.

If you love artisan bread with its thick, chewy crust and interior full of holes, milk bread is not for you. If you only want to eat bread made with whole grains, milk bread is not for you. If, however, you love the guilty pleasure of soft, creamy, slightly sweet white bread, read on.

Image by Sornram Srithong from Pixabay

According to Bon Appetit, Japanese milk bread may have been invented by a British baker who opened a bakery in Japan in 1862. If you have never tasted milk bread, the closest thing you may recognize is white supermarket sandwich bread, although that is not as flavorful or as fluffy as milk bread.

Japanese milk bread is an enriched bread, meaning it contains more than just flour, water and yeast. Enriched breads also contain fat, dairy, eggs and/or sugar.

Other names you may see are Hokkaido milk bread or Shokupan. The latter Japanese term means “food bread.” It is a general term for a loaf that you slice and toast into sandwiches. It has a soft interior with a mild flavor and minimal crust. As it has evolved, today’s shokupan contains more fat than the original.

The key to making this bread is something called Tangzhong, which is a Chinese technique. It is a warmed roux usually made with milk and flour, although some recipes use water and flour, and others use all three. This tangzhong is said to do a couple of things. According to MasterClass, it allows the flour to absorb more liquid, yielding a moister result. The warm liquid also starts activating the gluten in the flour, aiding in trapping the liquid and achieving the final soft texture. It also helps to give milk bread a slightly longer shelf life than other breads.

As a sideline, not all bakers agree that tangzhong is the key to milk bread. Read this post from Epicurious for more information. Since the large majority of recipes use the tangzhong method, I will discuss that.

Besides the tangzhong, the other ingredients are flour, yeast, milk, sugar, butter, eggs and salt. Some recipes will add nonfat dry milk powder, saying it improves the bread’s tenderness and flavor.

  • Tangzhong – This is made by mixing the flour, milk, and/or water together over low heat until it thickens to a pudding-like consistency and reaches 150°F. It is then set aside and allowed to cool slightly before continuing with the recipe.
  • Flour – Most recipes use bread flour, although some have developed recipes using all-purpose flour.
  • Sugar – This gives the bread a sweeter flavor than other breads. Most recipes call for about ¼ cup.
  • Butter – As with all baking, use unsalted unless salted is specifically called for. Some recipes just have you soften it, while others will melt and cool it before adding it to the mixture.
  • Egg – Another enriching ingredient that increases the fat content.
  • Folding/Shaping – After the dough is mixed sufficiently and allowed to rise, most recipes require you to follow a folding technique for shaping followed by a second rise. The folding technique will vary depending on the recipe, so consult the one you are using for their recommendations. The classic baking method is in a Pullman pan, but you can also use a loaf pan or even shape the dough into rolls.

Although most recipes are similar, they can vary somewhat. As with all baking, it is best to follow your specific recipe carefully and use weights rather than volume measurements, if possible. Here are three recipes to try—all from reputable sources. The first two give measurements in weight and volume, while the third is volume only.

Have you made milk bread before? Did you like it? If you haven’t made it, I encourage you to try it. Although it is not the healthiest bread, it is delightful on the palate!

Cooking Tips · Ingredients · Techniques

Beurre Monté – just another butter sauce?

Sauces are one of my favorite things to make. They are easy, and they elevate food from ordinary to delicious. I have written three prior Cooking Tips – Sauces Demystified, Mother Sauces I and Mother Sauces II on different types of sauces. One sauce I have not discussed is Beurre Monté. That is the subject of this Cooking Tip.

Image by Peter Toporowski from Pixabay

As you might suspect, beurre monté is a French invention. It is translated in various ways: “worked up butter,” “prepared butter,” “mounted butter,” or “whipped butter.” It is also a very simple and delicious sauce, as long as you don’t mind that it is made almost entirely of butter.

We all know that fat and water do not mix. We must force them to do so by the process called emulsification. This is done by slowly adding one ingredient to the other while vigorously mixing. This suspends tiny droplets of the one into the other. Vinaigrettes are one type of emulsion. The water element is typically vinegar, citrus juice, fruit juice or a combination. The fat usually is olive oil. If you pour them together, they will naturally separate. It is only by whisking the water-like ingredient while you slowly pour in the oil that you will get them to combine into an emulsion. They will often separate when setting, but you can again re-emulsify the mixture by shaking or mixing.

If you have read my Sauce Cooking Tips, you will have read that most pan sauces are finished by whisking a small amount of cold butter into the sauce. This thickens the sauce and gives it a glossiness and richness. That process is called “monter au beurre.”

Although it sounds similar, beurre monté is different. It is an emulsion, one that is made by whisking cold butter into simmering water. As one source puts it, it is the “lifeblood of many professional French kitchens.” That sounds like it would also be a good sauce for us home cooks to know.

There are only two ingredients – butter and water. Cooks Illustrated will tell you that the ratio of butter to water is crucial. You want only enough water for the fat droplets to disperse themselves without the result being too thin and watery. However, not everyone is such a stickler for that ratio.

Cooks Illustrated recommends three tablespoons of water to eight tablespoons of butter. Thomas Keller of The French Laundry uses four tablespoons of water to one pound (32 tablespoons) of butter. Masterclass agrees with Keller.

Despite your water-to-butter ratio, all agree on the method. Bring your water to a boil and reduce to a very low simmer. Start whisking the cold butter in piece by piece. You want the butter to melt and break into droplets that you emulsify in the water bit by bit. Continue this process until you have emulsified all the butter. Season to taste and you are done.

Feel free to try some variations on this basic recipe.

  • Stock – substitute stock for water, but be cautious of the sodium content.
  • Herbs – whisk in minced fresh herbs. Hardy ones (rosemary) can be added at the start, but more delicate ones (tarragon) should be added at the last minute.
  • Preserves, liqueurs, juice – After adding the butter to the water, whisk in 1½ Tablespoons jam or jelly and 1½ teaspoons of liqueurs or juice. Cooks Illustrated recommends raspberry jam plus Chambord, apple jelly plus brandy, or plum preserves plus amaretto.

Some might ask how this is different than just melting butter by itself. The result is quite different. Melted butter will be thin and just run off the food. By contrast, beurre monté coats and clings to the food and provides a more luxurious experience.

How would you use beurre monté?

  • As a sauce on its own for meat, fish, pasta or veggies.
  • As a base for another sauce. Make the beurre monté and add other flavorings such as herbs, spices, lemon juice, shallots, jams, liqueurs and more.
  • As a poaching liquid for veggies, delicate meat or seafood. Because of fat’s low heat conductivity as compared to water, it will allow you to cook meat and fish more gradually, giving you a tender and not overcooked result. It also infuses the meat and fish with the flavor of butter.

You may make smaller amounts to meet your immediate needs. You can also make it ahead and hold it for up to 4 hours. To do that, put a lid on the pot and keep it warm but only at a sub-simmer, 135-160°F.

The leftover sauce may be refrigerated but will not have the same texture upon reheating. Instead, upon reheating, use it as you would regular melted butter. You could also heat it to turn it into clarified butter by removing the milk solids.

I do not know about you, but I have some salmon in my freezer that is just calling out to me for it to be dressed in a beurre monté. What about you?

Cooking Tips · Ingredients · Techniques

Sour Cream – for more than baked potatoes!

Take a look in your refrigerator right now. Is there a container of sour cream there? Did you buy it for one recipe, and then it just sits there until it goes moldy, and you throw it away? What is sour cream anyway? All those questions and more are the subject of this Cooking Tip.

Sour cream is a dairy ingredient that adds a creamy and tangy flavor to your dishes. It can be used in both sweet and savory applications. It is made by adding lactic acid and bacteria to a combination of cream and/or milk and letting it thicken and sour.

Regular sour cream contains about 20% milk fat. Light sour cream is made from a mixture of milk and cream, resulting in a lower fat content.  Non-fat sour cream has no fat, but it needs to be thickened. This is achieved by adding stabilizers and thickeners such as corn starch, gelatin, carrageenan, and guar gum.

Brand Differences

There are differences in the ingredient lists between brands. Just check the labels.

  • The Daisy Brand list of ingredients is only “cultured cream.” This is the top choice of America’s Test Kitchen.
  • Knudsen’s brand shows “cultured pasteurized Grade A cream (from milk), enzymes.”
  • My store brand has this much longer list – “cultured cream and skim milk, whey, modified corn starch, cultured dextrose, gelatin, sodium phosphate, guar gum, carrageenan, sodium citrate, calcium sulfate and locust bean gum.” I know which one I would rather buy for the minimal difference in price!
  • The “Natural” store brand is better, showing “cultured cream and skim milk, enzymes.”

Uses for Sour Cream

  • In cold dishes, it:
    • Adds creaminess, mild acidity and a bit of tang.
    • Acts as a binding agent to hold ingredients together, as in a chicken salad.
    • Can be a replacement for mayonnaise with a lower fat content but it won’t be as acidic.
    • Examples
      • Use in deviled eggs in place of mayonnaise.
      • In pasta/potato salads, swap sour cream for all or part of the mayonnaise.
      • Try as a sandwich spread.
      • It makes for creamy dressings and dips.
      • Add to whipped cream to add another flavor dimension. Add ¼ cup to 1 cup of heavy cream along with your sweetener of choice. Whip together with an electric mixer.
  • In hot dishes, it:
    • Balances heat with its tanginess.
    • Adds richness to baked goods.
    • Can be a wonderful finishing touch with a hint of acidity.
    • It can act as a thickening agent for sauces and soups.
      • For sauces, gradually whisk it into the warm sauce to prevent curdling and separation.
      • For soups, add towards the end of the cooking process.
    • Examples
      • Add to soup or chilis as a topping/garnish.
      • Top your tacos, burritos, and baked potatoes.
      • Add to a pasta sauce to increase creaminess.
      • In cakes/muffins, it can give you a moist and tender crumb. The acidity also helps balance the sweetness. Substitute a portion of the liquid in your recipe with sour cream.

Make your own

Image by Олег from Pixabay

Some people like to make their own as they control the ingredients that go into it, and they only have to make the amount they want. Here are some ways to do that.

Buttermilk technique

  • Combine 1 cup heavy cream and ¼ cup buttermilk in a sterilized jar and seal. Shake vigorously to combine.
  • The bacteria in the buttermilk will ferment the cream, which leads to souring and thickening.
  • Allow to sit at room temperature for 24 hours.
  • Store in refrigerator for up to 2 weeks.
  • Replace some of the cream with whole milk, half-and-half, or light cream if you’d prefer a lower-fat version. Just keep in mind that your sour cream will not turn out quite as thick if you decrease the fat. To thicken, you can pour through cheesecloth.

Vinegar/lemon juice technique

  • This is similar to the buttermilk technique but uses a different acid – either lemon juice or white vinegar.
  • Combine ¼ cup room temperature milk and either 1 tablespoon of lemon juice or 2 tablespoons of white vinegar. Thoroughly combine.
  • Add 1 cup room temperature of heavy cream. Combine.
  • Let sit in a warm place for at least 12 hours to a maximum of 24 hours.

Powdered sour cream

Many of us use powdered buttermilk. There is also powdered sour cream that you can reconstitute just like powdered milk. The former is easy to find in our markets, whereas the latter will probably have to be purchased online.

Substitutions

If you do not have any on hand for a particular recipe, you can try the following substitutions.

Yogurt

  • America’s Test Kitchen tried substituting Greek yogurt for sour cream in three recipes.
    • In biscuits and a sour cream sauce, the yogurt did fine.
    • In beef stroganoff, the yogurt with its lower fat content broke due to the heat.
  • Use plain yogurt, preferably Greek, in equal parts.
  • If you are not using Greek yogurt, consider draining it through a cheese-cloth-lined sieve over a bowl for at least 30 minutes.
  • Since yogurt is only 10-12% fat, it will not give you the same richness but can certainly be used.
  • For baking, for one cup of sour cream, use one cup of yogurt plus one teaspoon of baking soda.
  • For a dip, combine 1 cup sour cream with ¼ cup yogurt and 1 cup cottage cheese.
  • For a sauce, mix 1 cup of sour cream, 1 cup of yogurt, 1 tablespoon of flour, and 2 teaspoons of water.

Buttermilk

  • Try plain buttermilk. Since this is thinner than sour cream, many like to add softened butter to improve the texture.
  • Also, use less than the amount of sour cream called for, or it might be too liquid.
  • For baking, try ¾ cup buttermilk + ⅓ cup softened, unsalted butter.

Cottage cheese or Cream cheese

  • The texture of both of these items is different than sour cream. So, you should blend them with some liquid to get a consistency similar to sour cream.
  • For dips, combine 1 cup cottage cheese and ¼ cup yogurt/buttermilk in a blender.
  • For cream cheese, blend together 6 ounces of cream cheese and three tablespoons of milk.

Storage

  • To help it last as long as possible, store it in the refrigerator sealed tightly. It should keep for about three weeks.
  • Signs of it going bad are visible mold, the aroma of mold, or other off-smell (even if you do not see mold), or if it is taking on an off-white color.
  • If you see mold, just as with soft cheeses, you should not just scrape off the moldy part as the mold can extend into the product even if it doesn’t appear so.
  • Not a problem if it has separated. This is normal, and you can either drain it off or mix it back in.
  • When spooning it out of the container, always use a clean spoon to prevent introducing pathogens into the sour cream.
  • If you can’t use it up, try freezing it. Because the texture will suffer, reserve your frozen sour cream for use in cooked dishes, not fresh. Allow it to thaw in the refrigerator. If you add it to soup or similar, toss it in frozen.

Sour cream is such a simple ingredient, but it can add so much to your dishes. I am sure you already use it, but if not, pick some up when you are in the store or try making your own!